Brumby rear bumper corners off , how?

General Subaru Talk - Media / News / Stories ...
Post Reply
User avatar
steptoe
Master Member
Posts: 11582
Joined: Thu Oct 06, 2005 10:00 am
Location: 14 miles outside Gotham City

Brumby rear bumper corners off , how?

Post by steptoe » Sat Nov 02, 2013 5:54 pm

I got talking to a retired gent with a 93 Brumby he bought for his wife to run about their farm - she picked it out as an alternative to a quad bike :)

Asked me f I knew how to remove the rear bumper corners as he has a donor Brumby to tart the farm runner up.

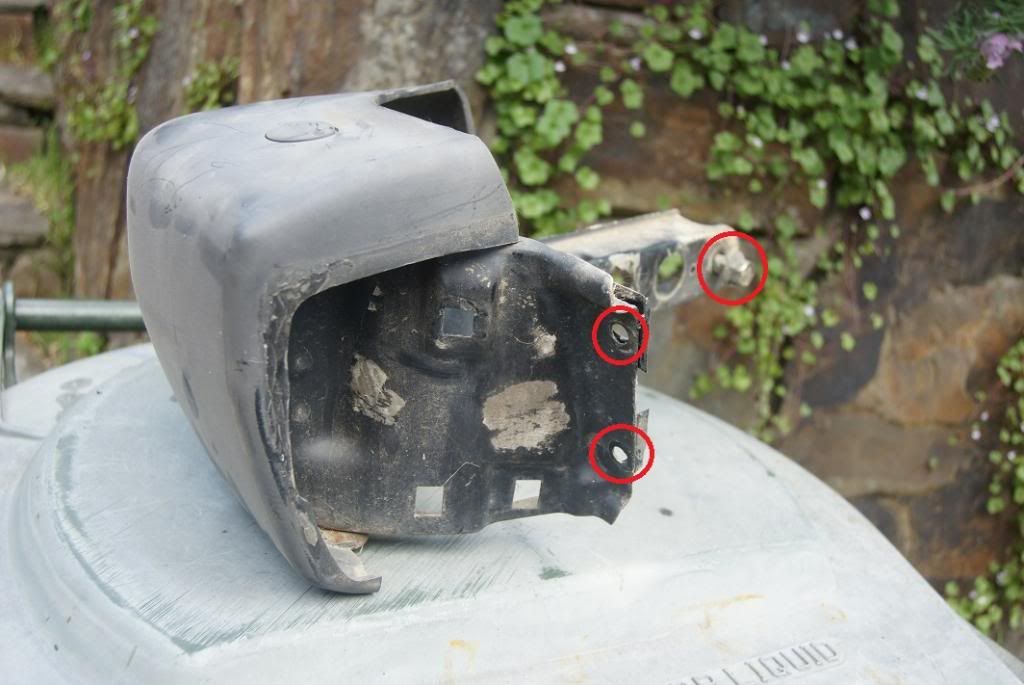
I have never had to deal with these bits so no idea. They have plastic bung plug in the top that he says reveals a 10mm headed bolt at right angles so still can't get at it. The one of his we looked at had a broken underside M6 bolt and could see the pressed metal bracket the plastic bit hangs on to has at least two M6 bolts at the rear that may help get whole assy off...

any experience ??

User avatar
TroyTroia
Junior Member
Posts: 6
Joined: Wed Jul 10, 2013 5:13 pm
Location: Sunshine Coast QLD

Post by TroyTroia » Sun Nov 03, 2013 4:06 pm

Pretty sure to remove the whole thing.. Bumperette and mount bracket it's just the one 14mm bolt on the underside of the car.. If that makes sense..

User avatar
dfoyl
Junior Member
Posts: 717
Joined: Mon Aug 28, 2006 12:13 pm
Location: Victoria eastern suburbs

Post by dfoyl » Sun Nov 03, 2013 5:44 pm

From memory you need to remove the plastic "cap" on the end (towards the middle of the car), which exposes 2 M6 bolts.
1989 Brumby - Shiny new red paint, stroked EJ20 phase 2 SOHC with Darton sleeves bored to EJ22, Wiseco high-compression pistons, Delta 2000 grind cams , EJ/XT6 5 stud with WRX 4/2 pots, 5-speed, 86 GTS seats and so much more.
Contact me for reproduction XT6 hubs...and EA82 rear discs.

User avatar
Bantum
General Member
Posts: 1994
Joined: Sun Jul 29, 2012 4:30 pm
Location: Northern Territory + QLD
Contact:

Stumpped ...

Post by Bantum » Mon Nov 04, 2013 12:29 am

Here is the Brat full rear Bumper :

Image

My understanding is that on the Brumby, it is similar where the 'Stay' - ( item 5 ) is bolted to the 'Bumper Side' ( item 2 ) as suggested by dfoyl - where a cover is placed on the inside ( not shown on above diagram ) ... ;)

I've never taken mine off either - Stuffed if I can find any pictures of it taken off too ... :o

Add : Just found this if it helps:

Image

You can just make out the bracket attachment ... :)

Ciao, Bantum ...

User avatar
steptoe
Master Member
Posts: 11582
Joined: Thu Oct 06, 2005 10:00 am
Location: 14 miles outside Gotham City

Post by steptoe » Mon Nov 04, 2013 7:13 am

Yeah, thanks guys,those inner trims / end plugs on the bonnet pic, not there on his ute, exposes the bracket and M6 bolt heads. That Brat pic diagram shows a centre piece like a sedan or wagon ! We got the plug ends and nothing but a number plate space and butt plugs covering chassis rail ends or the rare and sought after step/tow bar which I think used sedan rear bar infills. Now realised if I kept my sedan coulda played with custom rear bar - trick done with swapping aussie sedan bars onto utes :)

User avatar
dfoyl
Junior Member
Posts: 717
Joined: Mon Aug 28, 2006 12:13 pm
Location: Victoria eastern suburbs

Post by dfoyl » Mon Nov 04, 2013 4:38 pm

Here you go :

Image
1989 Brumby - Shiny new red paint, stroked EJ20 phase 2 SOHC with Darton sleeves bored to EJ22, Wiseco high-compression pistons, Delta 2000 grind cams , EJ/XT6 5 stud with WRX 4/2 pots, 5-speed, 86 GTS seats and so much more.
Contact me for reproduction XT6 hubs...and EA82 rear discs.

User avatar
Silverbullet
Senior Member
Posts: 2920
Joined: Mon Aug 23, 2010 6:20 pm
Location: Adelaide

Post by Silverbullet » Mon Nov 04, 2013 4:59 pm

Hey where can I get a couple of those inside-end caps?? Mine is just the bumperettes and empty space on the inside of them. I always thought it looked wrong, like there should be a bar all the way across.
Will it ever end!?
-EA81 TWIN CARB!!!!
-L series 5 speed
-Custom paint job
-2" lift
-Full custom re-wire
-L series front end
Image

User avatar
steptoe
Master Member
Posts: 11582
Joined: Thu Oct 06, 2005 10:00 am
Location: 14 miles outside Gotham City

Post by steptoe » Mon Nov 04, 2013 6:54 pm

hint, hint, try the bullets rear bar bits Sam and see if you can clean up the bum of at least one Brum.

Thanks Dean, such speedy and detailed reply. We'd better start calling them an assembly :)

User avatar
El_Freddo
Master Member
Posts: 12626
Joined: Tue Oct 04, 2005 10:00 am
Location: Bridgewater Vic
Contact:

Post by El_Freddo » Mon Nov 04, 2013 8:26 pm

Silverbullet wrote:Hey where can I get a couple of those inside-end caps?? Mine is just the bumperettes and empty space on the inside of them. I always thought it looked wrong, like there should be a bar all the way across.
I think you have to buy a new set of bumperettes - I don't think anyone would separate unless you find a set in the wreckers.

Once you've got them, clip them on then use cable ties to hold them in place ensuring you'll never loose them ;)

Cheers

Bennie
"The lounge room is not a workshop..."
Image
El Freddo's Pics - El_Freddo's youtube

User avatar
David D
Junior Member
Posts: 209
Joined: Sat Dec 11, 2010 4:54 pm
Location: Adelaide, SA

Post by David D » Tue Nov 05, 2013 2:52 pm

Dunno if I'm too late but be careful removing the M6 bolts - I'm pretty sure most (if not, all) of mine snapped when I removed mine! I think I ended up drilling the remains out and using nuts and bolts instead.

David

User avatar
steptoe
Master Member
Posts: 11582
Joined: Thu Oct 06, 2005 10:00 am
Location: 14 miles outside Gotham City

Post by steptoe » Tue Nov 05, 2013 3:19 pm

might sneak in some penetrating stuff for future needs :) A lot of those exposed to mud and grit over thirty years bloody go snappo !

User avatar
El_Freddo
Master Member
Posts: 12626
Joined: Tue Oct 04, 2005 10:00 am
Location: Bridgewater Vic
Contact:

Post by El_Freddo » Tue Nov 05, 2013 4:47 pm

David D wrote:Dunno if I'm too late but be careful removing the M6 bolts - I'm pretty sure most (if not, all) of mine snapped when I removed mine! I think I ended up drilling the remains out and using nuts and bolts instead.
Ours did the same - My fix was exactly as you've described!

Cheers

Bennie
"The lounge room is not a workshop..."
Image
El Freddo's Pics - El_Freddo's youtube

Post Reply

Return to “Subaru Chat”