What did you do to improve your soobie today

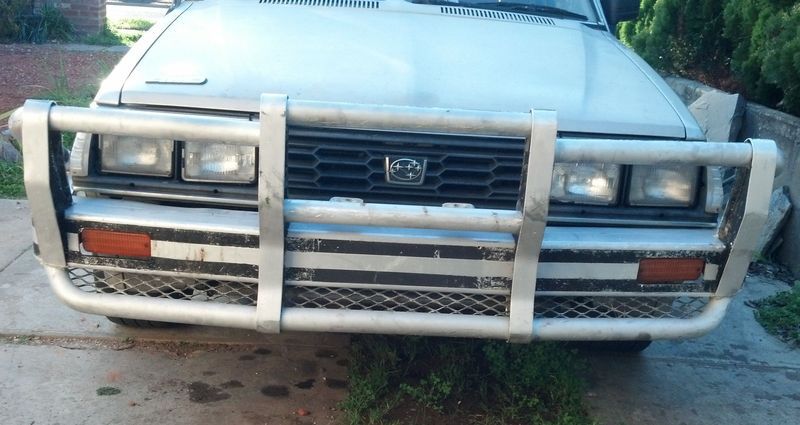
bull bar replaces nudge bar and standard bumper
feel safer re interstate trips now.
needs a little adjustment
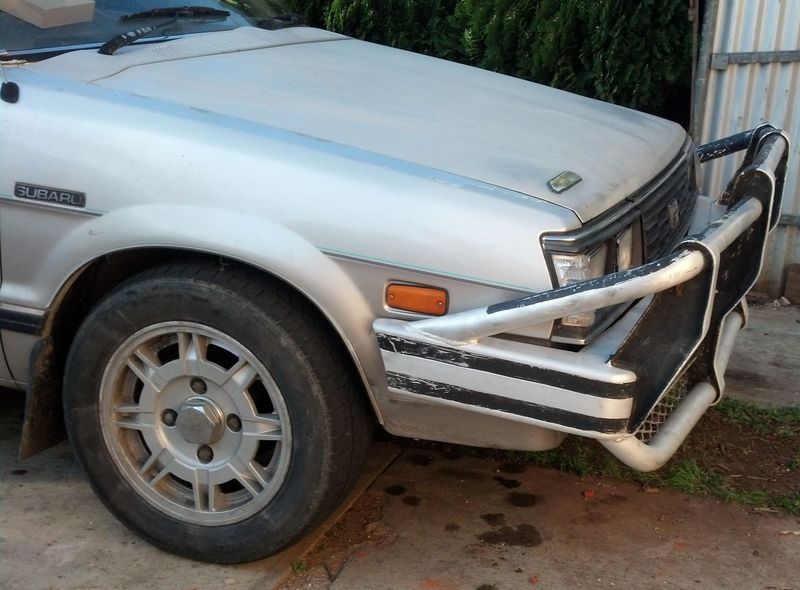
the bar was second hand and really not in the best condition.
the aluminum mesh between all 4 posts had been removed, ( I'll see about replacing it) it was missing one of the rubber pads, missing both steel fitment arms, and one of the 4 captive bolts had been broken off. The new Pup chewed off thel electrical leads from the indicator pods, and one of those got destroyed by me with a fully jammed attachment screw - fortunately they were the standard brumby indicator pods, so I used the ones from the original bumper. Also Ruined one new nut cleaning out the bolt threads.
A good mate fabbed up new supports for me, as I had a 5 poster from the same QLD manufacturer on the white brumby, so he used its supports as templates, and they fitted perfectly . I stole a rubber pad of it as well.
This was the one that I will still have on the white beast., the 5 posts are just a little too intimidating on a non-lifted Brumby IMHO . But it certainly ensures that EVERYONE gives way to you

Got Copper grease to use on the bolts/nuts to make it easier to remove / tighten up next time.
But all in all I'm good with it , I wanted four posts and the slight wrap around at the side, and that's what I got.
needs a little adjustment
the bar was second hand and really not in the best condition.
the aluminum mesh between all 4 posts had been removed, ( I'll see about replacing it) it was missing one of the rubber pads, missing both steel fitment arms, and one of the 4 captive bolts had been broken off. The new Pup chewed off thel electrical leads from the indicator pods, and one of those got destroyed by me with a fully jammed attachment screw
A good mate fabbed up new supports for me, as I had a 5 poster from the same QLD manufacturer on the white brumby, so he used its supports as templates, and they fitted perfectly . I stole a rubber pad of it as well.
This was the one that I will still have on the white beast., the 5 posts are just a little too intimidating on a non-lifted Brumby IMHO . But it certainly ensures that EVERYONE gives way to you
Got Copper grease to use on the bolts/nuts to make it easier to remove / tighten up next time.
But all in all I'm good with it , I wanted four posts and the slight wrap around at the side, and that's what I got.

I put mine up side down on a chassis...
- Attachments
-
- IMG_20150829_131839_309.jpg (120.58 KiB) Viewed 16029 times
Owned - 89 Brumby, 83 Wagon, 83 Leone 4WD Sedan, 83 Touring Wagon, 99 Outback
Own - 87 Brumby, 93 Liberty, 09 Forester
Offroading Subarus Facebook Page
Own - 87 Brumby, 93 Liberty, 09 Forester
Offroading Subarus Facebook Page
>Audi A4 (a3?) "pepper pots" 15' alloys used to be the go to cheap rims for the rs lib / wrx crew for drag racing rims. Right offset and cleared 4 pot brakes. Availability is near zero tho
The early A3 offset works only for L series, not MY. I have seen a set for sale, but it gets me from +48 to +45, and I need about +25 on a 6" rim (+30 on a 7").
(I don't believe A4's use the 5x100 PCD, has always been 5x112 - only the A3 had 5x100)
The early A3 offset works only for L series, not MY. I have seen a set for sale, but it gets me from +48 to +45, and I need about +25 on a 6" rim (+30 on a 7").
(I don't believe A4's use the 5x100 PCD, has always been 5x112 - only the A3 had 5x100)
1989 Brumby - Shiny new red paint, stroked EJ20 phase 2 SOHC with Darton sleeves bored to EJ22, Wiseco high-compression pistons, Delta 2000 grind cams , EJ/XT6 5 stud with WRX 4/2 pots, 5-speed, 86 GTS seats and so much more.
Contact me for reproduction XT6 hubs...and EA82 rear discs.
Contact me for reproduction XT6 hubs...and EA82 rear discs.
New wheels test-fitted (tyre size is 55 profile, which is too big, but was really just to ensure no turning issues...offset at +31 on a 7" rim is perfect.
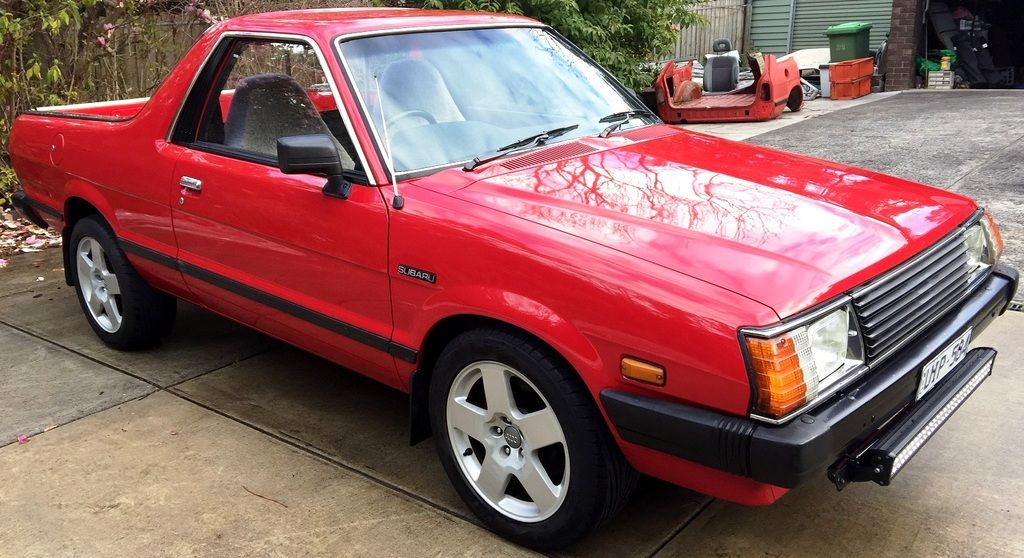
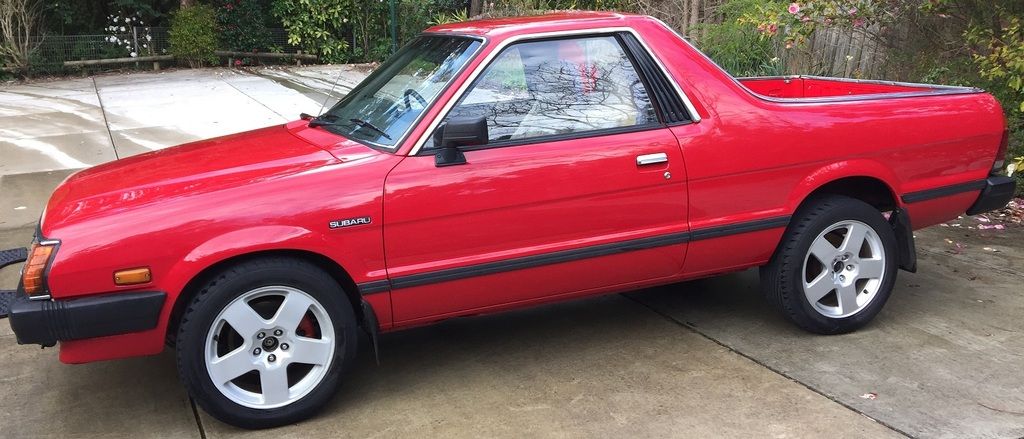
The OEM silver finish will be redone to something more like this :
I have seen these wheels done entirely polished, but I think that will look too bling for the Brumby - a mix of polished with black is my preference but I might go argent grey...
The OEM silver finish will be redone to something more like this :
I have seen these wheels done entirely polished, but I think that will look too bling for the Brumby - a mix of polished with black is my preference but I might go argent grey...
1989 Brumby - Shiny new red paint, stroked EJ20 phase 2 SOHC with Darton sleeves bored to EJ22, Wiseco high-compression pistons, Delta 2000 grind cams , EJ/XT6 5 stud with WRX 4/2 pots, 5-speed, 86 GTS seats and so much more.
Contact me for reproduction XT6 hubs...and EA82 rear discs.
Contact me for reproduction XT6 hubs...and EA82 rear discs.
-
Proton mouse
- Junior Member
- Posts: 378
- Joined: Mon Nov 06, 2006 11:35 pm
- Location: Diagonally parked in a parallel universe
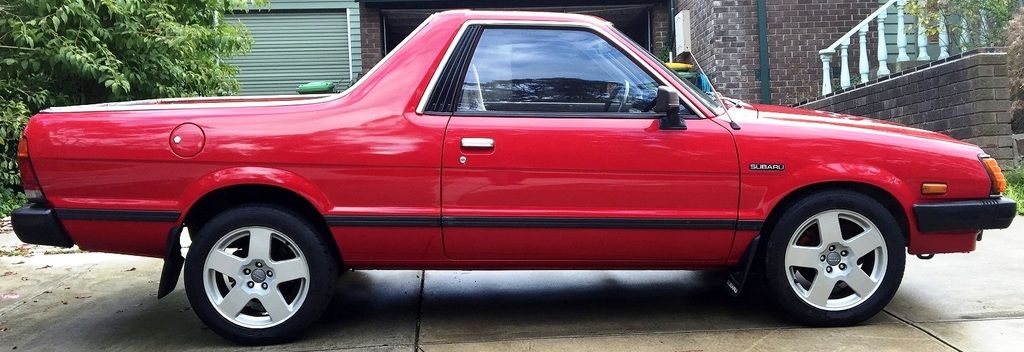
I cheated a little, as I took the photos after washing it and also adjusted the contrast and brightness slightly to make the red "pop" and the black dark. That said, I was pretty impressed with the photo sharpness given it was taken on an iPhone (and scaled 50% down). All the little marks and dents in the tailgate, behind the drivers side door, on the bonnet, etc are hard to spot once the contrast is brought up.
1989 Brumby - Shiny new red paint, stroked EJ20 phase 2 SOHC with Darton sleeves bored to EJ22, Wiseco high-compression pistons, Delta 2000 grind cams , EJ/XT6 5 stud with WRX 4/2 pots, 5-speed, 86 GTS seats and so much more.
Contact me for reproduction XT6 hubs...and EA82 rear discs.
Contact me for reproduction XT6 hubs...and EA82 rear discs.

-
mrwalker500

- Junior Member
- Posts: 65
- Joined: Mon Aug 17, 2015 8:17 pm
- Location: Western Victoria
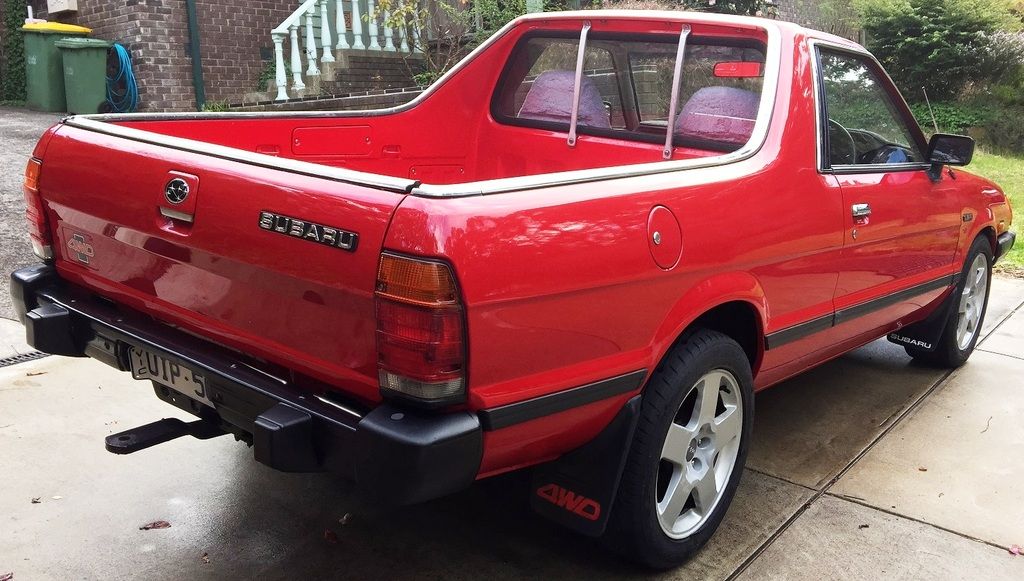
It's an 82 front bar, actually came off a Brumby, but no bumperettes. USDM rear bar.
1989 Brumby - Shiny new red paint, stroked EJ20 phase 2 SOHC with Darton sleeves bored to EJ22, Wiseco high-compression pistons, Delta 2000 grind cams , EJ/XT6 5 stud with WRX 4/2 pots, 5-speed, 86 GTS seats and so much more.
Contact me for reproduction XT6 hubs...and EA82 rear discs.
Contact me for reproduction XT6 hubs...and EA82 rear discs.

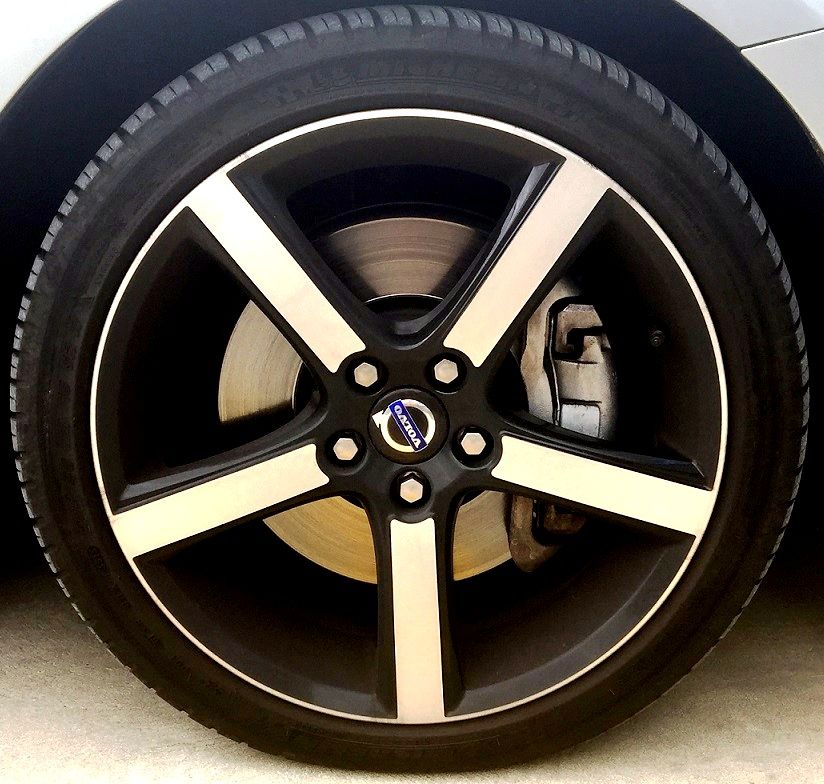
Spent a few hours working on the (new but old) wheels. Unlike the early WRX/Impreza wheels, the Audi TT wheels are a more porous material and need more polishing. Plus the undercoat is impervious to non-caustic paint stripper so it's strip, then sand off the white fill, then sand off the grey rubbery fill, then wet&dry sand with 200>400>800>1200, then buff, and repeat x 24 spokes. Starting to think about having them chemically treated to remove the layers, especially the centre and between the spokes...
1989 Brumby - Shiny new red paint, stroked EJ20 phase 2 SOHC with Darton sleeves bored to EJ22, Wiseco high-compression pistons, Delta 2000 grind cams , EJ/XT6 5 stud with WRX 4/2 pots, 5-speed, 86 GTS seats and so much more.
Contact me for reproduction XT6 hubs...and EA82 rear discs.
Contact me for reproduction XT6 hubs...and EA82 rear discs.
-
El_Freddo

- Master Member
- Posts: 12704
- Joined: Tue Oct 04, 2005 10:00 am
- Location: Bridgewater Vic
- Contact:
You're talking about the EJ converted L series?GOD wrote:I started mine today. First time in about 4.5 years.
Just gotta work out why it idles at 5000rpm, then she'll be sweet
Dane.
Make sure you don't have a sticky throttle, next would be to clean out the IACV as this may be stuck open. Don't remove the electrical part on top as this has been adjusted to the right spot and is apparently a difficult task to get it right again - instead remove the whole unit, which could mean breaking the cooling system to do it.
I turned my L around in the shed, did some over due maintenance/finishing off of the rear bar so everything sits as it should rather than looking like it's just hanging there
Cheers
Bennie

-
Silverbullet

- Senior Member
- Posts: 2953
- Joined: Mon Aug 23, 2010 6:20 pm
- Location: Adelaide
After nearly 3 years of ownership, I finally decided to see why the interior light in my ute didn't work...
Light bulb was blown, no power at the light fitting, light switch was pretty much melted together so it couldn't move
Followed the wire down the back pillar to behind the seatbelt reel to find the 2 pin plug...insides completely covered in green crust and soon as I touched it most of the wires fell out Crimped on some new terminals, cleaned the door switch while I was there and she's good as gold again.
Every time I take some interior panels off this car I'm greeted by piles of red bull dust, and about 5mm layer of dried mud on the floor. I can only imagine where this cars been before I had it and without doubt its been full of muddy water more than once in its life.
Light bulb was blown, no power at the light fitting, light switch was pretty much melted together so it couldn't move
Followed the wire down the back pillar to behind the seatbelt reel to find the 2 pin plug...insides completely covered in green crust and soon as I touched it most of the wires fell out
Every time I take some interior panels off this car I'm greeted by piles of red bull dust, and about 5mm layer of dried mud on the floor. I can only imagine where this cars been before I had it and without doubt its been full of muddy water more than once in its life.
Will it ever end!?
-EA81 TWIN CARB!!!!
-L series 5 speed
-Custom paint job
-2" lift
-Full custom re-wire
-L series front end

-EA81 TWIN CARB!!!!
-L series 5 speed
-Custom paint job
-2" lift
-Full custom re-wire
-L series front end

Managed to do a couple of things of late.
Painted up the Subaru Sunnies that I kept off my last L series (92 wagon), bought 2 x new 185/70/13 tyres for the front and fitted my existing 2 x 185/70/13 to the rear. At least I can put the car into 4WD now and not wind the drive train up due to different sized tyres.
Only problem is, I only have (2) centre caps as this is all that was on the L series when I bought it.
Cant fit the spare L series sunnie to the rear bumper mounted wheel carrier (not on the car at the moment) as it looks to have been made for a 14" rim with less offset than the L series rim so in order to fit the L series rim I will need to install a spacer on the carrier to sit the rim further out and fit longer stud bar to suit the spacer.

Bit the bullet and bought these for the MY.
I have an oil leak which could be the front crankshaft seal or it could be the usual issue with a crack in the oil pump. It is a 2nd had pump on the car now anyway.
Many thanks to Andy (FROG) for suppling the pump and the oil gauge sender came off ebay and is OEM Subary too.
Haven't fitted the new oil pump yet as I need to get a new crankshaft seal first and get some time together to due justice to be able to do the job properly.

Have fitted the oil gauge sender though and as I haven't had the correct sender for years (been using one off a Ford Falcon) I forgot what the reading on the gauge looked like with the correct sender so this is awesome now.
Painted up the Subaru Sunnies that I kept off my last L series (92 wagon), bought 2 x new 185/70/13 tyres for the front and fitted my existing 2 x 185/70/13 to the rear. At least I can put the car into 4WD now and not wind the drive train up due to different sized tyres.
Only problem is, I only have (2) centre caps as this is all that was on the L series when I bought it.
Cant fit the spare L series sunnie to the rear bumper mounted wheel carrier (not on the car at the moment) as it looks to have been made for a 14" rim with less offset than the L series rim so in order to fit the L series rim I will need to install a spacer on the carrier to sit the rim further out and fit longer stud bar to suit the spacer.
Bit the bullet and bought these for the MY.
I have an oil leak which could be the front crankshaft seal or it could be the usual issue with a crack in the oil pump. It is a 2nd had pump on the car now anyway.
Many thanks to Andy (FROG) for suppling the pump and the oil gauge sender came off ebay and is OEM Subary too.
Haven't fitted the new oil pump yet as I need to get a new crankshaft seal first and get some time together to due justice to be able to do the job properly.
Have fitted the oil gauge sender though and as I haven't had the correct sender for years (been using one off a Ford Falcon) I forgot what the reading on the gauge looked like with the correct sender so this is awesome now.
-
Silverbullet
- Senior Member
- Posts: 2953
- Joined: Mon Aug 23, 2010 6:20 pm
- Location: Adelaide
Lost an important little thing down the side of the passenger seat, last thing I wanted to be doing after work today was taking the seat out and interior apart to find it 
Anyway, got to clean some more red dirt out from under the floor mat and a few other interesting items")

The more interesting things I find in this car the more of a picture I get of its past And no, these weren't what I lost down the side of the seat.
Anyway, got to clean some more red dirt out from under the floor mat and a few other interesting items
The more interesting things I find in this car the more of a picture I get of its past
Will it ever end!?
-EA81 TWIN CARB!!!!
-L series 5 speed
-Custom paint job
-2" lift
-Full custom re-wire
-L series front end
-EA81 TWIN CARB!!!!
-L series 5 speed
-Custom paint job
-2" lift
-Full custom re-wire
-L series front end
Giving this stuff a go starting with the wagons rear, side windows and then when I work out the best way to apply it, it will go onto the main the rear window too.
Always had an external rear window louver but it is getting brittle and could be knocked off with a Philips head screwdriver but I still wanted some sort of sun protection.
I have managed to get in onto the rear side RH widow so far and I need to trim the sections outer edges but it doesn't look too bad.
Just want to see how it goes to see if it falls off but with the static properties it should hopefully be OK.
Locally, I can only get the version with the black interior and the silver outer colours. The car is silver anyway but the ideal would have been the black inner and outer. Each pack is 120 x 45cm in size so it isn't wide enough to go the whole height of the rear window.
You have to be an octopus to work this stuff even with plenty of water so putting it on across the rear window solo is virtually impossible.
I think for the rear window I will be putting on 3 separate vertical pieces starting with the middle section and then the outer 2 sections.
See how it goes anyway.