Page 2 of 4

Posted: Tue Mar 05, 2013 8:25 pm
by El_Freddo
GOD - smack on the money! Even referenced it's shape etc properly.

Other mentions go to (in no particular order) Rodeo4jake, 60766244, T.Farm.Brumby, RSR555, Bantum and Subrau.

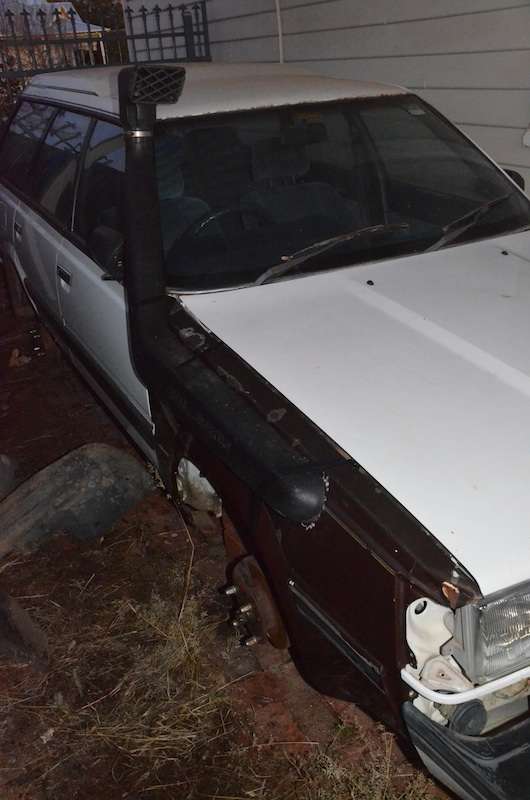
We tried out a bead roller for S&G's more than anything, but yes there will be a rubber flexible hose to clamp onto this.
steptoe wrote:an exhaust system with greater ground clearance
Now that would be cool, painful to do but I don't need it, my exhaust is tucked up enough as it is :rolleyes:
steptoe wrote:Does exhaust travel straight down a round pipe or in a spiral ? Would a system made up of oval shape change note or affext flow ?
Straight down regardless of the shape, unless there's turbulence - which is what you're trying to avoid!
Silverbullet wrote: Although I've never seen oval to round before...what are you up to Bennie :p
A very interesting machine stretched the 2.5 inch pipe out to 3 inch, then we hammered it into the elliptical shape at one end and welded up a dummy piece we made a couple of weeks ago - this is on the cheap, so it's scrap where we can!

So I guess it's time for pics :twisted:


Image

Image

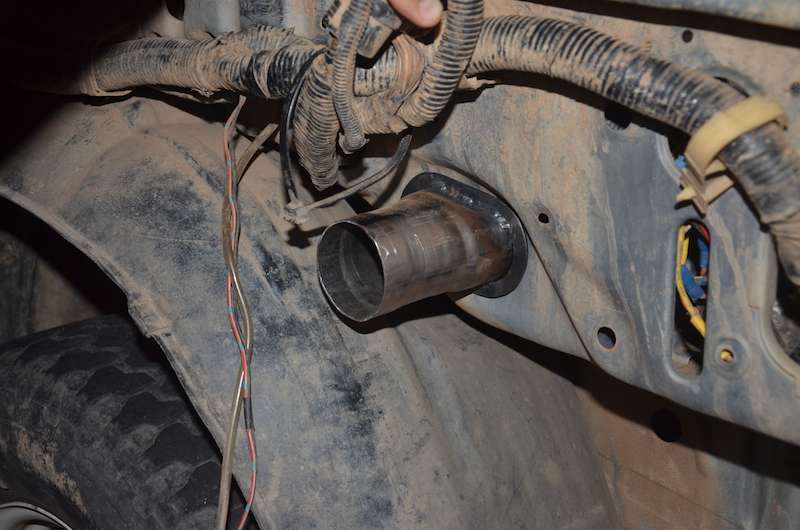
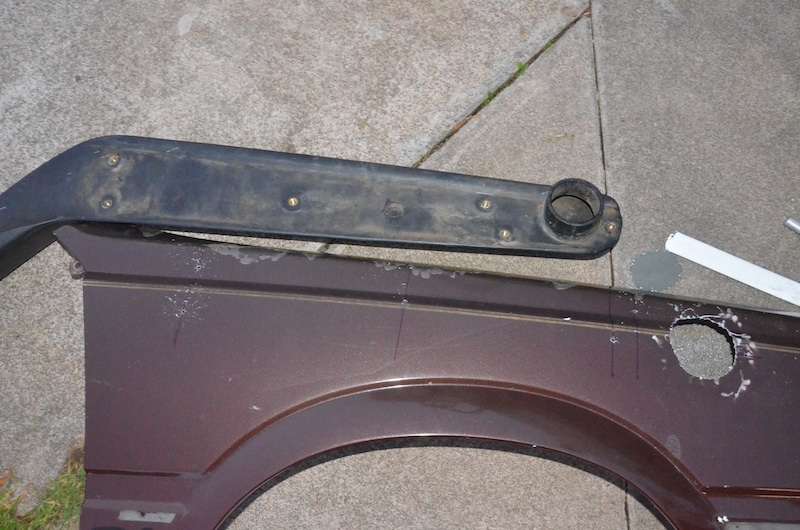
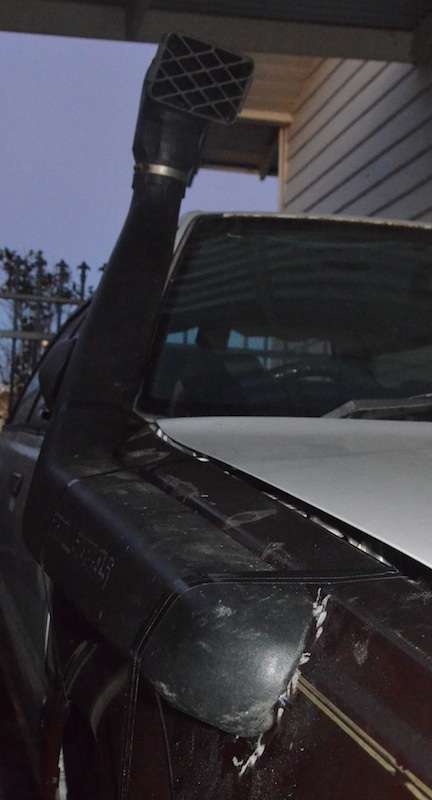
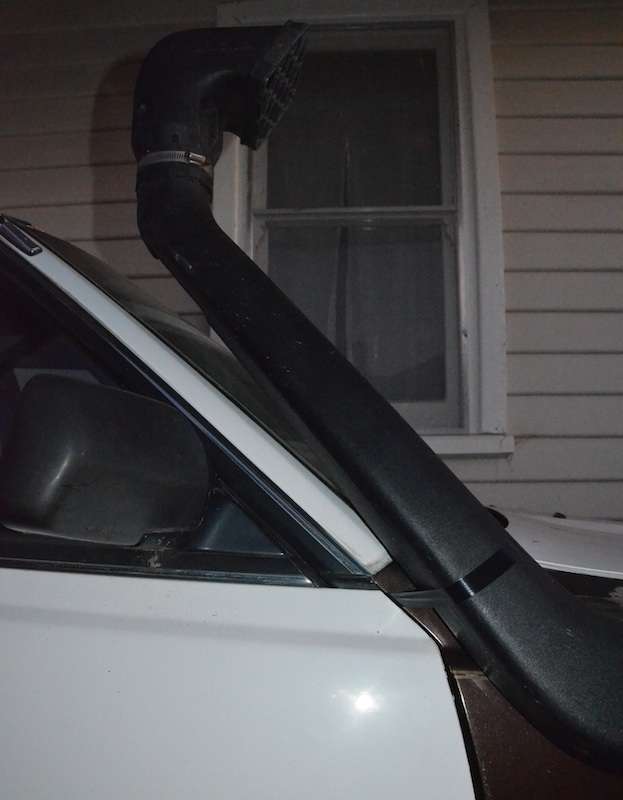
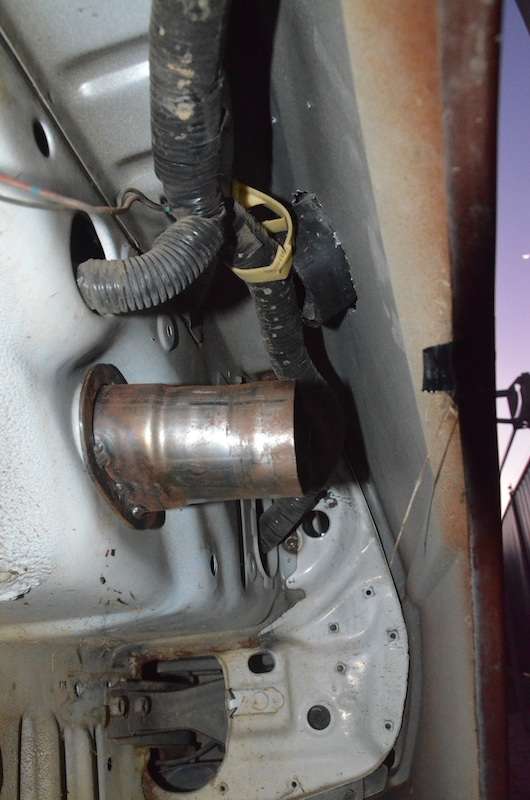
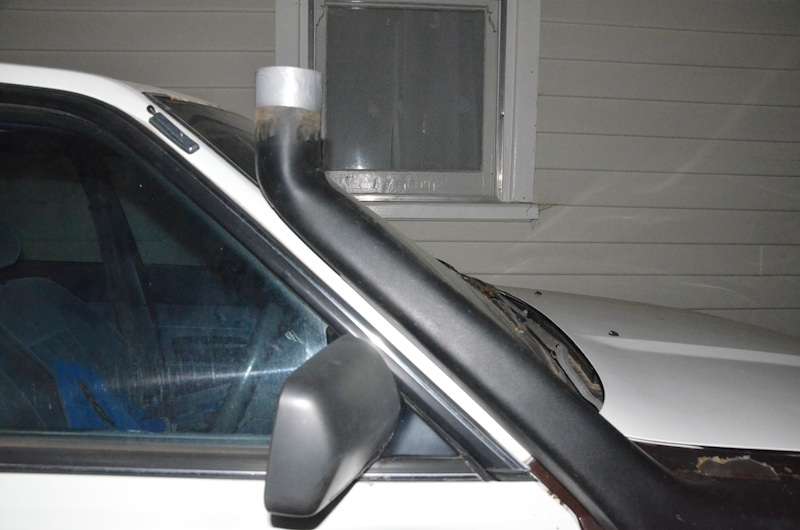
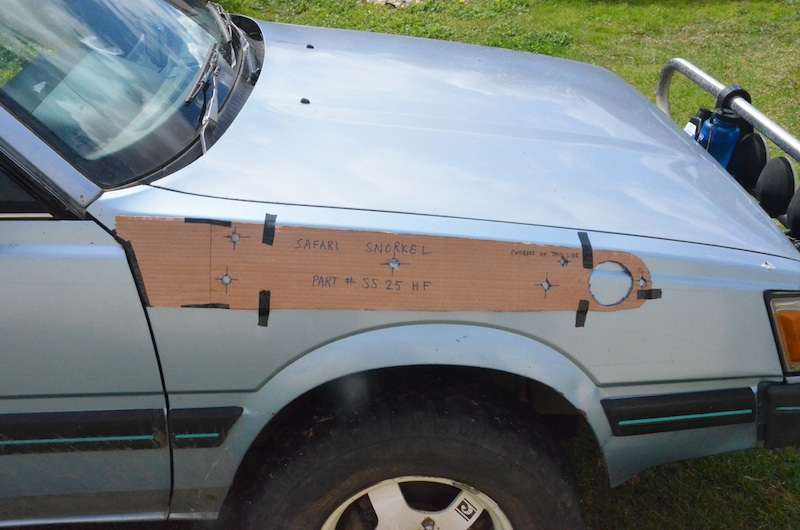
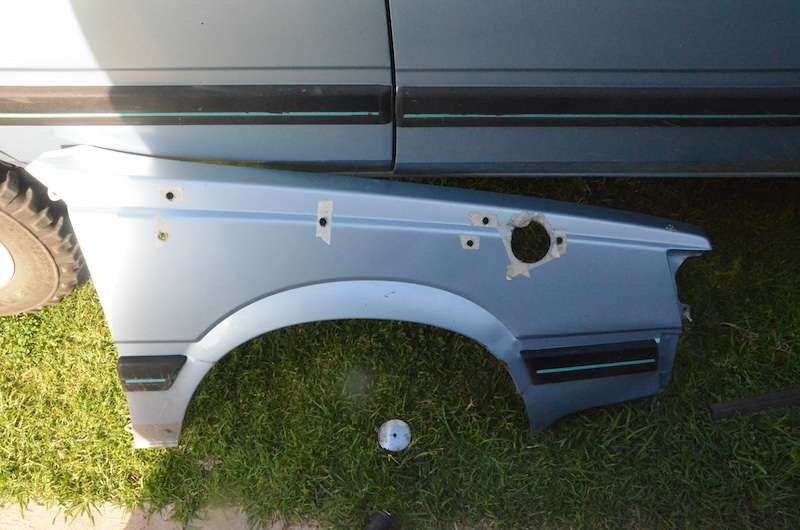
This adaptor will have a closed cell foam "gasket" between the inner guard and the air box sandwiched together with a set of bolts from the flange to the air box.

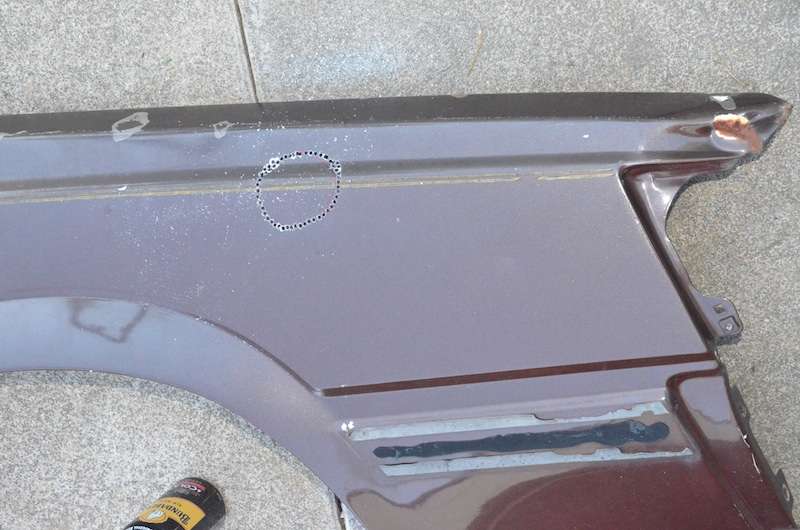
Doing it this way will also allow me to pick where I punch the hole in the guard and where I want to do it. Trick now is to find a 2.5 inch flexible rubber hose - and I don't want to use one of those ones from fleabay as I don't want to skimp on something that is so important.

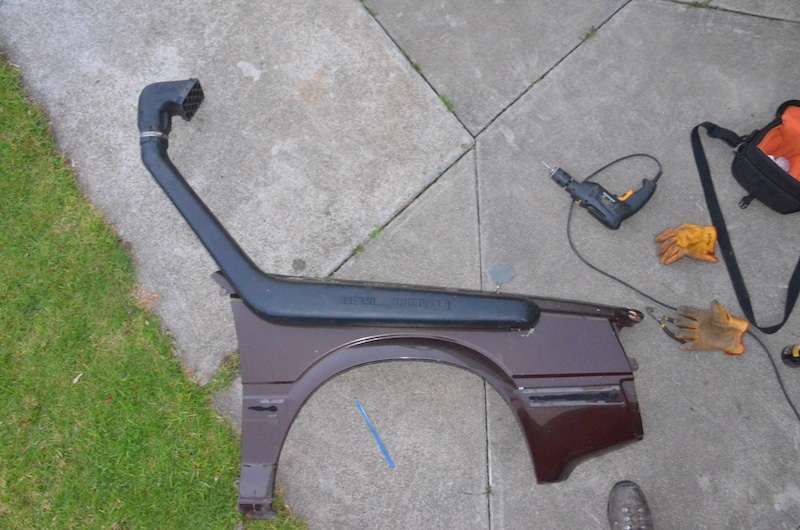
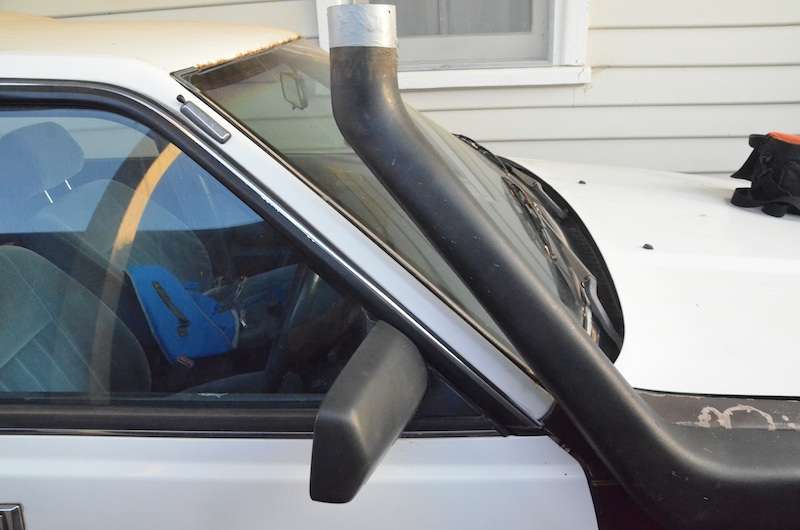
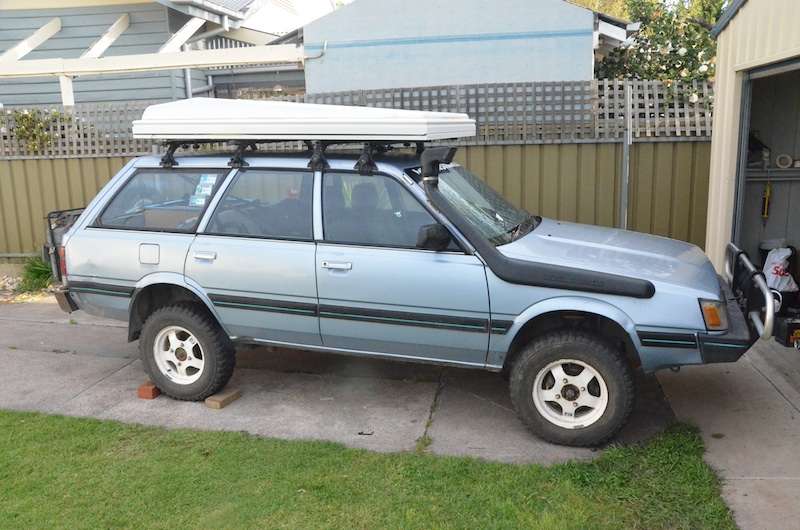
I'm looking forward to having this done. That adaptor flange/pipe will get a coat or two of red oxide to slow the rust "effect" down. Then the external pipe will probably be painted a hammer tone grey - same as what the rear bar is supposed to be...

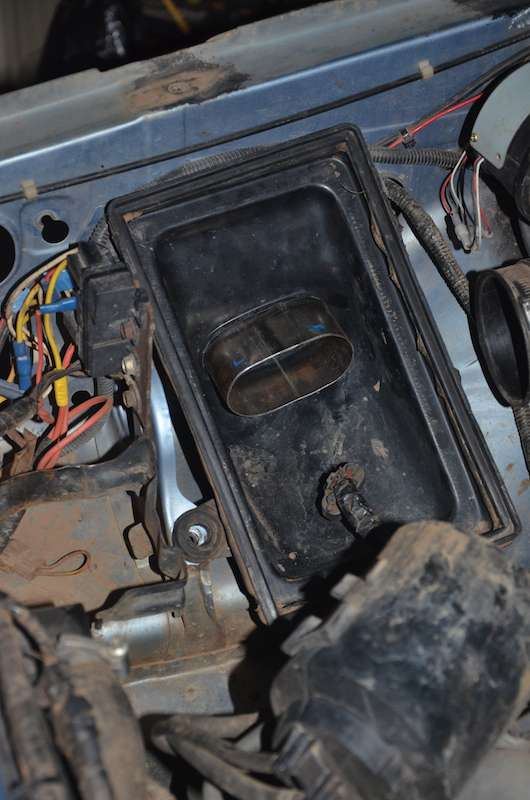
A couple of things to do - first is work out a new window washer bottle as the stock one gets right in the way! Next is cut the end of the pipe down that'll be in the air box so it clears the filter element. Next is to get the flexible rubber hose in my hot little hands before we make up the next bit.

Gotta give out a huge thanks to my mate, and his dad's exhaust workshop! They do all sorts of bar work in there - custom exhausts, full roll cages - anything with pipes they can do it! Thinking of a set of side rails next :twisted: :p

Cheers

Bennie

Posted: Tue Mar 05, 2013 8:38 pm
by Venom
Neat! Looks pro. That's probably the hardest part of the snorkel done.

Posted: Tue Mar 05, 2013 10:10 pm
by NachaLuva
Awesome! Do you have a snorkel yet?

I wonder if somewhere like Pirtek would have a decent flexible hose...if not they might be able to recommend somewhere.

Posted: Wed Mar 06, 2013 7:09 am
by steptoe
there is a nice variety of silicone hoses, joiners, bends, adaptors and hump hoses on ebay

Posted: Wed Mar 06, 2013 8:11 pm
by El_Freddo
Venom wrote:Neat! Looks pro. That's probably the hardest part of the snorkel done.
Thanks mate and yes it is. Once I get the rubber hose it'll be pretty smooth sailing.

For now I just need to get the closed cell foam sorted to create a proper seal and the washer bottle replaced with something that can be relocated.
NachaLuva wrote:Awesome! Do you have a snorkel yet?
Not yet. But a mandrel bend and some mild steel pipe will have that sorted. Then some paint for prettiness. It'll be a pot load cheaper than buying one!
steptoe wrote:there is a nice variety of silicone hoses, joiners, bends, adaptors and hump hoses on ebay
You wouldn't happen to know the seller would you? I'm sick of going through listings - haven't found anything I'm keen on thus far :(

Cheers

Bennie

Posted: Wed Mar 06, 2013 8:39 pm
by FujiFan
How about a rear washer bottle from L series wagon, its a lot smaller and has a flexible filler hose that could prob be setup in place of the original. Would prob need the pressed steel bracket that goes with rear bottle that could be bent then bolted into place.

Nice piece of metal work!

Posted: Wed Mar 06, 2013 8:47 pm
by El_Freddo
FujiFan wrote:How about a rear washer bottle from L series wagon, its a lot smaller and has a flexible filler hose that could prob be setup in place of the original. Would prob need the pressed steel bracket that goes with rear bottle that could be bent then bolted into place.
I've looked into that and from memory it's too long. I'll check it again though as I was looking at using it on the other side of the vehicle for another project :twisted:
FujiFan wrote:Nice piece of metal work!
Thank FF! I can't take all the credit, I was just a lackey on this one! It was great to watch a master at work though!!

Cheers

Bennie

Posted: Wed Mar 06, 2013 10:20 pm
by GOD
FujiFan wrote:How about a rear washer bottle from L series wagon, its a lot smaller and has a flexible filler hose that could prob be setup in place of the original. Would prob need the pressed steel bracket that goes with rear bottle that could be bent then bolted into place.
That's what I've got on my car, held in place with a heap of cable ties.

Trying to find some pics now...

Dane.

Posted: Thu Mar 14, 2013 3:26 pm
by RSR 555
Update? more pics or banned :p

Posted: Tue Mar 19, 2013 6:01 pm
by El_Freddo
RSR 555 wrote:Update? more pics or banned :p
Now what would banning me achieve? How would I update the thread??

I realise now that I didn't mention that this is a work in progress. Between long weekends waterskiing, work commitments, family commitments (and having to drive the 1.5+ hours to get there) things have been moving very slowly on the projects front - including that of the brumby :(

I still haven't got the flexible rubber hose I'm after.

Cheers

Bennie

Posted: Wed Mar 20, 2013 10:07 am
by RSR 555
El_Freddo wrote:Now what would banning me achieve? How would I update the thread??
Probably not a lot but it certainly got you to respond :p

I know you're busy with your hands full and maybe I used the wrong term, Sorry hope you can forgive me?

Posted: Wed Mar 20, 2013 1:33 pm
by Venom
Stuff flexible hose. Get some nice mandrel bends going and maybe a silicone joiner or two.

Posted: Wed Mar 20, 2013 9:02 pm
by El_Freddo
RSR 555 wrote:Probably not a lot but it certainly got you to respond :p
Yeah, but I took my time - much like I am on this project :(
RSR 555 wrote:I know you're busy with your hands full and maybe I used the wrong term, Sorry hope you can forgive me?
None needed mate ;)
Venom wrote:Stuff flexible hose. Get some nice mandrel bends going and maybe a silicone joiner or two.
Flexible hose is the easy way to do it, plus if I brush anything with the snorkel it will be independent of the air box. Add some solid pipe in there and it'll want to bend other things, plus it'd be a pain in the arse to fit to the vehicle!

This, as usual, is being built on a budget. So far it's all been made with scrap material. So now all I need is a bit of mandrel bend to go into the guard neatly ;)

Cheers

Bennie

Posted: Thu Mar 21, 2013 10:33 am
by RSR 555
I know your pain Bennie.

I'm very interested in this, as I'm still using the bottom half of my EFI air box ;)

Posted: Fri Mar 22, 2013 11:08 am
by Wooster
Bugger & I thought it was some sort of unique Victorian apparatus for securing the tails of those goats down there

Posted: Fri Mar 22, 2013 10:21 pm
by NachaLuva
This stuff looks good:

http://www.ebay.com.au/itm/76-mm-3-BLUE ... 4cfaaddb7b

Would look nice under your bonnet :cool:

They also have silicone reducers, 90' & 45' elbows & much much more lol

Posted: Sat Aug 10, 2013 9:33 pm
by El_Freddo
I'll start a thread once this is completed. But I've done some work on the setup today using a dummy guard (parts bitch is great for this), used another L series to mock it up.

Best part is that a mate's brother gave me a N-something pajero snorkel that he got from a mate who didn't need it. Gold. This is what I got up to tonight, it's coming together very well so far. Just need to bend the elbow and sort out some flexible hose.

I put the guard on the spare L, held the snorkel where I think it needs to be, marked where the hole should go and ended up with this:

Image

Marked where the bolt holes need to go, but didn't have a big enough drill bit to find out if I got it right. I've got to find some bolts to fit the captive nuts too:

Image

Image

This is what it looks like dummied up on the car - with poor lighting conditions...

Image

Lines up pretty well:

Image

Some bending required:

Image

Best bit is that this lines up very well. Thinking a mandrel bend might be in order to finish off the adaptor, then some flexi hose to finish it off:

Image

Pretty happy with how this is going. I'm nervous about the bending of the elbow with the heat gun, just the usual thing of wanting to get it right the first time.

Cheers

Bennie

Posted: Sun Aug 11, 2013 10:33 pm
by 60766244
Looks great. Excited to see the final product soon!

Posted: Thu Sep 19, 2013 9:07 pm
by El_Freddo
Start:

Image

After some heat gun action with sand in the snorkel to keep some shape:

Image

Other bits of work needed:

Image

Image

And all fitted up:

Image

Image

Image

Love it!

Cheers

Bennie

Posted: Thu Sep 19, 2013 9:13 pm
by Silverbullet
Man that's awesome! :eek: Fantastic job on the heat bending, how easy was it? It looks like it was made for the car, well done. Now Ruby Scoo looks even more bad ass :twisted: