EA81 into trike VW automatic

For those that have a 2 wheel affliction, share away here !
User avatar
TOONGA
Elder Member
Posts: 5339
Joined: Sat May 30, 2009 10:15 am
Location: Mandurah where they divided by zero
Contact:

Post by TOONGA » Sun Aug 14, 2011 6:54 pm

Give that cast iron aircon compressor bracket the flick completely and look for the standard issue brumby or wagon bracket.

something like this will work fine

Image

TOONGA
Image
PJ Gone but not forgotten
JETCAR AKA the sandwedge Rusted in pieces

User avatar
Silverbullet
Senior Member
Posts: 2920
Joined: Mon Aug 23, 2010 6:20 pm
Location: Adelaide

Post by Silverbullet » Sun Aug 14, 2011 7:07 pm

BP6ES plugs are correct, can't remember the gap off the top of my head though, I only remember in metric anyway :mrgreen: Is it .9mm or thereabouts? someone on here will know.
Will it ever end!?
-EA81 TWIN CARB!!!!
-L series 5 speed
-Custom paint job
-2" lift
-Full custom re-wire
-L series front end
Image

User avatar
TOONGA
Elder Member
Posts: 5339
Joined: Sat May 30, 2009 10:15 am
Location: Mandurah where they divided by zero
Contact:

Post by TOONGA » Sun Aug 14, 2011 7:35 pm

0.9 to 1.0mm, the plugs normally come pre-gapped but store assistants have a way of dropping stock when they put it on shelves :)

TOONGA
Image
PJ Gone but not forgotten
JETCAR AKA the sandwedge Rusted in pieces

User avatar
Tweety
General Member
Posts: 1253
Joined: Mon Jul 04, 2011 9:45 am
Location: ea81 powered trike Victoria

Post by Tweety » Sun Aug 14, 2011 8:42 pm

Yep, that light weight alternator bracket is the go. have cut and painted the cast one and will install it and exchange it when I can (the perils of rural life).

gap of .9 and 1.0 seems right according to some web sites. Having been a VW guy at .28 thou it seemed really large but you confirmed my thoughts. The plugs were 0.39-.41 thou being around .1mm. great.

Can you tell me what coil I can run. There are two types an "R" with resister and without R (not that you wouldnt know that). The engine didnt come with a coil.

Thanks again

User avatar
TOONGA
Elder Member
Posts: 5339
Joined: Sat May 30, 2009 10:15 am
Location: Mandurah where they divided by zero
Contact:

Post by TOONGA » Sun Aug 14, 2011 9:04 pm

steptoe wrote:BIC290 is the Bosch part number of the coil I got to suit my 84 Brumby with ignition module in case this helps
stole this from rat campers thread, if you click the arrow it will take you to the post.

TOONGA
Image
PJ Gone but not forgotten
JETCAR AKA the sandwedge Rusted in pieces

User avatar
Tweety
General Member
Posts: 1253
Joined: Mon Jul 04, 2011 9:45 am
Location: ea81 powered trike Victoria

Post by Tweety » Mon Aug 15, 2011 9:28 pm

Got your sunglasses on????

Image

Image

Image

Image

I am somewhat wiser today having read up on the carbon canister, its purpose and use.
For those unaware it has a tube running from the petrol tank to it so it can store fumes. Then when the engine is restarted the fumes get burned off. So as my VW engine didnt have one of these, my fuel tank doesnt need venting, and it look crappy on my trike I'm going to keep it for now until the engineer passes it. then I think it might fall off seeing as its very loose.....

now all I have to do is obtain a new fanbelt and other small items like rear main seals before installation.

User avatar
El_Freddo
Master Member
Posts: 12626
Joined: Tue Oct 04, 2005 10:00 am
Location: Bridgewater Vic
Contact:

Post by El_Freddo » Tue Aug 16, 2011 12:48 am

Looking good there mate! I bet you're excited to have this thing installed and running yesterday ;)

Keep up the good work!

Cheers

Bennie

PS I like your colour scheme, much better taste than another member's on here!!
"The lounge room is not a workshop..."
Image
El Freddo's Pics - El_Freddo's youtube

User avatar
Tweety
General Member
Posts: 1253
Joined: Mon Jul 04, 2011 9:45 am
Location: ea81 powered trike Victoria

Post by Tweety » Tue Aug 16, 2011 10:02 am

Not installed nor running but yes am excited.

Colour scheme was a debate with me and my wife. I wanted a red block....but it seemed a lot more work taking the manifolds off etc. she wanted the black and alloy look. glad I went with her taste.

Will take a week or so to get some bits then installation.....

User avatar
Tweety
General Member
Posts: 1253
Joined: Mon Jul 04, 2011 9:45 am
Location: ea81 powered trike Victoria

Post by Tweety » Tue Aug 16, 2011 11:08 pm

All the vacuum points and water cooling locations on the intake manifolds I got confused. One left me wondering where it led. So found a good site explaining such things.

http://www.angelfire.com/crazy/bushy5552/weber1.html

the one I was concerned about was a 3/16th tube that was meant for a brake booster....so I can black it off ans it isnt needed.

User avatar
TOONGA
Elder Member
Posts: 5339
Joined: Sat May 30, 2009 10:15 am
Location: Mandurah where they divided by zero
Contact:

Post by TOONGA » Wed Aug 17, 2011 8:25 am

Thats a nice write up, it is interesting how they use the EA82 carby manifold with the bigger opening for the carby.

TOONGA
Image
PJ Gone but not forgotten
JETCAR AKA the sandwedge Rusted in pieces

User avatar
Tweety
General Member
Posts: 1253
Joined: Mon Jul 04, 2011 9:45 am
Location: ea81 powered trike Victoria

Post by Tweety » Wed Aug 17, 2011 12:11 pm

Agreed Toonga. When guys take the time and effort to create such a good thread with arrows and text it makes it all easy to understand especially by novices like myself.

It also proves that google is an art form. All the googling I've done in recent weeks came up with the same old threads but when you alter your words...in this case say "ea81 intake manifold" or "ea81 vacuum diagram" the results can show one or two really interesting sites.

User avatar
Tweety
General Member
Posts: 1253
Joined: Mon Jul 04, 2011 9:45 am
Location: ea81 powered trike Victoria

Post by Tweety » Wed Aug 17, 2011 9:02 pm

made up a mount for the auto kick down switch. Also a new throttle arrangement.

Hooked up the fume breathers from both valve covers to a 'T' peice behind the engine and connected it to the top of the carbie

progress...pics tomorrow.

User avatar
Tweety
General Member
Posts: 1253
Joined: Mon Jul 04, 2011 9:45 am
Location: ea81 powered trike Victoria

Post by Tweety » Thu Aug 18, 2011 8:25 pm

seal removal tool came today. made life easy.

Image

New seal pushed in easy and snug

Image

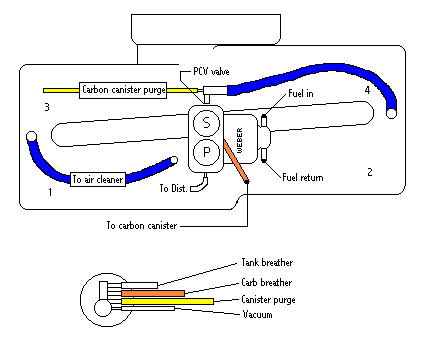
valve cover breathers end up here for intake- note home made throttle cable end mount. bit rough but effective..

Image

kick down switch mounted

Image

this show clearly the valve cover hoses now around the rear.

Image

engine on wheels! ready for 2 main seals then installation.

Image

Image

extendable air intake will allow for cool air induction around the wide Jeep Cherokee radiator if it is mounted above the transaxle. I'm not concrete on that location. might put it at the rear as it is only 270mm high and 800mm wide- which will make it barely noticable .

hopeing other novices see how easy this conversion is...so far.!

User avatar
TOONGA
Elder Member
Posts: 5339
Joined: Sat May 30, 2009 10:15 am
Location: Mandurah where they divided by zero
Contact:

Post by TOONGA » Thu Aug 18, 2011 9:10 pm

looking good there my only concern is the way you have plumbed the crankcase breather gases

Image

above is the way it should be done so you get positive crankcase ventilation which is important to keep the oil flowing properly in the engine and to stop condensation from forming in the engine on cool down

from this page http://www.subarubrat.com/Retrofitting% ... V%2032.htm

TOONGA
Image
PJ Gone but not forgotten
JETCAR AKA the sandwedge Rusted in pieces

User avatar
Tweety
General Member
Posts: 1253
Joined: Mon Jul 04, 2011 9:45 am
Location: ea81 powered trike Victoria

Post by Tweety » Thu Aug 18, 2011 10:03 pm

good pick up Toonga.

The way it reads is that the LHS I think is the side the thermostat is on links up to the pcv valve then onto the intake and the RHS (alt side) goes straight to the intake.

But they cant link up in a 'T' peice eh because gases will simply go from one side to the other. (unless they have one way valves in them)

Means I'll need to get another black plastic attachment for the rHS valve cover hose and place it on the other side of that filter alloy top adapter.

hope I make sense Toonga. What do you think?

User avatar
Tweety
General Member
Posts: 1253
Joined: Mon Jul 04, 2011 9:45 am
Location: ea81 powered trike Victoria

Post by Tweety » Thu Aug 18, 2011 10:13 pm

actually this pic has made it clearer but its still confusing overall.

Image

firstly I know I would have taken off the PCV valve but what does it look like?
What is the LHS and the RHS of the engine?- just confirming (I think the RHS is the alt side)
Does the diagrams mean that one side takes in air to the vavle cover then the air goes to the sump eventually out to the PCV valve then to the intake???

I knew this wouldnt be simple:)

User avatar
TOONGA
Elder Member
Posts: 5339
Joined: Sat May 30, 2009 10:15 am
Location: Mandurah where they divided by zero
Contact:

Post by TOONGA » Thu Aug 18, 2011 11:03 pm

that diagram you got is an overhead valve engine which is another kettle of fish again.

the diagram I grabbed is for the EA81 and is way simpler to deal with :)

the PCV valve is on the intake manifold near the base of the carby and is shown on the bottom manifold in the photo below

Image

it will look like this on its own

http://www.autopartsway.com/PartDetails ... 5-0031/BA/

if you find number one cylinder on the engine that is the side that draws fresh air from the aircleaner. the breather on the other side of the engine goes to the PCV valve.

hope this helps

TOONGA
Image
PJ Gone but not forgotten
JETCAR AKA the sandwedge Rusted in pieces

User avatar
Tweety
General Member
Posts: 1253
Joined: Mon Jul 04, 2011 9:45 am
Location: ea81 powered trike Victoria

Post by Tweety » Fri Aug 19, 2011 9:27 am

Sure did Toonga. I still have that valve in place.

Thanks mate. will update soon.

User avatar
Tweety
General Member
Posts: 1253
Joined: Mon Jul 04, 2011 9:45 am
Location: ea81 powered trike Victoria

Post by Tweety » Fri Aug 19, 2011 9:38 am

Sure did Toonga. I still have that valve in place.

Thanks mate. will update soon.

User avatar
Tweety
General Member
Posts: 1253
Joined: Mon Jul 04, 2011 9:45 am
Location: ea81 powered trike Victoria

Post by Tweety » Fri Aug 19, 2011 9:59 am

Dug up this thread

http://70.85.249.34/~byb555/forum/showthread.php?t=6433

Seems to me if I am correctly understanding.... that the breather hose from the valve cover on the dizzy side has to suck air from the air cleaner. The alt side valve cover hose goes to the pcv valve.?

Post Reply

Return to “Bike Projects”