Forester rear brakes into Brumby ... info needed

Get the most out of your ride & how to make enhancements ...
Post Reply
User avatar
dfoyl
Junior Member
Posts: 717
Joined: Mon Aug 28, 2006 12:13 pm
Location: Victoria eastern suburbs

Forester rear brakes into Brumby ... info needed

Post by dfoyl » Sat Jan 10, 2015 8:22 pm

I have started mocking up the XT6 hubs onto an MY wagon rear end, and had no problem pulling the old drums. I am now back to the axle with no issues.

My donor 1998 Forester rear brake setup is at a point where I have removed the axle nut (which is smaller than the MY 36mm castle nut, I think it was 32mm from memory), and the rear disc itself (easy to do). Now I assume I need to remove the Forester hub, and then unbolt the 3 x 14mm bolts to detach the backing plate from the "bit that connects the backing plate to the trailing arm" :rolleyes:

BUT, the Forester hub has what looks like an aluminium castellated plate that bolts to the hub with 5 allen bolts:

Image

Do I need the plate ? If so, does that mean I need to drill holes in my XT6 nuts (I hope not).
1989 Brumby - Shiny new red paint, stroked EJ20 phase 2 SOHC with Darton sleeves bored to EJ22, Wiseco high-compression pistons, Delta 2000 grind cams , EJ/XT6 5 stud with WRX 4/2 pots, 5-speed, 86 GTS seats and so much more.
Contact me for reproduction XT6 hubs...and EA82 rear discs.

User avatar
dfoyl
Junior Member
Posts: 717
Joined: Mon Aug 28, 2006 12:13 pm
Location: Victoria eastern suburbs

Post by dfoyl » Sat Jan 10, 2015 8:26 pm

Further question: Best way to pull the hub, without an axle puller ? I can't lever from the back without damaging the drum-in-disc hand brake.
1989 Brumby - Shiny new red paint, stroked EJ20 phase 2 SOHC with Darton sleeves bored to EJ22, Wiseco high-compression pistons, Delta 2000 grind cams , EJ/XT6 5 stud with WRX 4/2 pots, 5-speed, 86 GTS seats and so much more.
Contact me for reproduction XT6 hubs...and EA82 rear discs.

User avatar
Tuckerbag
Junior Member
Posts: 31
Joined: Mon Jul 19, 2010 12:03 am
Location: NSW

Post by Tuckerbag » Sat Jan 10, 2015 8:56 pm

the castle ring is for abs. you have to pull the wheel bearing apart for the backing plate to come off.

User avatar
littlewhiteute
Junior Member
Posts: 623
Joined: Sat Sep 30, 2006 7:22 am
Location: Brisbane

Post by littlewhiteute » Sun Jan 11, 2015 6:57 am

I've done a rear disc brake conversion on my Brumby.

Mine is earlier XT6 and does not have rear handbrake or ABS.

Piece of cake conversion.

What front brakes are you using?
Regards

Gary ;)

User avatar
dfoyl
Junior Member
Posts: 717
Joined: Mon Aug 28, 2006 12:13 pm
Location: Victoria eastern suburbs

Post by dfoyl » Sun Jan 11, 2015 7:15 am

OK, so next dumb question is how do I pull the wheel bearing apart ? Press from the wheel side into the axle ?

Gary, 98 Forester all round. I wanted to keep the Forester rears to get the rear handbrake (plus it saved me on shipping the rest of the XT6 setup).
1989 Brumby - Shiny new red paint, stroked EJ20 phase 2 SOHC with Darton sleeves bored to EJ22, Wiseco high-compression pistons, Delta 2000 grind cams , EJ/XT6 5 stud with WRX 4/2 pots, 5-speed, 86 GTS seats and so much more.
Contact me for reproduction XT6 hubs...and EA82 rear discs.

User avatar
Nubaru
Junior Member
Posts: 165
Joined: Fri Jan 10, 2014 8:02 am
Location: within the girth

Post by Nubaru » Sun Jan 11, 2015 7:36 am

watching this closely. am curious about Garys XT6 piece of cake - was this piece of cake much the same as an L Series RX or AWD Vortex piece of cake, just with the 5 stud system ? Which means import from US uh huh ?

Gary, was the front 5 stud just as easy as taking candy from a baby , also ?
member since 10january2014 #6191

User avatar
Nubaru
Junior Member
Posts: 165
Joined: Fri Jan 10, 2014 8:02 am
Location: within the girth

Post by Nubaru » Sun Jan 11, 2015 7:40 am

Tuckerbag wrote:the castle ring is for abs. you have to pull the wheel bearing apart for the backing plate to come off.
psst..i think by castellated plate, dfoyl does not mean an ABS sensor ring but the bit of hub the stud bit bolts to with those gold zinc allen head bolts in pic
member since 10january2014 #6191

User avatar
TOONGA
Elder Member
Posts: 5335
Joined: Sat May 30, 2009 10:15 am
Location: Australind closer to where they divided by zero
Contact:

Post by TOONGA » Sun Jan 11, 2015 11:25 am

Nubaru wrote:psst..i think by castellated plate, dfoyl does not mean an ABS sensor ring but the bit of hub the stud bit bolts to with those gold zinc allen head bolts in pic
He means the ABS ring ... and no he doesn't need it

Two how to's that are very similar this job. Both are for bearing replacement but they both should ashow how to get the assembly apart.


http://www.scoobymods.com/showthread.ph ... 4125.html?

http://www.dirtyimpreza.com/forums/show ... ech-Inside

good luck with it

TOONGA
Image
PJ Gone but not forgotten
JETCAR AKA the sandwedge Rusted in pieces

User avatar
dfoyl
Junior Member
Posts: 717
Joined: Mon Aug 28, 2006 12:13 pm
Location: Victoria eastern suburbs

Post by dfoyl » Sun Jan 11, 2015 1:41 pm

Toonga, on the dirtyimpreza link under this section: "I couldn't quite find a good place to brace the knuckle with the backing plate attached to press out the hub. Every thing I tried was going to damage the backing plate. So my solution was to clamp the knuckle in my vice then using a socket and hammer, drive the hub out. It came right out with a few solid whacks. "

This is pretty much what I need to do, but my half-shaft is still attached. How do I detach the half-shaft from the axle stub ? On an MY it is a pin that gets knocked out, I don't see it on the Forester ?
1989 Brumby - Shiny new red paint, stroked EJ20 phase 2 SOHC with Darton sleeves bored to EJ22, Wiseco high-compression pistons, Delta 2000 grind cams , EJ/XT6 5 stud with WRX 4/2 pots, 5-speed, 86 GTS seats and so much more.
Contact me for reproduction XT6 hubs...and EA82 rear discs.

User avatar
TOONGA
Elder Member
Posts: 5335
Joined: Sat May 30, 2009 10:15 am
Location: Australind closer to where they divided by zero
Contact:

Post by TOONGA » Sun Jan 11, 2015 2:29 pm

Is the hub still in the car? as pictured?

Using a pointed drift, place it in hole in the centre of the end of the half shaft, then belt it a few times with a good hammer. the half shaft should pop out.

If the hub is out you will need to secure it in a good vice and do the same thing.

TOONGA
Image
PJ Gone but not forgotten
JETCAR AKA the sandwedge Rusted in pieces

User avatar
dfoyl
Junior Member
Posts: 717
Joined: Mon Aug 28, 2006 12:13 pm
Location: Victoria eastern suburbs

Post by dfoyl » Sun Jan 11, 2015 3:07 pm

I removed the entire rear arm from the car, just disconnected from the diff (so much easier than on a MY, just a solid pull and it popped out), then removed the trailing arm and brake lines (hand brake cables are still attached).

I ended up mounting the assembly between two benches with a couple of 2x4s and used the pointed drift as you said - and the half shaft came out.

I then flipped the rest over and using a socket head drifted out the hub. So I am now ready to work out where to drill holes to mount the plate to the MY rear.
1989 Brumby - Shiny new red paint, stroked EJ20 phase 2 SOHC with Darton sleeves bored to EJ22, Wiseco high-compression pistons, Delta 2000 grind cams , EJ/XT6 5 stud with WRX 4/2 pots, 5-speed, 86 GTS seats and so much more.
Contact me for reproduction XT6 hubs...and EA82 rear discs.

User avatar
dfoyl
Junior Member
Posts: 717
Joined: Mon Aug 28, 2006 12:13 pm
Location: Victoria eastern suburbs

Post by dfoyl » Sun Jan 11, 2015 3:17 pm

Here's the hub removed, showing the ABS (thanks!) :

Image

And here's the rest of it:

Image

Remove the 4 screws and the two parts separate. I don't think I need the mounting bracket any more.

Image

So, I have 4 mounting holes. The MY has from memory three, of which one was a blind (into tapped bracket only) and two were through holes (into nuts on the back). For the Cr0ssbr#d kit, where were the holes put ?

And just for the hell of it, here's the (almost) finished wheel (see the "what have you done to your Subaru today" thread for the before photos) :

Image

(Still need to clean up the painting edge, I can't get painters tape to curve).
1989 Brumby - Shiny new red paint, stroked EJ20 phase 2 SOHC with Darton sleeves bored to EJ22, Wiseco high-compression pistons, Delta 2000 grind cams , EJ/XT6 5 stud with WRX 4/2 pots, 5-speed, 86 GTS seats and so much more.
Contact me for reproduction XT6 hubs...and EA82 rear discs.

User avatar
dfoyl
Junior Member
Posts: 717
Joined: Mon Aug 28, 2006 12:13 pm
Location: Victoria eastern suburbs

Post by dfoyl » Sun Jan 11, 2015 4:57 pm

I have mocked up with two of the three MY bolts (the two that screw in to the suspension bracket (I listed it as one blind and two through-with-nuts, it's actually the other way around) line up) :

Image

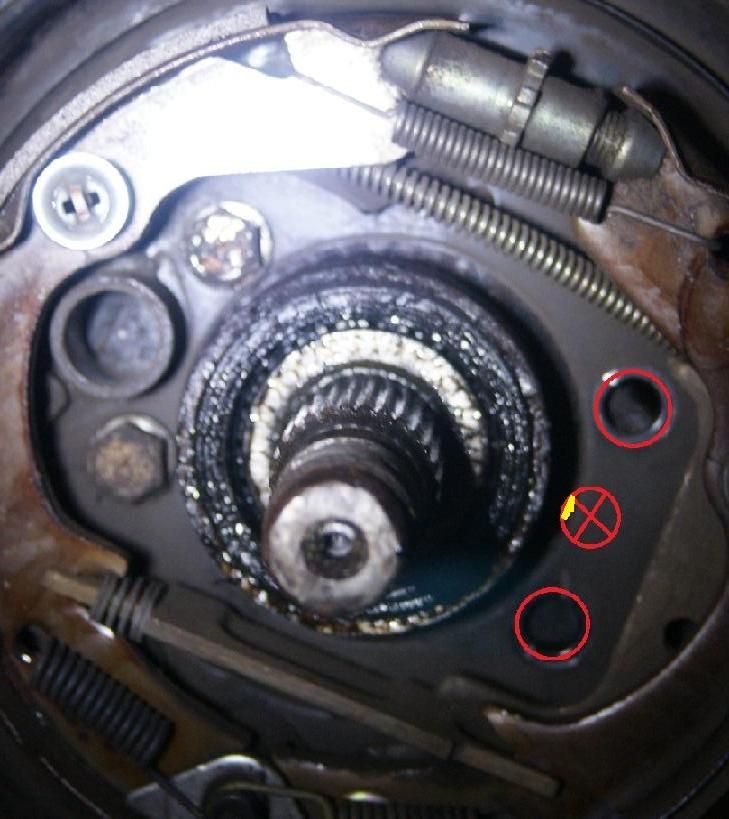
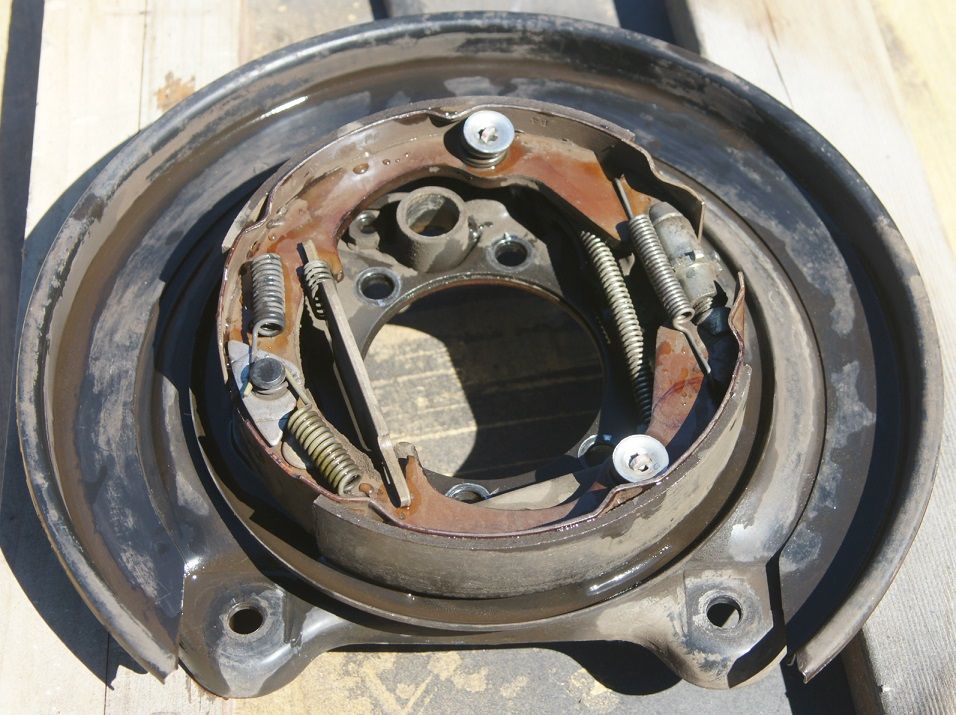
There are two options I can see. One is use either (or both) of the (brake side) holes, and drill through the (suspension side) bracket - which isn't ideal as (a) the bracket is pretty heavy gauge but more importantly (b) there isn't full material on the back (you can see on the top red circle that the top 40% from the top right corner is just thin air). Option two is to use the (suspension side) hole and drill a matching hole in the (brake side) bracket. Again, there isn't 100% material coverage (the yellow area inside the red circle with the diagonal lines through it has no metal), but I think it is better than option one.

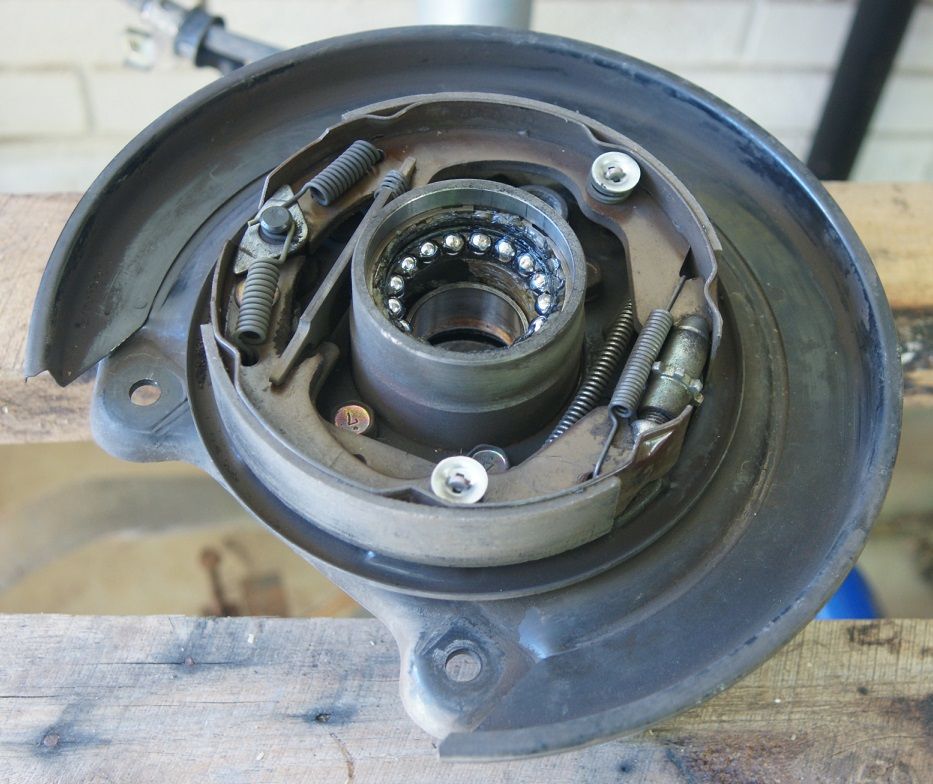
Next issue is the hand-brake cable is right up against the suspension bracket :

Image

I think this is ok, as it needs to stay away from the wheel itself.

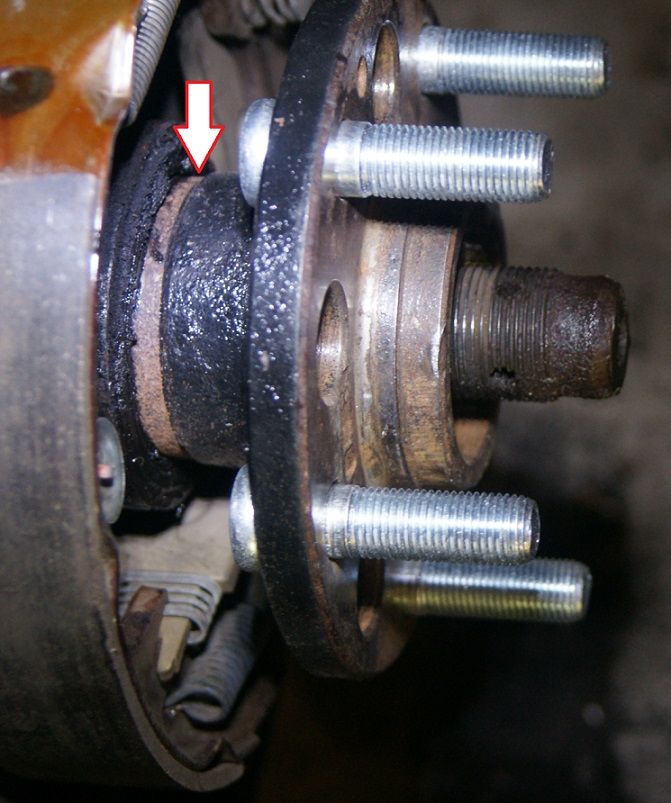
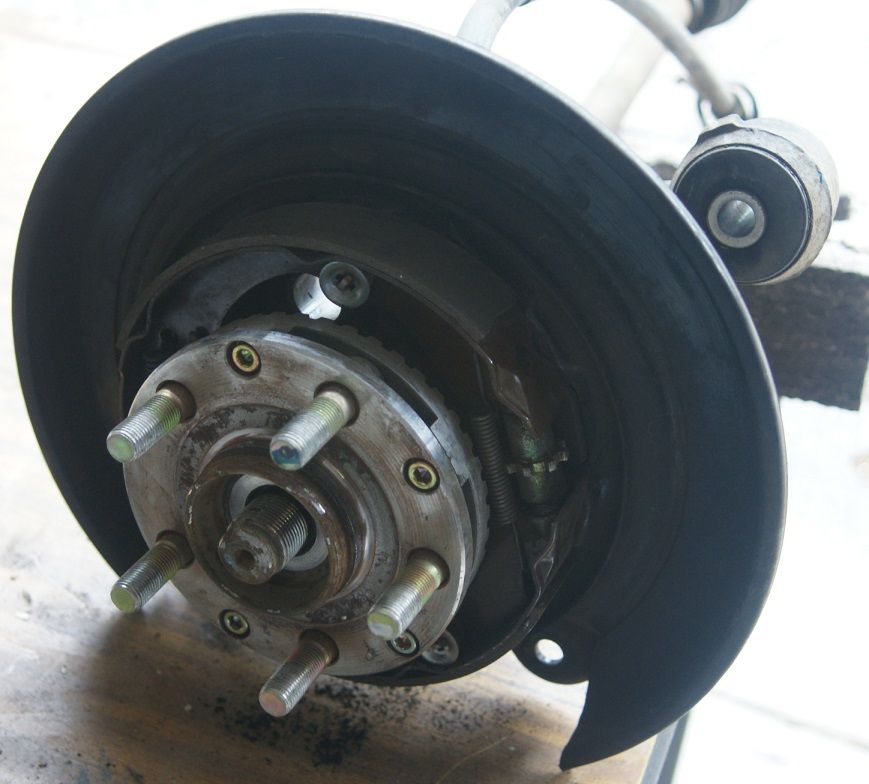
So, I continued the mock-up with the two bolts only attached (and haven't refitted the calipers), and there is a bit of a gap between the hub and the backing plate. The rust marks on the XT6 hub seem to indicate this is same as factory :

Image

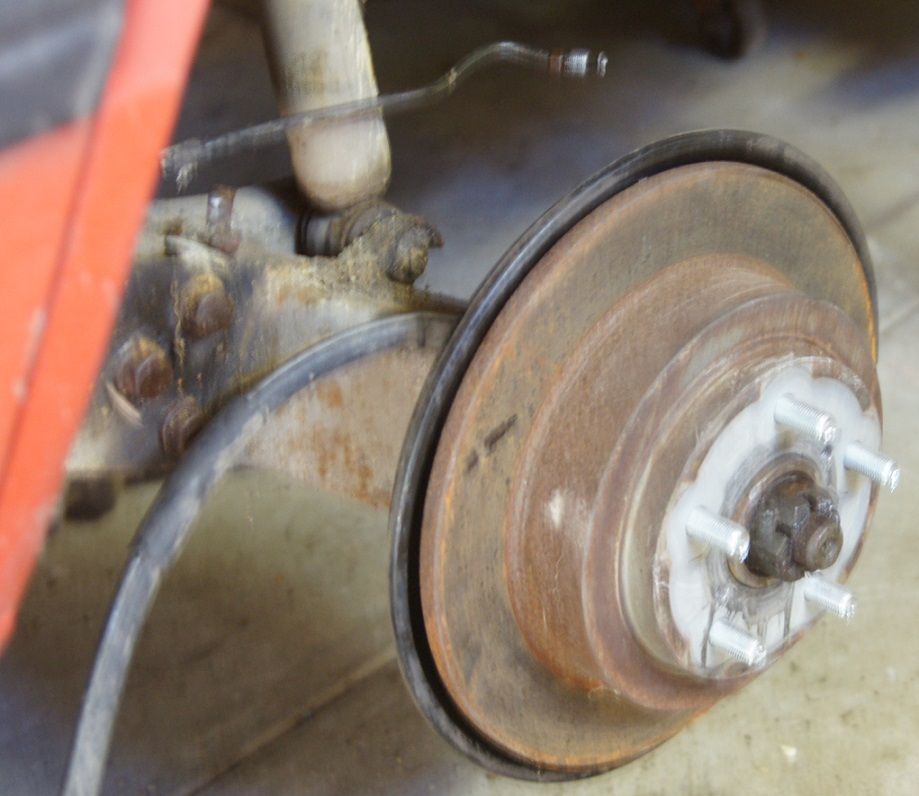
And now with the disc fitted :

Image

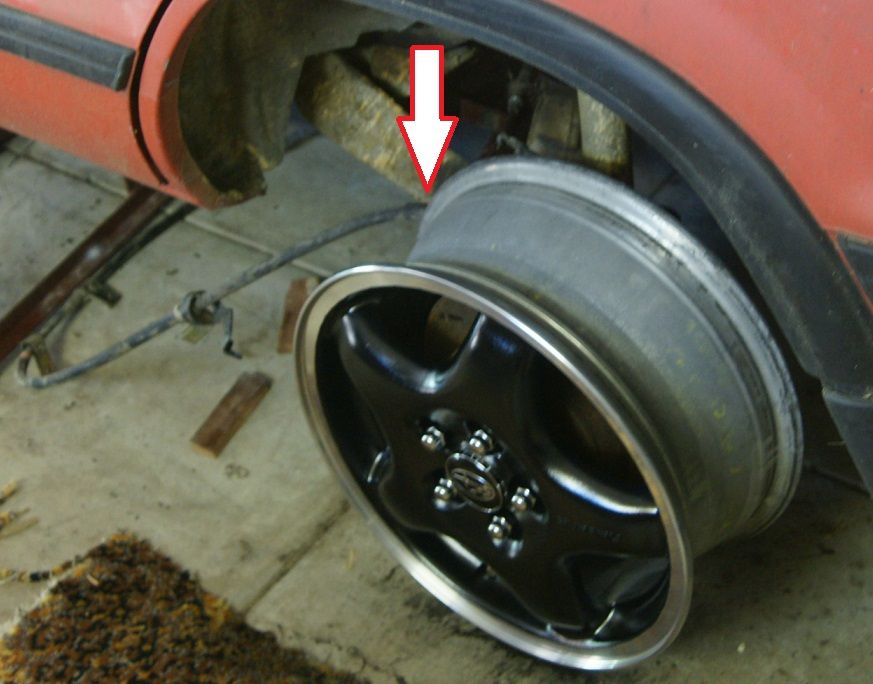
The position of the caliper is a bit of a concern, as it's basically in the 4 o'clock position. I would have been happier in the 3 o'clock but I think it's ok.

And a shot of the mock up complete (sans caliper), except taken from the back of the car to show the hand brake cable routing :

Image
1989 Brumby - Shiny new red paint, stroked EJ20 phase 2 SOHC with Darton sleeves bored to EJ22, Wiseco high-compression pistons, Delta 2000 grind cams , EJ/XT6 5 stud with WRX 4/2 pots, 5-speed, 86 GTS seats and so much more.
Contact me for reproduction XT6 hubs...and EA82 rear discs.

User avatar
El_Freddo
Master Member
Posts: 12502
Joined: Tue Oct 04, 2005 10:00 am
Location: Bridgewater Vic
Contact:

Post by El_Freddo » Mon Jan 12, 2015 4:18 pm

I wouldn't worry about the position of the caliper, and you'll probably find that it will "return" to the 3 o'clock position when you put weight back on the suspension.

The EJ brake conversion kit (c r oss bre d) uses a plate between the suspension arm and the brake backing plate. The only reason I know this has been done this way was because the engineer that signed off the original kit wanted the two unused holes in the backing plate filled in. This plate had the "fillers" machined into it. It may have also aligned the brakes to the hub better but I'm not 100% sure on this one.

Otherwise it all looks good! Great score on the XT6 hubs. I was offered a set but couldn't afford the asking price (USD!) :sad: Plus I don't know what I'd put it on anyway!

I didn't know about the specific "lug nut" stubs that this hub uses...

Oh, and the original kit called for the Gen1 Liberty backing plates so there was no ABS moulding in the plate or that hole to worry about closing up. Welding wasn't an option in the engineer's book hence that plate (sorry, don't have a pic).

Cheers

Bennie
"The lounge room is not a workshop..."
Image
El Freddo's Pics - El_Freddo's youtube

User avatar
dfoyl
Junior Member
Posts: 717
Joined: Mon Aug 28, 2006 12:13 pm
Location: Victoria eastern suburbs

Post by dfoyl » Mon Jan 12, 2015 8:00 pm

You are probably right on the caliper position - didn't think of that!
I found (on AUSubaru) some good photos of the rear plate, and have asked Jeff if they are still available as left-overs from the old kits, or if drawings are available. If not, I'll proceed with drilling the backing plate to match the factory MY mating part.
I knocked down the second axle set tonight, took less than an hour compared to at least 3 x that on the first one. Things to remember for next time : loosen the 32mm nut before removing from car (if you don't have an impact wrench, which I don't), and ideally undo the 4 bolts holding the backing plate from the car also while attached to the car - fitting the assembly into a vice to "break" the bolt isn't ideal due to the size and weight of the complete unit. I think with a impact wrench and doing it while fitted to the car the entire operation would take less than 20 minutes a side...
1989 Brumby - Shiny new red paint, stroked EJ20 phase 2 SOHC with Darton sleeves bored to EJ22, Wiseco high-compression pistons, Delta 2000 grind cams , EJ/XT6 5 stud with WRX 4/2 pots, 5-speed, 86 GTS seats and so much more.
Contact me for reproduction XT6 hubs...and EA82 rear discs.

User avatar
wagonist
Junior Member
Posts: 597
Joined: Sun Nov 13, 2005 10:00 am
Location: Sydney

Post by wagonist » Thu Jan 15, 2015 2:15 pm

I got a dodgied up kit on another car I bought.
To get rid of the handbrake cable issue, it's advisable to twist the backing plate around slightly. This means that you'll need to redrill the 2 holes you've done.
Firstly, I'd weld up all the holes currently drilled. It's only mild steel so I don't see why an engineer wouldn't pass it this way.
It also came with some spacers between the backing plate & hub. Again, I'd weld these on.
I'm also not sure why the other kit didn't use a bolt from the outside with a nut inboard like the factory L backing plates. Except the this bolt has clearance issues with the handbrake mech. But to solve this I would put a bolt in, grind it down so it clears, then weld it in.

Also, to fit the 5 stud wheels, I found I needed to cut off the extended non threaded part of the stub axle.
I just left the axle on the car without anything bolted to it (including the driveshaft), then used an angle grinder just resting gently on top. The spinning of the blade spins the axle also to get a nice even cut. Just make you stay off the end of the thread and don't force it in, let gravity do the work, otherwise it'll get too hot.
Current rides:
JDM GTII Touring wagon
88 RX Turbo Full-time 4wd touring wagon project - 97 Toyota Caldina GTT (turbo 4wd WRX eater:twisted:) - Hyundai Excel Rally Car:confused::???:
Previous rides:
93 Legacy GT wagon - 85 RX Turbo Full time 4wd Touring Wagon - 85 GL AWD sedan
96 Toyota Caldina wagon

Post Reply

Return to “Conversions, Modifications and Performance Upgrades”