Dann's 92 Subaru L Series Build

haha yeah i've started, And yeah i've killed two red backs and got bitten twice by another spider, little brown buggers, while under working on it. Almost finished working on the car it's self just trying to get all the things off it so i can get rid of it and free up space 
Cheers,
Dann
http://www.ausubaru.com/forum/showthrea ... t=dann%27s
Looking for:
- LSD diff
IMG_0957 by Dann_Evans, on Flickr
Dann
http://www.ausubaru.com/forum/showthrea ... t=dann%27s
Looking for:
- LSD diff
IMG_0957 by Dann_Evans, on Flickr
-
RSR 555

- Elder Member
- Posts: 6951
- Joined: Sat Nov 10, 2007 10:42 am
- Location: ATM... stuck in Rockingham
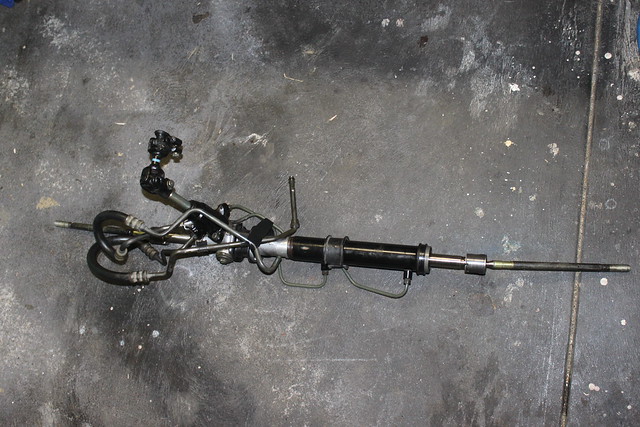
Yeah Dann.. you'll need use the Tie Rods from your L (as well as the Tie Rod Ends) onto you Liberty RackDann wrote:Pulled the power steering rack out today, need to get new boots and Lseries ends for it now,
liberty power steering rack by Dann_Evans, on Flickr
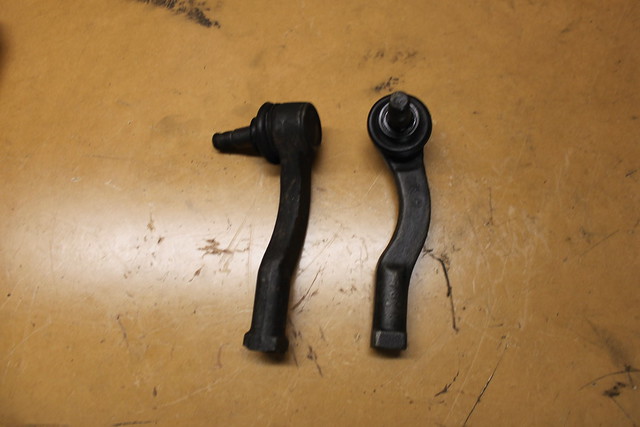
Question - Because i'm using the liberty power steering rack I know you have to change the ends, I'm pretty shore I know the part that needs to get changed but just confirming I've taken a pic of the liberty ends, so i just need to get the l series ones lyk these or is it more??
You know you are getting old when the candles on your birthday cake start to cost more than the cake itself.
RSR Performance
Home of the 'MURTAYA' in Oz
Subaru Impreza WRX based Sportscar
[SIGPIC][/SIGPIC]
Disclaimer: Not my website but hyperlink here to Subaru workshop manuals
RSR Performance
Home of the 'MURTAYA' in Oz
Subaru Impreza WRX based Sportscar
[SIGPIC][/SIGPIC]
Disclaimer: Not my website but hyperlink here to Subaru workshop manuals
-
d_generate

- General Member
- Posts: 1529
- Joined: Sat Feb 16, 2008 1:51 am
- Location: Back in Perth and SORing it atm.
Should get up that hill at Two Rocks with the 2.2 lol, great going.....Like my new sig pic, my fav pic of the car so far, bloody under-tray & things getting in the way & stopping me
98 Libbo with V3 STI running gear. 13.0 @ 105mph with CAI & 3" Zorst:mrgreen:
http://www.youtube.com/watch?v=TKrsF-2JS3M

http://www.youtube.com/watch?v=TKrsF-2JS3M
haha nice tom . and paul sorry i'm still new to terms even though i've had my subie for lyk a year already haha. so the tie rod ends are the little bent things right at the ends of the rack with the little ball joint on them, and the tie rods are the two rods right at the end that the tie rod ends attach on to??
just confirming thanks.
just confirming thanks.
Cheers,
Dann
http://www.ausubaru.com/forum/showthrea ... t=dann%27s
Looking for:
- LSD diff
IMG_0957 by Dann_Evans, on Flickr
Dann
http://www.ausubaru.com/forum/showthrea ... t=dann%27s
Looking for:
- LSD diff
IMG_0957 by Dann_Evans, on Flickr
-
El_Freddo

- Master Member
- Posts: 12502
- Joined: Tue Oct 04, 2005 10:00 am
- Location: Bridgewater Vic
- Contact:
Looking good dan!
You'll love the EJ!!! L series (4wd one's at least) should have come from the factory with 27 inch tyres, 3 inch lift and EJ22. A well tried and tested setup!
130,000km on the EJ is still a baby - especially for a conversion. I was lucky to find one at the wreckers with 124,xxxkm on it. Since then I've done about 40k kms with it and no major issues (touch wood).
Keep the pics coming - its what we love around here
Cheers
Bennie

Cheers bennie :P
Yeah I can't wait for the EJ, still stripping it and cleaning bit and pieces, here's a pic of it at the moment;
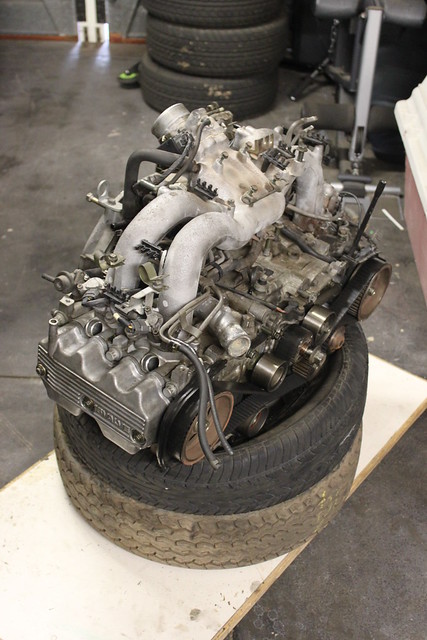
EJ22 at the moment by Dann_Evans, on Flickr
I managed to put the liberty seats in the "L" today not much work 4 new holes and they went in just fine, very happy with them, pitty they not the same colour but i'll just get sum nice seat covers for em.
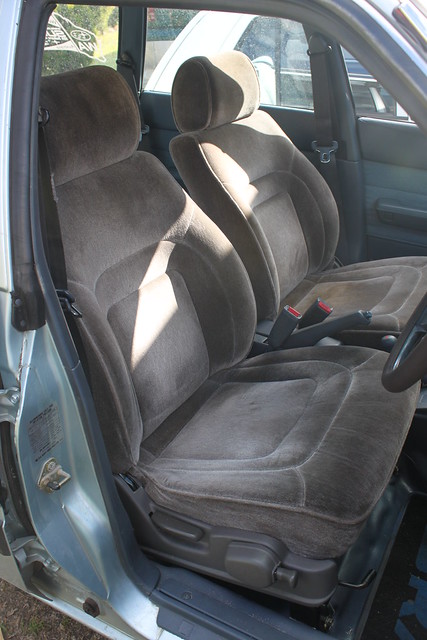
My new liberty seats by Dann_Evans, on Flickr
Yeah I can't wait for the EJ, still stripping it and cleaning bit and pieces, here's a pic of it at the moment;
EJ22 at the moment by Dann_Evans, on Flickr
I managed to put the liberty seats in the "L" today not much work 4 new holes and they went in just fine, very happy with them, pitty they not the same colour but i'll just get sum nice seat covers for em.
My new liberty seats by Dann_Evans, on Flickr
Cheers,
Dann
http://www.ausubaru.com/forum/showthrea ... t=dann%27s
Looking for:
- LSD diff
IMG_0957 by Dann_Evans, on Flickr
Dann
http://www.ausubaru.com/forum/showthrea ... t=dann%27s
Looking for:
- LSD diff
IMG_0957 by Dann_Evans, on Flickr
Great work dann, were you able to keep the 'up&down' feature of the seat?
Hows the head space?
Engine looks very clean:)
Hows the head space?
Engine looks very clean:)
The project, EJ22 --->>> EJ25 Quad CAM:D touring wagon

Thinking of going on holidays on a little paradise island, Check out http://www.dodolidays.com

Thinking of going on holidays on a little paradise island, Check out http://www.dodolidays.com
Yeah I was able to keep the up and down feature, not that I need it cause when i put it up my head is touching the roof lol, But yeah it's an added featureguyph_01 wrote:Great work dann, were you able to keep the 'up&down' feature of the seat?
Hows the head space?
Engine looks very clean:)
Cheers,
Dann
http://www.ausubaru.com/forum/showthrea ... t=dann%27s
Looking for:
- LSD diff
IMG_0957 by Dann_Evans, on Flickr
Dann
http://www.ausubaru.com/forum/showthrea ... t=dann%27s
Looking for:
- LSD diff
IMG_0957 by Dann_Evans, on Flickr
-
RSR 555
- Elder Member
- Posts: 6951
- Joined: Sat Nov 10, 2007 10:42 am
- Location: ATM... stuck in Rockingham
Nps Dann.. this first pic is of the sterring rack with the Liberty Tie Rods attached (which you'll need to swap for the L.Series ones)Dann wrote:haha nice tom
just confirming thanks.
These are the L.Series Tie Rod Ends that will also be neededDann wrote:
Dann wrote:
+1.. should look sweet in the engine bayguyph_01 wrote:Engine looks very clean:)
You know you are getting old when the candles on your birthday cake start to cost more than the cake itself.
RSR Performance
Home of the 'MURTAYA' in Oz
Subaru Impreza WRX based Sportscar
[SIGPIC][/SIGPIC]
Disclaimer: Not my website but hyperlink here to Subaru workshop manuals
RSR Performance
Home of the 'MURTAYA' in Oz
Subaru Impreza WRX based Sportscar
[SIGPIC][/SIGPIC]
Disclaimer: Not my website but hyperlink here to Subaru workshop manuals
ok awsum one more thing i've got sorted
Does the tie rods have to be from an L series with power steering to??
hows the rest of the kit going paul have you heard from the guy yet??
Does the tie rods have to be from an L series with power steering to??
hows the rest of the kit going paul have you heard from the guy yet??
Cheers,
Dann
http://www.ausubaru.com/forum/showthrea ... t=dann%27s
Looking for:
- LSD diff
IMG_0957 by Dann_Evans, on Flickr
Dann
http://www.ausubaru.com/forum/showthrea ... t=dann%27s
Looking for:
- LSD diff
IMG_0957 by Dann_Evans, on Flickr
-
angosurf_81@hotmail.com
- Junior Member
- Posts: 32
- Joined: Fri Aug 20, 2010 3:22 pm
- Location: L series Western Australia

6X9 in the rear
hey Dann,
Just curious about thos 6X9 in the rear, i put 6's cause i didnt think i could get 6X9's in. Can you put a pic up of them or something. Cheers mate.
Just curious about thos 6X9 in the rear, i put 6's cause i didnt think i could get 6X9's in. Can you put a pic up of them or something. Cheers mate.
yeah no worries mate. heres a pic of them mounted and how it looks, I wanted to put them long ways but they ended up being to low down so i mounted them upright, also cause I didn't wanna cut anything.angosurf_81@hotmail.com wrote:hey Dann,
Just curious about thos 6X9 in the rear, i put 6's cause i didnt think i could get 6X9's in. Can you put a pic up of them or something. Cheers mate.
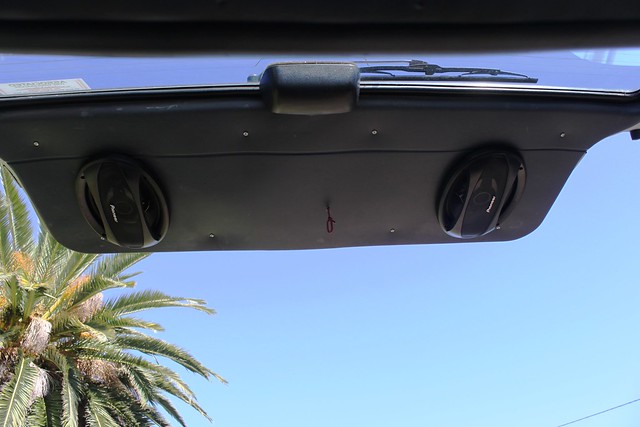
6/9 speakers mounted in rear door by Dann_Evans, on Flickr
The next pic shows the backside of them on the panel, I put thin MDF on the back to take up the room inbetween the panel and the door, to stop vibration. And to strengthen it.
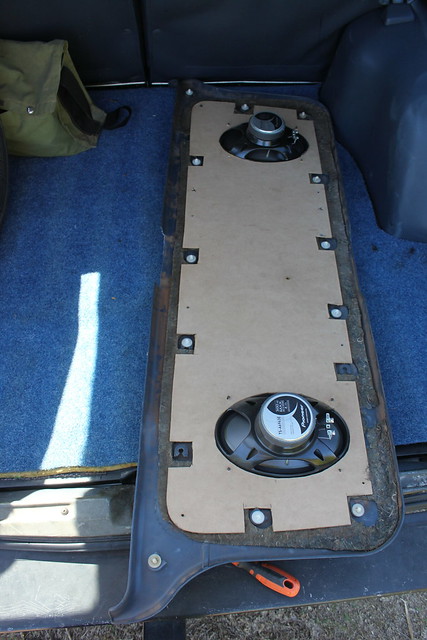
rear side of the 6/9's by Dann_Evans, on Flickr
And the third pic is of the in side of the door i had some sound proofing lying around so i put that in aswell, (really does help) and if you can see i have taped all the wires and anything that can rattle down so if you tap the back door you can't hear all the rattle from wires and shit.
I also had to screw the panel on because if I didn't, the speakers are so heavy when you close the door they fall off.
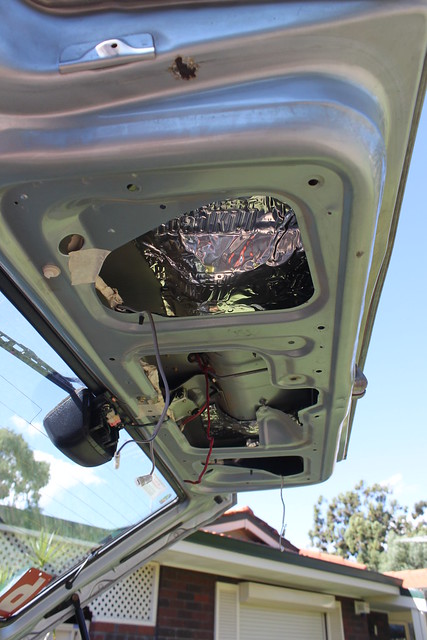
inner door contents by Dann_Evans, on Flickr
Hope that helps abit
Cheers,
Dann
http://www.ausubaru.com/forum/showthrea ... t=dann%27s
Looking for:
- LSD diff
IMG_0957 by Dann_Evans, on Flickr
Dann
http://www.ausubaru.com/forum/showthrea ... t=dann%27s
Looking for:
- LSD diff
IMG_0957 by Dann_Evans, on Flickr
-
RSR 555
- Elder Member
- Posts: 6951
- Joined: Sat Nov 10, 2007 10:42 am
- Location: ATM... stuck in Rockingham
Yep.. if you're using the Liberty Steering Rack in the L.Series Engine Crossmember then you'll need to use both the Tie Rods and the Tie Rod Ends from the L.Series Steering Rack and fit them to your Liberty Steering Rack. If you're going to use the Liberty Engine Crossmember in the L.Series (and convert to 5 stud), then you can use the complete Liberty Steering Rack without modifying (so hang on to your Liberty Tie Rods and Ends)Dann wrote:ok awsum one more thing i've got sorted
Does the tie rods have to be from an L series with power steering to??
hows the rest of the kit going paul have you heard from the guy yet??
You know you are getting old when the candles on your birthday cake start to cost more than the cake itself.
RSR Performance
Home of the 'MURTAYA' in Oz
Subaru Impreza WRX based Sportscar
[SIGPIC][/SIGPIC]
Disclaimer: Not my website but hyperlink here to Subaru workshop manuals
RSR Performance
Home of the 'MURTAYA' in Oz
Subaru Impreza WRX based Sportscar
[SIGPIC][/SIGPIC]
Disclaimer: Not my website but hyperlink here to Subaru workshop manuals
-
RSR 555
- Elder Member
- Posts: 6951
- Joined: Sat Nov 10, 2007 10:42 am
- Location: ATM... stuck in Rockingham
Hey Dann.. guess what I have for you???
You know you are getting old when the candles on your birthday cake start to cost more than the cake itself.
RSR Performance
Home of the 'MURTAYA' in Oz
Subaru Impreza WRX based Sportscar
[SIGPIC][/SIGPIC]
Disclaimer: Not my website but hyperlink here to Subaru workshop manuals
RSR Performance
Home of the 'MURTAYA' in Oz
Subaru Impreza WRX based Sportscar
[SIGPIC][/SIGPIC]
Disclaimer: Not my website but hyperlink here to Subaru workshop manuals
Yay. Might pop down next week sumtime:).
Cheers,
Dann
http://www.ausubaru.com/forum/showthrea ... t=dann%27s
Looking for:
- LSD diff
IMG_0957 by Dann_Evans, on Flickr
Dann
http://www.ausubaru.com/forum/showthrea ... t=dann%27s
Looking for:
- LSD diff
IMG_0957 by Dann_Evans, on Flickr
-
RSR 555
- Elder Member
- Posts: 6951
- Joined: Sat Nov 10, 2007 10:42 am
- Location: ATM... stuck in Rockingham
haha.. sorry Bennie Top Secret Stuff.. LOLEl_Freddo wrote:Ok I'm intrigued!
Bennie
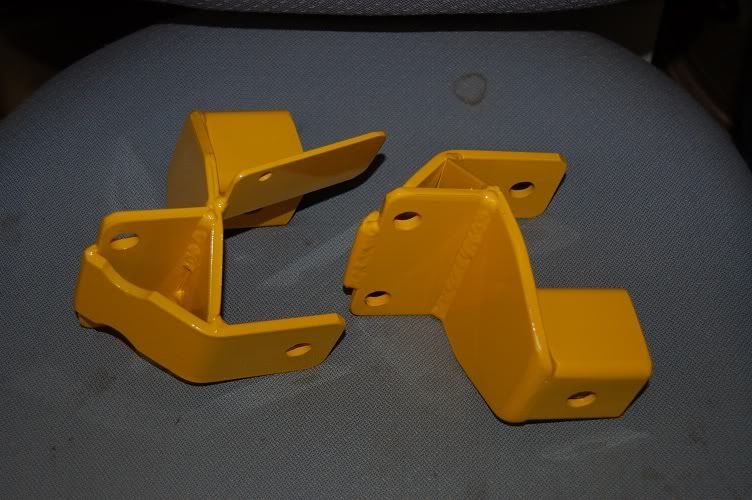
Nah.. just kidding, these are the part B to Dann's lift kit, these brackets are for the rear K frame. It's designed to stop the flex on the front bushing. Part C and hopefully the final to the kit is the rear bump stop mods but we'll need to wait to see what sort of wheel travel the car has after Dann does the rear strut conversion like you did to Suby Ruby (unless you know off hand?).
No probs Dann.. will need to be Monday or Tuesday as it's that time again.Dann wrote:Yay. Might pop down next week sumtime:).
You know you are getting old when the candles on your birthday cake start to cost more than the cake itself.
RSR Performance
Home of the 'MURTAYA' in Oz
Subaru Impreza WRX based Sportscar
[SIGPIC][/SIGPIC]
Disclaimer: Not my website but hyperlink here to Subaru workshop manuals
RSR Performance
Home of the 'MURTAYA' in Oz
Subaru Impreza WRX based Sportscar
[SIGPIC][/SIGPIC]
Disclaimer: Not my website but hyperlink here to Subaru workshop manuals
Hahaha, yeah this will definitely stop the 1cm flex that was seen on my car:D
Man, WA is up there with the design of new innovative parts for our subi's:p
Man, WA is up there with the design of new innovative parts for our subi's:p
The project, EJ22 --->>> EJ25 Quad CAM:D touring wagon
Thinking of going on holidays on a little paradise island, Check out http://www.dodolidays.com
Thinking of going on holidays on a little paradise island, Check out http://www.dodolidays.com

liberty seats into the L series
hey john the way I did it was that I used the original top hole(front of the seat holes) and drilled the appropriate hole corresponding to the bottom of the l series seat tracks, As everyone says pictures speak a thousand words, the picture below is of the difference between the liberty and the l series seat tracks (liberty-right with the red dots and L series- left with the green dots)Wagonman wrote:Hey,
With those Lib seats did you just use the same frames and drill four new holes??? Im asking cos im doing the same to mine 'shortly' (sometime this year)..
this is the passenger side (the easy side).
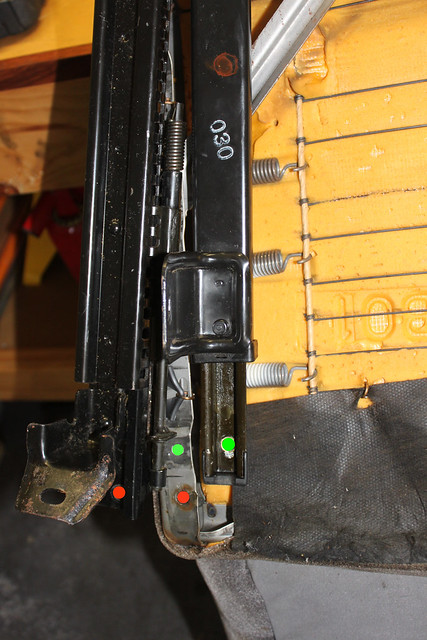
libertyl series seat runner by Dann_Evans, on Flickr
The second pic is with both L series tracks installed and the old hole at the bottom in red.

l series seat runner in place by Dann_Evans, on Flickr
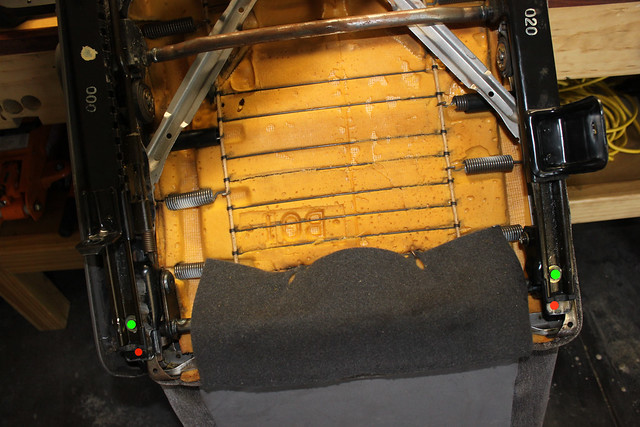
For the driver seat it's abit different because you have the raise and lower mechanism, the top (front of the seat) bolts are easy they just come out but the bottom is different because you need the bracket that swivels when you raise and lower the seat, the image bellow shows the bracket that you need, I had already taken it off so i just used paint to show you the position it was in. With this bracket it is spot welded onto the track at the bottom and like crimpt at the top, just cut the little crimpt knob off which should pop out with a metal punch or sumthing similar though a big hole you can see in the picture, next you just need to separate the two pieces, I used a chisel to get down to the spot weld and a hacksaw to cut it, you can pretty much do it what ever way you want you just need to get that bracket from both sides.
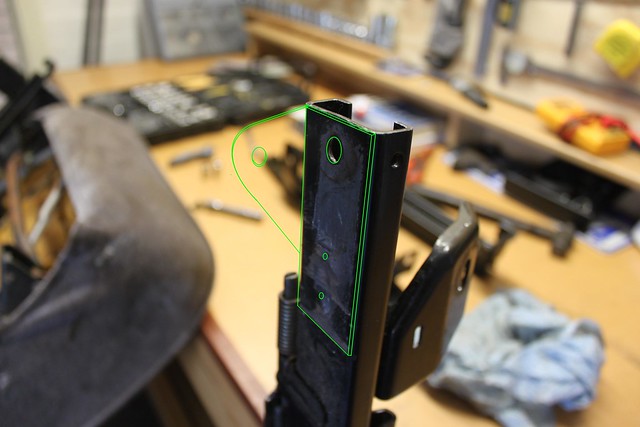
bracket liberty mount by Dann_Evans, on Flickr
The next image is of the L series track bolted at the top (front of the seat) and the bracket you cut off installed in the original position on the seat and how it all lines up, the red holes are the crimped knob that held the liberty track on and the green hole are the new holes to attach the L series track on. I'm pretty shore that i swapped the too brackets around so i put the left one on the right and the right one on the left otherwise the tracks don't line up, if you look in this image and the last one you can see how i have positioned them, the bigger one is on the left and the smaller one is on the right. mabey i didn't swap them?? haha forgot lol but you should see there only one way to put them on.
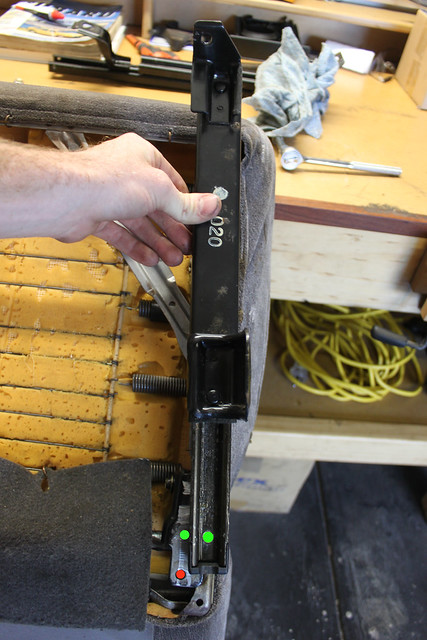
old and new hole l series bracket by Dann_Evans, on Flickr
The last image is of the L series tracks installed on the drivers side the red holes are the old original mounting points and the green ones are the new holes with a small bolt holding it, The bolt can't be too big otherwise it will interfere when you put the seat down.
liberty car with l series runners by Dann_Evans, on Flickr
Ok well that my way of putting liberty seats in an L series, I know other people have welded things and cut things but I found this way to be pretty straight forward
Cheers,
Dann
http://www.ausubaru.com/forum/showthrea ... t=dann%27s
Looking for:
- LSD diff
IMG_0957 by Dann_Evans, on Flickr
Dann
http://www.ausubaru.com/forum/showthrea ... t=dann%27s
Looking for:
- LSD diff
IMG_0957 by Dann_Evans, on Flickr