As most are aware there have been several L series builds detailed on the board recently. I have not been detailing mine as I have not always got the time to type out the details, some times I barely find the time to work on the car, and given that this project has just been an RX resto as apposed to an EJing most of the info is not as highly sort after (cause lets face its it’s not hugely difficult compared to some of the projects).
As some of you have been interested in this project and its progress, and I do not have the time to e-mail people - I am personally sorry about that. As a result I am attempting to “get with the times” and started playing with an on-line photo account.
Hopefully this will provide you with some of the info your after and you’ll enjoy the few pictures I have taken. That is when I remember to take them... Actually, I am often way to dirty to handle the camera so pictures are often an after thought with this project. As I plan to keep the final product there is not a great need for them either really – that’s my thoughts about it anyway.
Anyway for those of you that are interested the following link (http://s254.photobucket.com/albums/hh110/Diane-Palmer/) contains some pictures of the RX build and some 4WDing shots. Final note that I did not want to duplicate pictures that appear in others on-line accounts therefore most of the pictures are of us at this stage – some of the 4WDing shots some of you may have seen before however a majority of them you would not have been previously seen.
Hope the link works and Enjoy.
BlackMale Pictures
BlackMale Pictures
Toyota 105 Series LandCruiser (that nobody on here wants to really hear about).
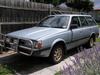
RX Touring Wagon - fitted out for 4WDing (currently collecting dust).
RX Project - will be road only at this stage (and currently taking way to long to finish).
RX Touring Wagon - fitted out for 4WDing (currently collecting dust).
RX Project - will be road only at this stage (and currently taking way to long to finish).

looking good mate. need to lift the leone tho 
l
l
[SIGPIC][/SIGPIC]
VER7 STI (FOR SALE) & RIP EJ22 AWD LEONE
PIX @ www.webshots.com/user/4muff
I hate to advocate drugs, alcohol, violence, or insanity to anyone, but they've always worked for me.
Hunter S. Thompson
http://www.brainyquote.com/quotes/quote ... 02861.htmlI hate to advocate drugs, alcohol, violence, or insanity to anyone, but they've always worked for me.
Hunter S. Thompson


Wow its great to finally see what you've been doing with these cars!
Wish I had enough time on mine to go the extra mile like you have and clean/rustproof/paint the underbody and under the carpet etc...I guess I will get to that eventually.
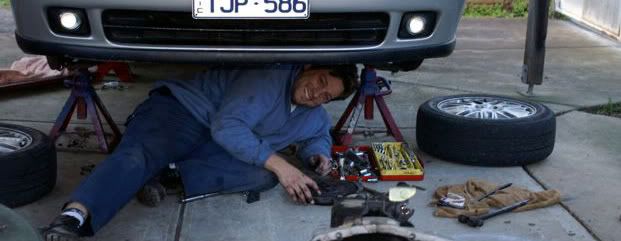
Love the stacks of newspaper as make-shift ramps
Wish I had enough time on mine to go the extra mile like you have and clean/rustproof/paint the underbody and under the carpet etc...I guess I will get to that eventually.
Love the stacks of newspaper as make-shift ramps
EZ30 L series - Monsterwagon
https://www.ausubaru.com.au/viewtopic.php?f=71&t=26163
https://www.ausubaru.com.au/viewtopic.php?f=71&t=26163
-
stamp_licker

- General Member
- Posts: 1066
- Joined: Wed Oct 05, 2005 10:00 am
- Location: Kallangur.Bris North
Yer sorry its been a while. Like most projects i suppose to be finished and its taken WAY longer then initially planned.
Knew that i was not ever going to go back and do it so i decided to just do it 1st time round take longer, all new bits and hopefully i never have to put a spanner on it again, other then servicing, for a long long time anyway. You'll be please to know i ALMOST EJ turbo’ed it however decided against it for now as i have SO many dam EA turbo parts. Should the engine go Ka-bang there's a very good chance she'll be EJ'ed.AndrewT wrote:Wish I had enough time on mine to go the extra mile like you have and clean/rustproof/paint the underbody and under the carpet etc...I guess I will get to that eventually.
Yer i was using the 2 set of jack stands on the wreck and could not be assed getting out the car ramps... also liked the extra ground clearance given its been lowered already - there's not a great deal of space under her if she's not on the papers.AndrewT wrote:Love the stacks of newspaper as make-shift ramps
Yes, its a great shirt - there are two of them, 1st is with my sister in Bris (she works for a Nutrition team with kids) and the 2nd with some friends in Perth who own a fruit n vegi shop. We're thinking about a new small venture as My wife made them... she actually designed and sewed up all those outfits and everything. Are you interested in a shirt (or 1 of the other outfits) S-L? I am sure we could do some fantastic deals for BYB members.stamp_licker wrote:Nice fruit and veg pics ,LOL.
Toyota 105 Series LandCruiser (that nobody on here wants to really hear about).
RX Touring Wagon - fitted out for 4WDing (currently collecting dust).
RX Project - will be road only at this stage (and currently taking way to long to finish).
RX Touring Wagon - fitted out for 4WDing (currently collecting dust).
RX Project - will be road only at this stage (and currently taking way to long to finish).

RX - Update.
Sorry its been ages on the updates, life just got WAY busy and thus project time a little limited. Anyway there are new pictures on the webshots account and I’ll attempt to post a few up on here.
There has been many parts on and then many parts back off as I have gotten the order of operation a little incorrect. I am in no way suggesting that we should all do this however I just love my new engine trolley/stand and it works a real treat – it was kindly ‘donated’ by a local shopping store… actually (before anyone starts) it went to a good home as I adopted 1 that had been neglected and abandon in some long grass.

Anyway, after the dumb ass put he thrust/throw/release bearing in (I forgot it the first time – d1ckhead!!) took me about 10 minutes to put the box back on the engine – slipped on perfect 1st shot = HUGE surprise. Now she was back together it was time to install. I decided that I was going to attempt to lift the engine/gear box as 1 entire unit and I was going to slide it under the chase and lift it up as apposed to through the top of the engine bay. As a result there was some BIG lift required
Big was not big enough. For those really interested you can play stop the difference (to see what was removed so it would fit under the front aprin).
Pic 1.

Pic 2.

Short version = looks like she’s going to fit under and ready for lifting.
Pictures got left at this point as the lifting started, then… BAM.
Har har she slipped right in and it all worked out perfectly!!!
All (air con/rad/engine/air box/etc) is in and, neat/clean and all cross members bolted up easily.


BIG THANKS has to go to my dedicated mechanics Jaffa and Craig
Yep, up until this point the ENTIRE project has been a solo mission (I suppose if anything fails then there are few people I can actually blame hey - although this is not the reason for doing it solo).
So there you have it, its been along time between drinks (read spanner swinging) and updates have been few and far between but fingers crossed I do not have to remove to many more bits, and I get some more time on it in the near future.
Cheers (and sorry about the size of the pics).
There has been many parts on and then many parts back off as I have gotten the order of operation a little incorrect. I am in no way suggesting that we should all do this however I just love my new engine trolley/stand and it works a real treat – it was kindly ‘donated’ by a local shopping store… actually (before anyone starts) it went to a good home as I adopted 1 that had been neglected and abandon in some long grass.
Anyway, after the dumb ass put he thrust/throw/release bearing in (I forgot it the first time – d1ckhead!!) took me about 10 minutes to put the box back on the engine – slipped on perfect 1st shot = HUGE surprise. Now she was back together it was time to install. I decided that I was going to attempt to lift the engine/gear box as 1 entire unit and I was going to slide it under the chase and lift it up as apposed to through the top of the engine bay. As a result there was some BIG lift required
Big was not big enough. For those really interested you can play stop the difference (to see what was removed so it would fit under the front aprin).
Pic 1.
Pic 2.
Short version = looks like she’s going to fit under and ready for lifting.
Pictures got left at this point as the lifting started, then… BAM.
Har har she slipped right in and it all worked out perfectly!!!
All (air con/rad/engine/air box/etc) is in and, neat/clean and all cross members bolted up easily.
BIG THANKS has to go to my dedicated mechanics Jaffa and Craig
Yep, up until this point the ENTIRE project has been a solo mission (I suppose if anything fails then there are few people I can actually blame hey - although this is not the reason for doing it solo).
So there you have it, its been along time between drinks (read spanner swinging) and updates have been few and far between but fingers crossed I do not have to remove to many more bits, and I get some more time on it in the near future.
Cheers (and sorry about the size of the pics).
Toyota 105 Series LandCruiser (that nobody on here wants to really hear about).
RX Touring Wagon - fitted out for 4WDing (currently collecting dust).
RX Project - will be road only at this stage (and currently taking way to long to finish).
RX Touring Wagon - fitted out for 4WDing (currently collecting dust).
RX Project - will be road only at this stage (and currently taking way to long to finish).
Minor update
Finally getting a chance to put a few things in (as opposed to removing) just hope i can remember where is all goes.
The girls spotted me fiddling around with bits and decided that they lie this minor modification to the rear door handles.
Its looks ok and worked - you can still wind the window up/down just fine and does not interfere with the seating position and was actually pretty comfortable to lean on/against, so at this stage it looks like it will remain

Covered the rear speaker boxes in carpet and mounted the 6x9's to it (as you can see i have forgotten to wipe the chalk off).

They do not fit on the rear shelf as i had hoped and i think that this is partly due to a minor miscalculation (by yours truly). When i first measured the speakers and the space i do not think i had the plastic shroud thing on top of the speaker (bugger) i then also decided to re-carpeted the rear shelf itself (another few mil i did not factor in) so its all VERY snug however they do still fit up there (they are just in the centre of the shelf now) it should do the job.
Sorry i though that i had a picture of this. I must not have uploaded it so i'll have a look for it on the home pc later.
Also for those interested i am going to attempt to renew the plastic cooling system. I found this sticky foam strip stuff and decided that it would be idea to attempt to replace all the warn out form surrounding the cooling vents etc in an effort to make the air go to where it needs to go and does not just leak/seep out. Here is an attempt to capture 1 of the before and after shots. I tell ya its more difficult to put back together with a few extra mil of foam in there (oh and i did clean off all the old tape and crap first before placing the new stuff on).

Just need to order the carpet now so i can put the rest together.
Actually the next job - i have been avoiding. Its the heater core and engine timing. Once i have done this dash goes back in and time for a test fire - i do not want to put all the interior in only to discover i got some wiring wrong. At this point i may need to call in a favor and get our local tech guru to oversee - hint hint
and this next step may not occur until after the new year we'll see.
Finally getting a chance to put a few things in (as opposed to removing) just hope i can remember where is all goes.
The girls spotted me fiddling around with bits and decided that they lie this minor modification to the rear door handles.
Its looks ok and worked - you can still wind the window up/down just fine and does not interfere with the seating position and was actually pretty comfortable to lean on/against, so at this stage it looks like it will remain
Covered the rear speaker boxes in carpet and mounted the 6x9's to it (as you can see i have forgotten to wipe the chalk off).
They do not fit on the rear shelf as i had hoped and i think that this is partly due to a minor miscalculation (by yours truly). When i first measured the speakers and the space i do not think i had the plastic shroud thing on top of the speaker (bugger) i then also decided to re-carpeted the rear shelf itself (another few mil i did not factor in) so its all VERY snug however they do still fit up there (they are just in the centre of the shelf now) it should do the job.
Sorry i though that i had a picture of this. I must not have uploaded it so i'll have a look for it on the home pc later.
Also for those interested i am going to attempt to renew the plastic cooling system. I found this sticky foam strip stuff and decided that it would be idea to attempt to replace all the warn out form surrounding the cooling vents etc in an effort to make the air go to where it needs to go and does not just leak/seep out. Here is an attempt to capture 1 of the before and after shots. I tell ya its more difficult to put back together with a few extra mil of foam in there (oh and i did clean off all the old tape and crap first before placing the new stuff on).
Just need to order the carpet now so i can put the rest together.
Actually the next job - i have been avoiding. Its the heater core and engine timing. Once i have done this dash goes back in and time for a test fire - i do not want to put all the interior in only to discover i got some wiring wrong. At this point i may need to call in a favor and get our local tech guru to oversee - hint hint
and this next step may not occur until after the new year
Toyota 105 Series LandCruiser (that nobody on here wants to really hear about).
RX Touring Wagon - fitted out for 4WDing (currently collecting dust).
RX Project - will be road only at this stage (and currently taking way to long to finish).
RX Touring Wagon - fitted out for 4WDing (currently collecting dust).
RX Project - will be road only at this stage (and currently taking way to long to finish).
-
AlpineRaven

- Senior Member
- Posts: 3682
- Joined: Wed Oct 19, 2005 10:00 am
- Location: Melbourne, Victoria, Australia.
Looks good mate, When you fitted the engine in from under the car - was it easier for you rather from top? How did you lift the engine up while under the car?
Cheers
AP
Cheers
AP
Subarus that I have/had:
1995 Liberty "Rallye" - 5MT AWD, LSD - *written off 25/8/06 in towing accident.
1996 Liberty Wagon - SkiFX AWD 5MT D/R, Lifted.. Outback Sway Bar, 1.59:1 Low Gearing see thread: 1.59:1 in EJ Box Page
Sold at 385,000kms in July 2011.
2007 Liberty BP Wagon, 2.5i automatic
1995 Liberty "Rallye" - 5MT AWD, LSD - *written off 25/8/06 in towing accident.
1996 Liberty Wagon - SkiFX AWD 5MT D/R, Lifted.. Outback Sway Bar, 1.59:1 Low Gearing see thread: 1.59:1 in EJ Box Page
Sold at 385,000kms in July 2011.
2007 Liberty BP Wagon, 2.5i automatic
AlpineRaven In terms of the lifting it was easy, I just used the engine crane on the engine and decided to place a trolley jack under the gear box to assist bring the back of the box up a little more square. I already had the engine cross member bolts hanging through and the cross member slid directly onto the RHS bolts without any adjustment and to locate the LHS bolts i just needed to push the engine back about 3-4mm and it also slid straight on as well. Box was not an issue either as the selectors were where they needed to be and again all bolts and cv’s slid in as they should (although I am going to need to take the cv’s off again as I need to replace the boot however can not undo the stupid locking nuts).
This was probably the easiest engine conversion/transplant I have ever done – this includes all the times I have done it with fellow board members, sorry guys not offence intended however it’s the truth. Already having the engine and gear box together and bolted to the engine cross member made it so simple to line everything up and I felt so much better about not having the engine so high off the ground swinging around. I really did not think that I was going to be able to lift it in by myself and was going to need to make a few calls for assistance. Personally, if I had the option would do it this way again without hesitation.
Sorry the response is a little long – i am still amazed that it actually worked so simple.
Now if only I could get the dam drive shaft (sorry mental blank) to locate back into the back of the gear box!?!?
Its got me buggered the stubborn (insert own profanities) piece of crap… make me wish I had of fitted this part before lifting as well .
Toyota 105 Series LandCruiser (that nobody on here wants to really hear about).
RX Touring Wagon - fitted out for 4WDing (currently collecting dust).
RX Project - will be road only at this stage (and currently taking way to long to finish).
RX Touring Wagon - fitted out for 4WDing (currently collecting dust).
RX Project - will be road only at this stage (and currently taking way to long to finish).
-
AlpineRaven
- Senior Member
- Posts: 3682
- Joined: Wed Oct 19, 2005 10:00 am
- Location: Melbourne, Victoria, Australia.
Interesting.. Fair enough, just wanna know your opinion.BlackMale wrote:AlpineRaven In terms of the lifting it was easy, I just used the engine crane on the engine and decided to place a trolley jack under the gear box to assist bring the back of the box up a little more square. I already had the engine cross member bolts hanging through and the cross member slid directly onto the RHS bolts without any adjustment and to locate the LHS bolts i just needed to push the engine back about 3-4mm and it also slid straight on as well. Box was not an issue either as the selectors were where they needed to be and again all bolts and cvs slid in as they should (although I am going to need to take the cvs off again as I need to replace the boot however can not undo the stupid locking nuts).
This was probably the easiest engine conversion/transplant I have ever done this includes all the times I have done it with fellow board members, sorry guys not offence intended however its the truth. Already having the engine and gear box together and bolted to the engine cross member made it so simple to line everything up and I felt so much better about not having the engine so high off the ground swinging around. I really did not think that I was going to be able to lift it in by myself and was going to need to make a few calls for assistance. Personally, if I had the option would do it this way again without hesitation.
Sorry the response is a little long i am still amazed that it actually worked so simple.
Now if only I could get the dam drive shaft (sorry mental blank) to locate back into the back of the gear box!?!?
Its got me buggered the stubborn (insert own profanities) piece of crap make me wish I had of fitted this part before lifting as well .
I've done countless of times removing engines with/without gearbox attached.. I'm thinking abt doing that kind of thing next time when i do that, problem is the clearance!
Cheers
AP
Subarus that I have/had:
1995 Liberty "Rallye" - 5MT AWD, LSD - *written off 25/8/06 in towing accident.
1996 Liberty Wagon - SkiFX AWD 5MT D/R, Lifted.. Outback Sway Bar, 1.59:1 Low Gearing see thread: 1.59:1 in EJ Box Page
Sold at 385,000kms in July 2011.
2007 Liberty BP Wagon, 2.5i automatic
1995 Liberty "Rallye" - 5MT AWD, LSD - *written off 25/8/06 in towing accident.
1996 Liberty Wagon - SkiFX AWD 5MT D/R, Lifted.. Outback Sway Bar, 1.59:1 Low Gearing see thread: 1.59:1 in EJ Box Page
Sold at 385,000kms in July 2011.
2007 Liberty BP Wagon, 2.5i automatic
Here are the pictures for those interested. As i said the end result is not at all what i was looking for however it fits, should work and most importantly i really can not be buggered changing it as it will not really effect the overall use of it.BlackMale wrote:Minor update...
Sorry i though that i had a picture of this. I must not have uploaded it so i'll have a look for it on the home pc later.
Pic from inside.

Pic from outside.

You'll have to wait and see what i've got planned for the unused speaker holes. Hint its not 6" sub's.
Toyota 105 Series LandCruiser (that nobody on here wants to really hear about).
RX Touring Wagon - fitted out for 4WDing (currently collecting dust).
RX Project - will be road only at this stage (and currently taking way to long to finish).
RX Touring Wagon - fitted out for 4WDing (currently collecting dust).
RX Project - will be road only at this stage (and currently taking way to long to finish).
Not sure what i was so anxious about. Heat core was an easy change over, took me about an hour max on the floor infront of the TV. For those with a real keen eye you'll notice a bit of the new foam i replaced hope the extra effort makes a difference to the air gove there will be no/less chance of leaks

Toyota 105 Series LandCruiser (that nobody on here wants to really hear about).
RX Touring Wagon - fitted out for 4WDing (currently collecting dust).
RX Project - will be road only at this stage (and currently taking way to long to finish).
RX Touring Wagon - fitted out for 4WDing (currently collecting dust).
RX Project - will be road only at this stage (and currently taking way to long to finish).
Minor update. Slow progress (due to trips to the east n stuff) however these are ready to be welded in.
Centre Bearing Brackets.

All of these parts have been cleaned, new foam installed (where foam was required). It all fit with some stuffing around and now just awaiting the dash.
 .
.
There has been some other stuff done (finished the a/c, fuel lines, rear diff in, new carpet in boot etc) however not major and no pictures.
Cheers
Centre Bearing Brackets.
All of these parts have been cleaned, new foam installed (where foam was required). It all fit with some stuffing around and now just awaiting the dash.
.There has been some other stuff done (finished the a/c, fuel lines, rear diff in, new carpet in boot etc) however not major and no pictures.
Cheers
Toyota 105 Series LandCruiser (that nobody on here wants to really hear about).
RX Touring Wagon - fitted out for 4WDing (currently collecting dust).
RX Project - will be road only at this stage (and currently taking way to long to finish).
RX Touring Wagon - fitted out for 4WDing (currently collecting dust).
RX Project - will be road only at this stage (and currently taking way to long to finish).
(Below is copied from another thread + small additional info not WAIC related).
Well i found some time and got out in the heat to tinkered for a bit today…
The WAIC only just fits everywhere (although the pictures do not often reflect this). Took to the front with an angle grinder as I had to remove the lip from little bar that supports the grill. I have been very lucky that the pipes just have enough space to fit the hoses on and still clear the a/c lines. It’s also hard up against the bonnet latch and the RHS grill support is hard against the end tank. I was initially thinking of making up a small locating bracket for the WAIC radiator however the unit sits firmly against the a/c radiator and bonnet lactch itself – PHEW.

I was going to make up some small mounting bracket also to support the bottom of the WAIC radiator however it was so tight I was able to just drill 2 holes in the front apron and slot the WAIC radiator mounts to slot firmly into the holes – SWEET, its going well. Once the hoses are on its not going to move at all.

The WAIC unit itself I do not think will fit under the spare wheel shelf, SWK I’m going to have a look and attempt to get a picture.

Sorry the close up is not as effective as the air-to-air intake/BOV is still in place.

I have also considered where to run the lines and I have drilled through the side of the engine bay near the window washer motor on the LHS so I can run the hoses through there and along the wheel arch to the front of the car (they’ll re-enter after the battery around the LHS headlight, its all going to fit as I’ve already cheeked this out). Just need to figure out where the water pump thing is going to be mounted/located - hmmm off to look at some pictures
Also finished the centre bearing mounts. In the end i also wussed out and decided to do similar to BrennyV just to be on the safe side so i not only have the brackets i also have the longer bolt to a plate on the floor pan on the inside of the tunnel... was not going to continue to F around with it (pulling the int. and crap out again) in the future - sorry no pictures at this stage. There will not be much to see anyway as i have already coated everything paint.
Well i found some time and got out in the heat to tinkered for a bit today…
The WAIC only just fits everywhere (although the pictures do not often reflect this). Took to the front with an angle grinder as I had to remove the lip from little bar that supports the grill. I have been very lucky that the pipes just have enough space to fit the hoses on and still clear the a/c lines. It’s also hard up against the bonnet latch and the RHS grill support is hard against the end tank. I was initially thinking of making up a small locating bracket for the WAIC radiator however the unit sits firmly against the a/c radiator and bonnet lactch itself – PHEW.
I was going to make up some small mounting bracket also to support the bottom of the WAIC radiator however it was so tight I was able to just drill 2 holes in the front apron and slot the WAIC radiator mounts to slot firmly into the holes – SWEET, its going well. Once the hoses are on its not going to move at all.
The WAIC unit itself I do not think will fit under the spare wheel shelf, SWK I’m going to have a look and attempt to get a picture.
Sorry the close up is not as effective as the air-to-air intake/BOV is still in place.
I have also considered where to run the lines and I have drilled through the side of the engine bay near the window washer motor on the LHS so I can run the hoses through there and along the wheel arch to the front of the car (they’ll re-enter after the battery around the LHS headlight, its all going to fit as I’ve already cheeked this out). Just need to figure out where the water pump thing is going to be mounted/located - hmmm off to look at some pictures
Also finished the centre bearing mounts. In the end i also wussed out and decided to do similar to BrennyV just to be on the safe side so i not only have the brackets i also have the longer bolt to a plate on the floor pan on the inside of the tunnel... was not going to continue to F around with it (pulling the int. and crap out again) in the future - sorry no pictures at this stage. There will not be much to see anyway as i have already coated everything paint.
Toyota 105 Series LandCruiser (that nobody on here wants to really hear about).
RX Touring Wagon - fitted out for 4WDing (currently collecting dust).
RX Project - will be road only at this stage (and currently taking way to long to finish).
RX Touring Wagon - fitted out for 4WDing (currently collecting dust).
RX Project - will be road only at this stage (and currently taking way to long to finish).
It might fit infront of the spare wheel well where it's supposed to go if you trim the little platform down abit. The useless overhang in front of where the brake lines pass underneath. I did this in my RX and it fits beautifully. Granted mine mounts in the stock location on the EJ20 motor... but I wouldn't imagine your throttle body is situated much further towards the rear of the car than mine. I'll try to post a couple of pics up in the next couple of days when I am back near where the RX is parked.
I found the neatest and most stock looking mounting location for the water pump is up inside the LHS guard (the original mounting location on the Liberty RS). This also allowed me to run the water lines through the standard access holes in the side of the engine bay without drilling any extra holes for them at all.
I found the neatest and most stock looking mounting location for the water pump is up inside the LHS guard (the original mounting location on the Liberty RS). This also allowed me to run the water lines through the standard access holes in the side of the engine bay without drilling any extra holes for them at all.
EZ30 L series - Monsterwagon
https://www.ausubaru.com.au/viewtopic.php?f=71&t=26163
https://www.ausubaru.com.au/viewtopic.php?f=71&t=26163
Sorry for the delay I have been traveling again and therefore RX time is limited.
The WAIC is all but finished. I am not interested in discussion about how its plumed up however have posted the pictures of what it was that I have done, it’s a little different however the end results should be similar. (Now I just need to have a closer look at what Gannon has done on the bottom of the WAIC and fab up something similar as I really like that setup – only at this stage I think I’ll retain the atom bov).
Not allot to report really, and I think that you can see almost all of it by the pictures.
The front and where the 2 hoses traveled through to the pump (well you should kinda – you get the idea).

LHS Inner Guard Quarter Panel – Front Angle. As you can see (if you look real close) I had a spare fuel filter bracket so I decided to provide the pump with some additional support. Just needed to cut its length back slightly and the pump fit perfectly… did not even need to drill any new holes as it all lined up with an existing 1’s.
 .
.
LHS Inner Guard Quarter Panel – Reverse Angle. I should add that the zip ties were not required just an added insurance while I was in there.

Into the Engine Bay. Again a keen eye will be required. As stated this was the chosen path for the hoses and this picture is so you can see where it re-enters the engine bay. 1 hose under the washer motor while the other is passing under the AWD vacuum lines and fuel filter (sorry forgot to get the picture before putting these bit on). Not a single kink or unnecessary anywhere so i am a very happy BYB'er

Sorry for the “off centre shot”. However THANKS to Gannon and SWK as you info was info was correct and I was able to fit the WAIC unit in front of the spare wheel shelf. I had to remove the heat shield support bar thing and I was sweet – for what its worth I wanted to retain the heat shield so I took to it with the grinder and cut the middle section out retaining the heat shield on the RHS and the bracket for the power leads on the LHS (again with a keen eye you can just see this 1 in the shot).

There have been some other minor work done however i'll update later, however dash is ready for re-instalation (1 step at a time i just wish they were being taken a bit quicker aye... might add this to my sig i think).
Later.
The WAIC is all but finished. I am not interested in discussion about how its plumed up however have posted the pictures of what it was that I have done, it’s a little different however the end results should be similar. (Now I just need to have a closer look at what Gannon has done on the bottom of the WAIC and fab up something similar as I really like that setup – only at this stage I think I’ll retain the atom bov).
Not allot to report really, and I think that you can see almost all of it by the pictures.
The front and where the 2 hoses traveled through to the pump (well you should kinda – you get the idea).
LHS Inner Guard Quarter Panel – Front Angle. As you can see (if you look real close) I had a spare fuel filter bracket so I decided to provide the pump with some additional support. Just needed to cut its length back slightly and the pump fit perfectly… did not even need to drill any new holes as it all lined up with an existing 1’s.
. LHS Inner Guard Quarter Panel – Reverse Angle. I should add that the zip ties were not required just an added insurance while I was in there.
Into the Engine Bay. Again a keen eye will be required. As stated this was the chosen path for the hoses and this picture is so you can see where it re-enters the engine bay. 1 hose under the washer motor while the other is passing under the AWD vacuum lines and fuel filter (sorry forgot to get the picture before putting these bit on). Not a single kink or unnecessary anywhere so i am a very happy BYB'er
Sorry for the “off centre shot”. However THANKS to Gannon and SWK as you info was info was correct and I was able to fit the WAIC unit in front of the spare wheel shelf. I had to remove the heat shield support bar thing and I was sweet – for what its worth I wanted to retain the heat shield so I took to it with the grinder and cut the middle section out retaining the heat shield on the RHS and the bracket for the power leads on the LHS (again with a keen eye you can just see this 1 in the shot).
There have been some other minor work done however i'll update later, however dash is ready for re-instalation (1 step at a time i just wish they were being taken a bit quicker aye... might add this to my sig i think).
Later.
Toyota 105 Series LandCruiser (that nobody on here wants to really hear about).
RX Touring Wagon - fitted out for 4WDing (currently collecting dust).
RX Project - will be road only at this stage (and currently taking way to long to finish).
RX Touring Wagon - fitted out for 4WDing (currently collecting dust).
RX Project - will be road only at this stage (and currently taking way to long to finish).
Great progress - she's looking just like a car now. I bet you're excited about driving her soon!
EZ30 L series - Monsterwagon
https://www.ausubaru.com.au/viewtopic.php?f=71&t=26163
https://www.ausubaru.com.au/viewtopic.php?f=71&t=26163