
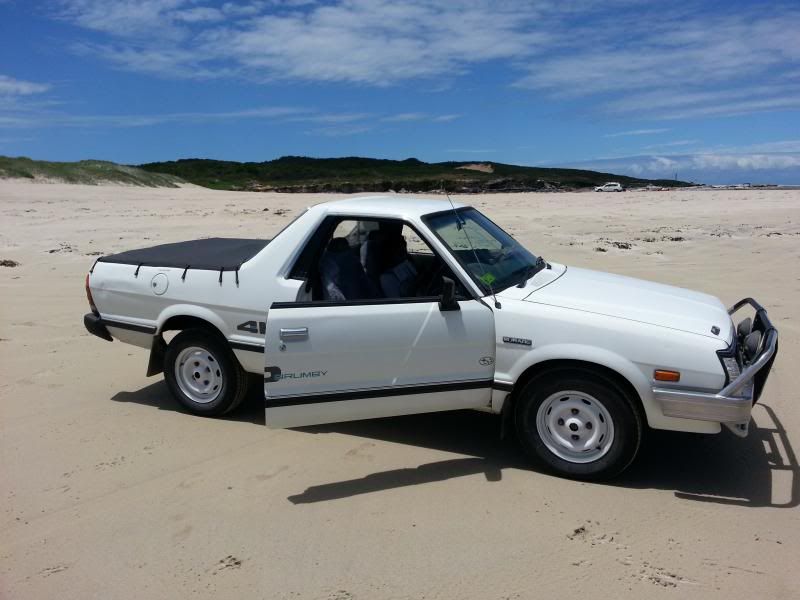
Looking real good with those wheels, yeah I like matt white too. They're great little utes, once you get it running well you won't look back.
If you have a timing light you can try setting the timing to 10 degrees btdc. I did this & run BP ultimate now, made a pretty noticeable difference.
Cheers Jake
G'day from Sydney

So the silly season persisted for longer than anticipated.... However the weber carby is now on as is the exhaust.
The exhaust actually didn't quite fit though it came off an another brumby (?? Older version?) so took it to the local pipe benders and got them to instal it for me. I also modded the exhaust mounts so it sits more, uh, snug and gives better clearance.
After spending a few hours fixing things with my weber eBay purchase (seriously nothing sold second hand on eBay works for me. Think I'm ebayilliterate) I got it on top and looking fine. The weber went in easy enough with a bit of mucking around fitting the throttle cable and adapter plate.
So bad news is... Surprisingly it is all very quiet. I hate exhaust drone as much as the next carosexual but I do like a bit of drama as the revs rise and mine is a bit library spec for the width of pipe fitted.
Good news... Under low power the fuel economy is actually a touch better. Also Under open throttle the weber does its best to let off a reasonable induction noise.
Bad news... If I open the throttle to get that noise the fuel economy becomes very impressive in the same way an f111 is impressive doing a dump and burn.
In seriousness though it isn't any faster overall but low end torque is very much improved. This is a huge bonus under towing and normal driving. Very happy.
I'll post pics of my botchy work soon
-
El_Freddo

- Master Member
- Posts: 12707
- Joined: Tue Oct 04, 2005 10:00 am
- Location: Bridgewater Vic
- Contact:
Love your use of descriptive imagery here! The mighty F1-11 - sorely missed!Pogman wrote:...Under open throttle the weber does its best to let off a reasonable induction noise.
Bad news... If I open the throttle to get that noise the fuel economy becomes very impressive in the same way an f111 is impressive doing a dump and burn.
Can't wait for the pics!
Cheers
Bennie

Thanks Bennie,
The picks... With it all out of the way and ready to go...
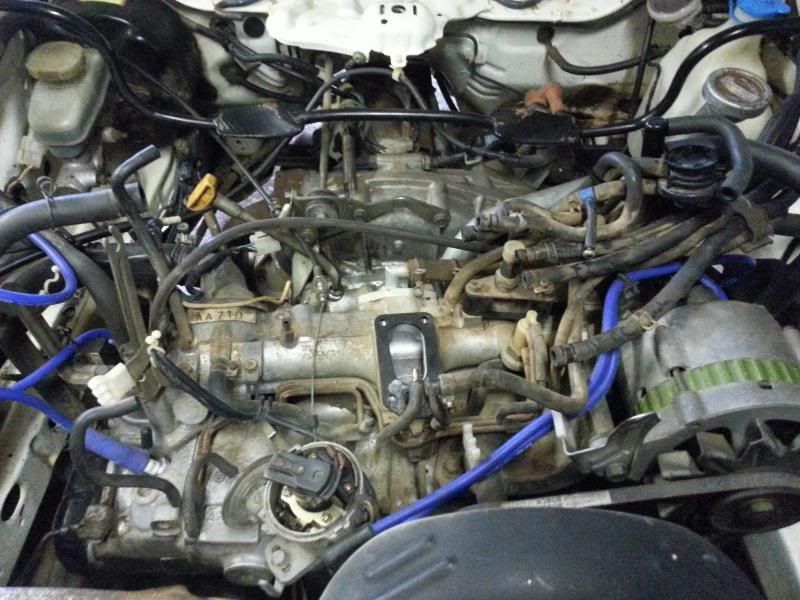
The interim result. I'm not overly proud of the throttle cable set up but it does the job and cost nothing so can't argue.
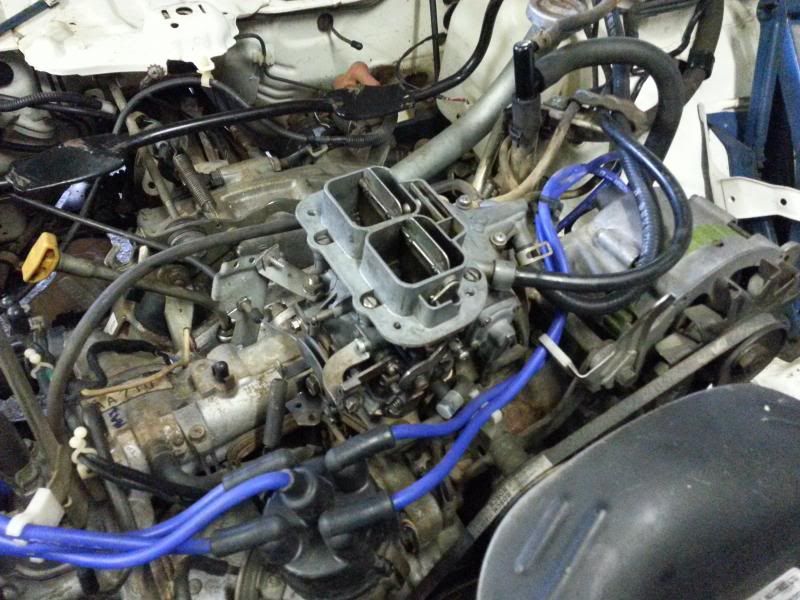
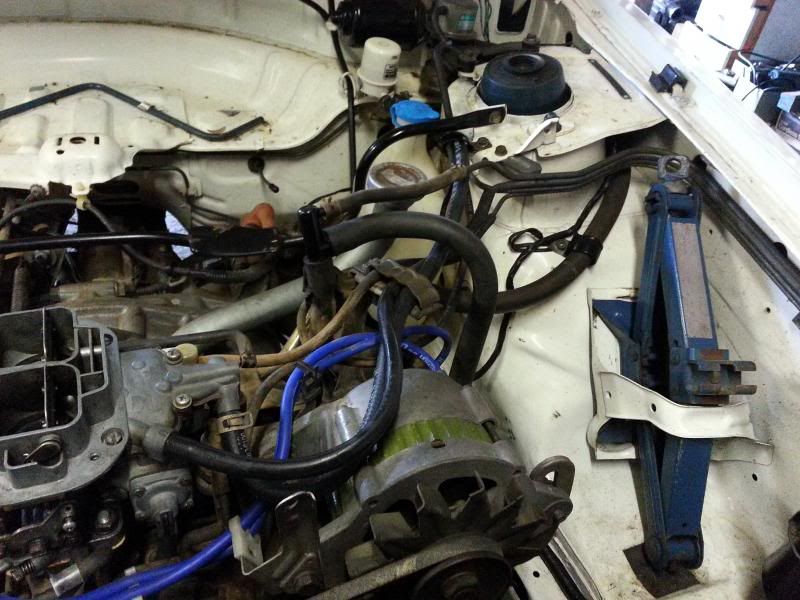
This is what I did with the emissions control setup. I had to rearrange where the different systems were getting their suck from and modify the fuel supply as the Weber didn't have a return fuel line like the Hitachi did. Anyone else have any similar ideas? this works perfectly using only the hoses from the old system however it does leave out the crank ventilation on the RH side.
With a tasty filter on top. The spare fits perfectly in it's slot so worked out well in the end.
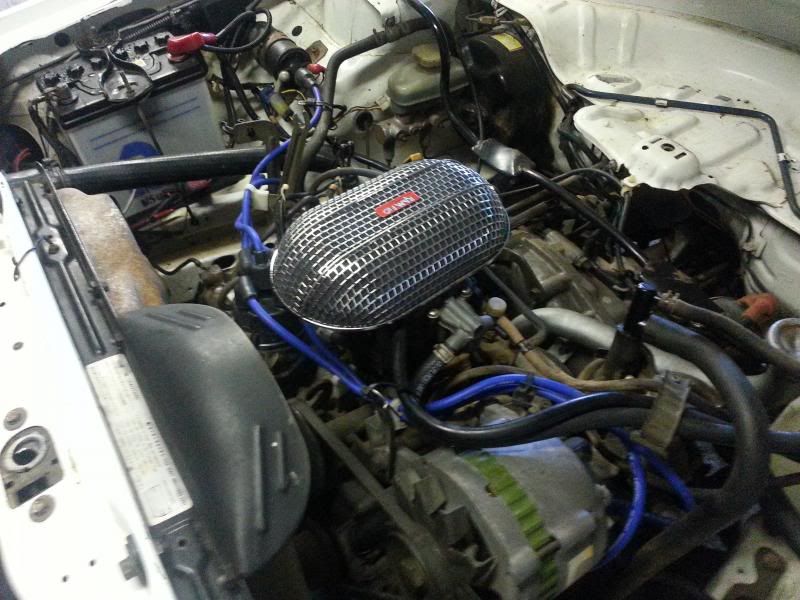
The end result... good times..
The picks... With it all out of the way and ready to go...
The interim result. I'm not overly proud of the throttle cable set up but it does the job and cost nothing so can't argue.
This is what I did with the emissions control setup. I had to rearrange where the different systems were getting their suck from and modify the fuel supply as the Weber didn't have a return fuel line like the Hitachi did. Anyone else have any similar ideas? this works perfectly using only the hoses from the old system however it does leave out the crank ventilation on the RH side.
With a tasty filter on top. The spare fits perfectly in it's slot so worked out well in the end.
The end result... good times..
-
RSR 555

- Elder Member
- Posts: 6951
- Joined: Sat Nov 10, 2007 10:42 am
- Location: ATM... stuck in Rockingham
Best times ever.. nothing bets a day on the beach driving the BrumbyPogman wrote:The end result... good times..
How do you like the new engine? with all that power
You know you are getting old when the candles on your birthday cake start to cost more than the cake itself.
RSR Performance
Home of the 'MURTAYA' in Oz
Subaru Impreza WRX based Sportscar
[SIGPIC][/SIGPIC]
Disclaimer: Not my website but hyperlink here to Subaru workshop manuals
RSR Performance
Home of the 'MURTAYA' in Oz
Subaru Impreza WRX based Sportscar
[SIGPIC][/SIGPIC]
Disclaimer: Not my website but hyperlink here to Subaru workshop manuals
Been ages since an update.
So a few little and big things completed over the last few months. Replaced the tail shaft uni joints (they rattle and chatter as the rpm increases in my case). Also picked up a used 4speed and plonked it in. My reverse was stuffed. While I was there relaced the clutch and machined the flywheel.
Also tinted the windows (tricky but my favourite upgrade thus far) and put a matt down for the back tray. I just used some rubber from aldi for 10 bucks. Bargin is the best.
Photos soon.
Saw a targa top brumby the other day. Very cool, would love to pick one up.
To do: the sound system, though auto electrics is black magic to me.
Hope your all well
-
El_Freddo
- Master Member
- Posts: 12707
- Joined: Tue Oct 04, 2005 10:00 am
- Location: Bridgewater Vic
- Contact:
Yeah I love the Targas, they just seem that little bit "extra" specialPogman wrote:Saw a targa top brumby the other day. Very cool, would love to pick one up.
If you can read a wiring diagram you should be able to sort out your sound system.Pogman wrote:To do: the sound system, though auto electrics is black magic to me.
The trick is to get the necessary wiring diagrams to work out what needs to be done. Then the second part is finding the wires you need to use for power etc in the vehicle.
Once you've got the wires needed it should come together easily.
Go and pick the dude's brain at your local Jaycar too - they can really help out with wiring techniques etc if they're worth their weight in gold. The guys in Bendigo are great, Shepp, not so
Cheers
Bennie
Thanks for the info.
I have a reasonable idea what I want to do. I have some 6x9s to build into the forward doors, some 4inch for the oem slots and an amp to power it all. Just trying to get my head around how to fit the head unit or more specifically which one will fit without spacers. I don't need CD capability.
I have a reasonable idea what I want to do. I have some 6x9s to build into the forward doors, some 4inch for the oem slots and an amp to power it all. Just trying to get my head around how to fit the head unit or more specifically which one will fit without spacers. I don't need CD capability.
I saw a Fusion head unit the other day on another forum that had a shallow mounting depth. I was going to try one out myself. I had a Pioneer unit that was mechless but was still standard length. Seems to be hard to find a short one.
http://www.fusionelectronics.com/car/pr ... ca-ml650bt
http://www.fusionelectronics.com/car/pr ... ca-ml650bt
Update
Long time no see AuSubaru! Soooo update on my ute.
So first of all, gave up on the sound system upgrade. Just couldn't be stuffed in the end.
Had a re look at the exhaust. I have been mucking around with the exhaust for ages so in the end decided to run with a 2.5 inch zorst with cat and 2 hot dogs to 2.5 pipe end. It's very oversized for a brumby but it's what I had lying around and it sounds good.
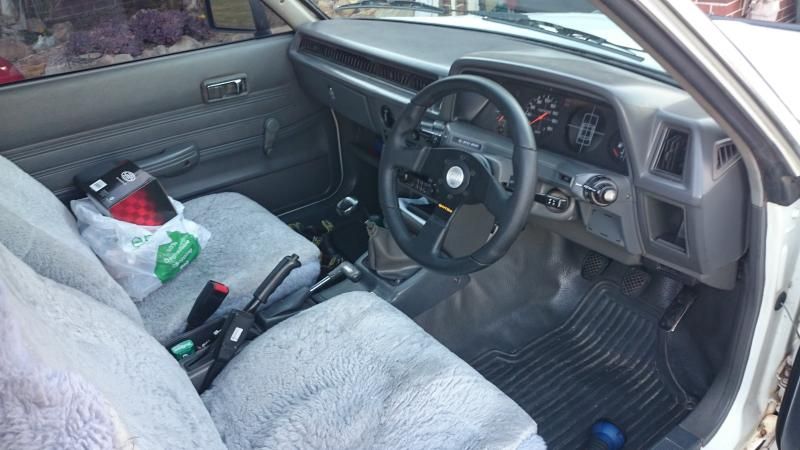
Bought a steering wheel off ebay for 20bucks and chucked it on. Makes a difference. Must be 50kws extra at least. More comfy too.
Before
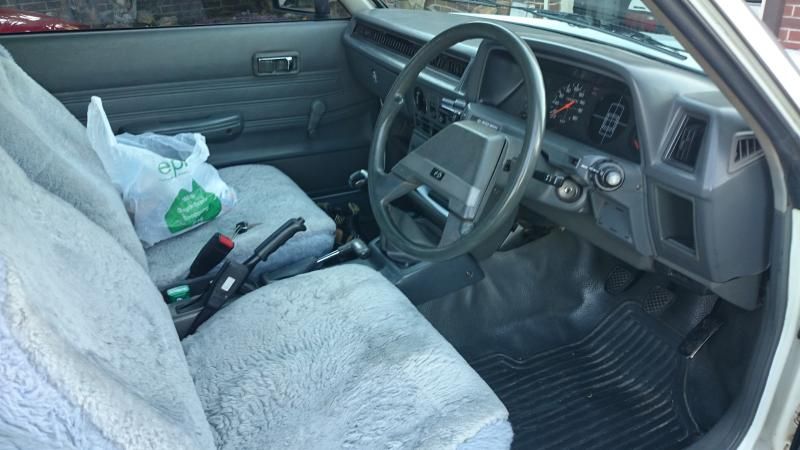
After
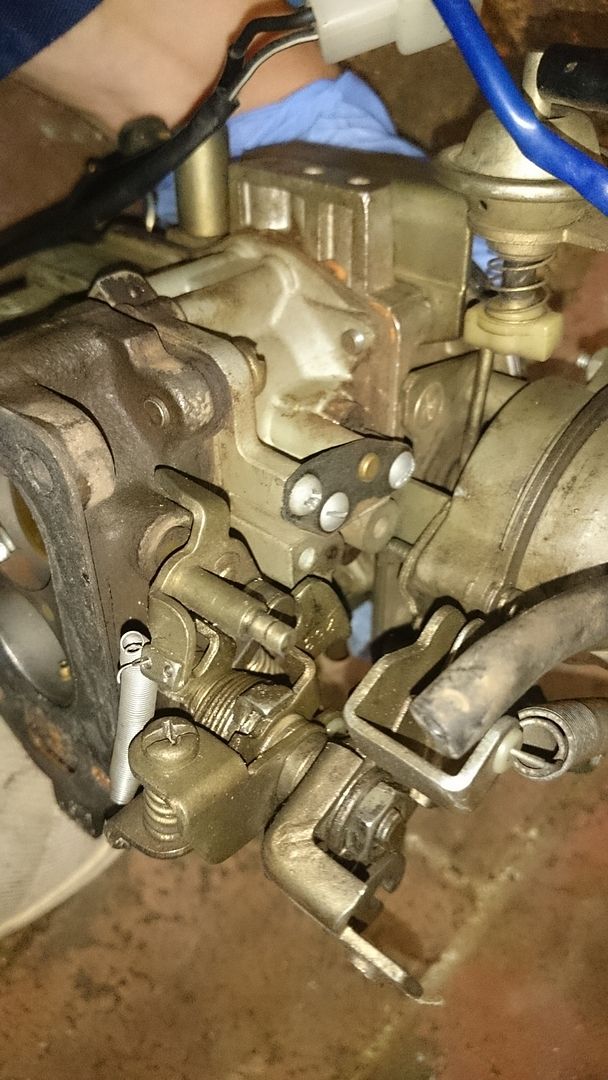
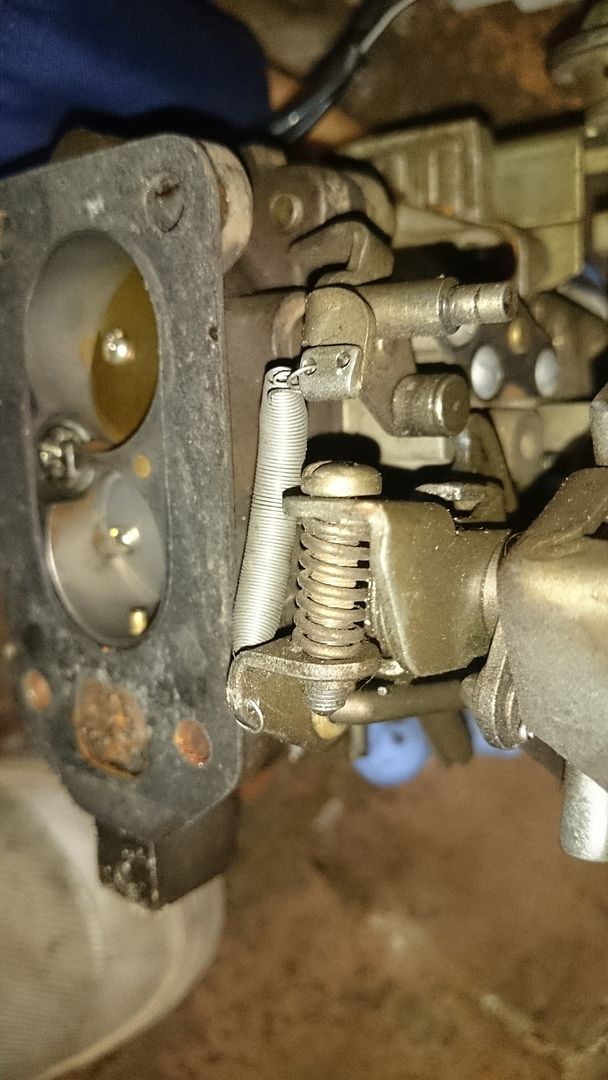
After reading the words of sage fisterbottom, I removed my Weber 32/36 and reinstalled the Hitachi but not before some work on the carby. Mostly this involved removal of the emission control parts and general clean ups of jets and passageways.
I also managed to rustle up from the shed an Hitachi carby from an old hilux model so went ahead and replaced whatever jets I could onto the stock carby.
Getting started (thanks for the manual willy)

I also linked the secondary throttle to the primary throttle directly, without the vacuum system. To allow the secondary throttle to close after you lift your foot off, I just drilled a small hole in one of the primary throttle assembly linkages and used a small spring.
I have heaps more pics of the carby dismantled and secondary throttle setup if anyone needs.
So Weber and Hitachi back to back? The weber under full power, high rpm, made good noises and was probably about the same speed but otherwise compared to the Hitachi (with the upgrades) that's where the benefits end. The Hitachi is now much faster in the normal RPM range and seems to pull loads much better. It also has an automatic choke system from the factory. I also believe (opinion) that the adapter for the Weber interrupts the airflow in a negative way. The Hitachi also burns less fuel.
Once I finished I put the stock air filter back on (because stealth...) It noticeably runs worse with the stock filter though after the upgrades so I modded the rear of the intake to allow better flow.
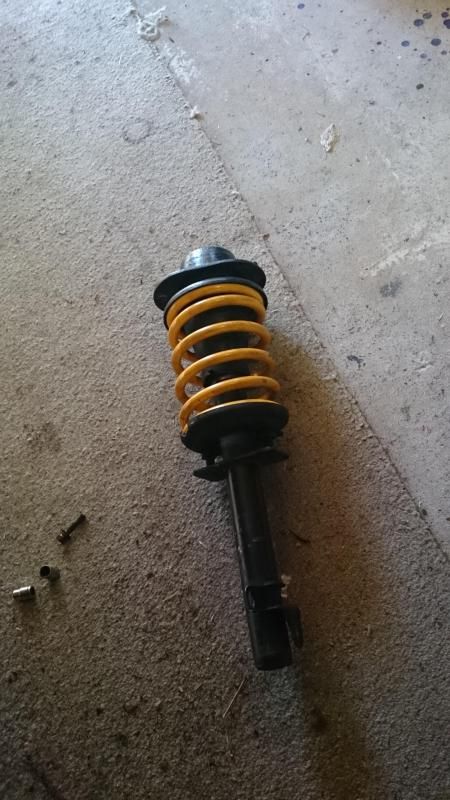
Managed to score some cheap King springs so put them on. Its not hard to do as the struts come out very easy on brumbys.
Here's a pic of the strut removed. It requires 6 bolts in total to remove plus the brake clip.
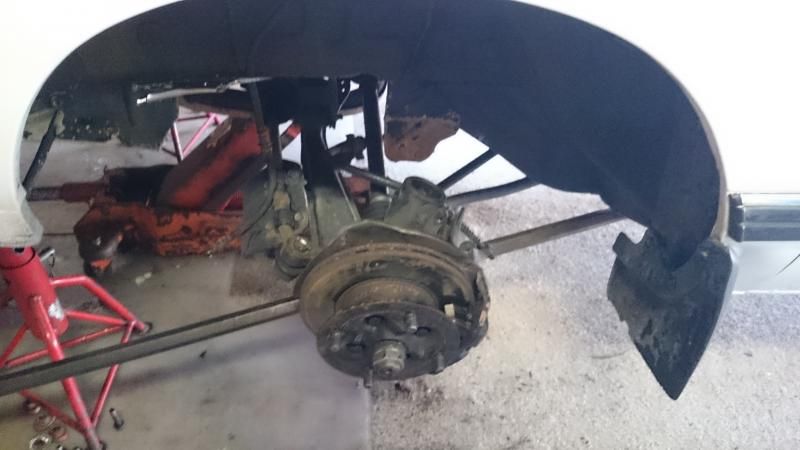
the new springs. mmmm yellow
That's it for now. It's in the shop getting an alignment at the moment.
Question: If you could put any stickers onto the brumby what would you put? I always liked the brat down the panel after the window on the yank versions. Wonder if there is any 'brumby' versions?
So first of all, gave up on the sound system upgrade. Just couldn't be stuffed in the end.
Had a re look at the exhaust. I have been mucking around with the exhaust for ages so in the end decided to run with a 2.5 inch zorst with cat and 2 hot dogs to 2.5 pipe end. It's very oversized for a brumby but it's what I had lying around and it sounds good.
Bought a steering wheel off ebay for 20bucks and chucked it on. Makes a difference. Must be 50kws extra at least. More comfy too.
Before
After
After reading the words of sage fisterbottom, I removed my Weber 32/36 and reinstalled the Hitachi but not before some work on the carby. Mostly this involved removal of the emission control parts and general clean ups of jets and passageways.
I also managed to rustle up from the shed an Hitachi carby from an old hilux model so went ahead and replaced whatever jets I could onto the stock carby.
Getting started (thanks for the manual willy)
I also linked the secondary throttle to the primary throttle directly, without the vacuum system. To allow the secondary throttle to close after you lift your foot off, I just drilled a small hole in one of the primary throttle assembly linkages and used a small spring.
I have heaps more pics of the carby dismantled and secondary throttle setup if anyone needs.
So Weber and Hitachi back to back? The weber under full power, high rpm, made good noises and was probably about the same speed but otherwise compared to the Hitachi (with the upgrades) that's where the benefits end. The Hitachi is now much faster in the normal RPM range and seems to pull loads much better. It also has an automatic choke system from the factory. I also believe (opinion) that the adapter for the Weber interrupts the airflow in a negative way. The Hitachi also burns less fuel.
Once I finished I put the stock air filter back on (because stealth...) It noticeably runs worse with the stock filter though after the upgrades so I modded the rear of the intake to allow better flow.
Managed to score some cheap King springs so put them on. Its not hard to do as the struts come out very easy on brumbys.
Here's a pic of the strut removed. It requires 6 bolts in total to remove plus the brake clip.
the new springs. mmmm yellow
That's it for now. It's in the shop getting an alignment at the moment.
Question: If you could put any stickers onto the brumby what would you put? I always liked the brat down the panel after the window on the yank versions. Wonder if there is any 'brumby' versions?
-
Willy Fisterbottom

- Junior Member
- Posts: 330
- Joined: Wed Feb 26, 2014 9:37 am
- Location: NSW
Good stuff mate  Glad to see the manual being downloaded and put to good use, also very happy someone else has done the re jet and agrees that it is better than a Weber
Would be good to see how you locked the linkages, so please post some pics.
I got myself a 81 Gen-1 Brumby with factory EA81 on the weekend so will be putting the re jetted carby in her.
Would be good to see how you locked the linkages, so please post some pics.
I got myself a 81 Gen-1 Brumby with factory EA81 on the weekend so will be putting the re jetted carby in her.
[SIGPIC][/SIGPIC]
http://www.willyweather.com.au
http://www.willyweather.com.au
I saw that brumby for sale, looked awesome. Would lurrrve a gen 1. Actually thinking about picking up a 90s one for sale at the moment with an ej conversion in mind.
I just really want a good body brumby, I have all the mechanicals and parts to fix almost anything but mine is a bit rough and ready body wise so just no point going too crazy on it. Need to find a good one, busted mechanical. Nice and cheap haha but all the good ones are 5k....
I just really want a good body brumby, I have all the mechanicals and parts to fix almost anything but mine is a bit rough and ready body wise so just no point going too crazy on it. Need to find a good one, busted mechanical. Nice and cheap haha but all the good ones are 5k....
-
Willy Fisterbottom
- Junior Member
- Posts: 330
- Joined: Wed Feb 26, 2014 9:37 am
- Location: NSW
Did you write down what jets were in it and what you put in it? also the info details from the Toyota carby would be good
Still waiting on those secondary pics.
Still waiting on those secondary pics.
[SIGPIC][/SIGPIC]
http://www.willyweather.com.au
http://www.willyweather.com.au
G'day again Subiefiles,
Long time no post so a quick update. Sorry for the delay Willy but here are a couple of fairly useless pics to show how I rigged the throttles.
And
I also got about putting some new seats in the old girl, though probably went a bit overboard...
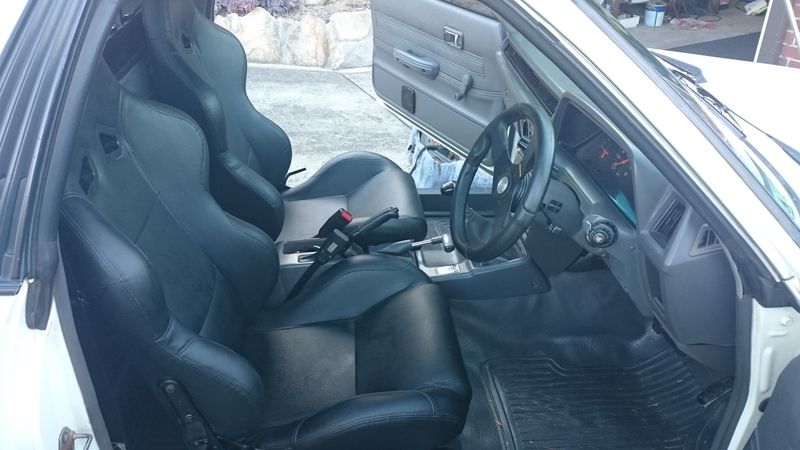
They are comfy though. The only issue is they are juuust too wide on the shoulder sides so it brushes against the door and can squeak when I'm blowing starlets *cough off the line and get pushed back into the seat. Not much I could think of that would fix that so I just let squeak occasionally (they're not a quiet car anyway as you all know).
I also re-painted the rims. I went with white again but with a blue edge around the circumference and blue wheel nuts.
I like the outcome but it also needed more colour so added a thin blue strip down the door line. It's hard to see in that photo above
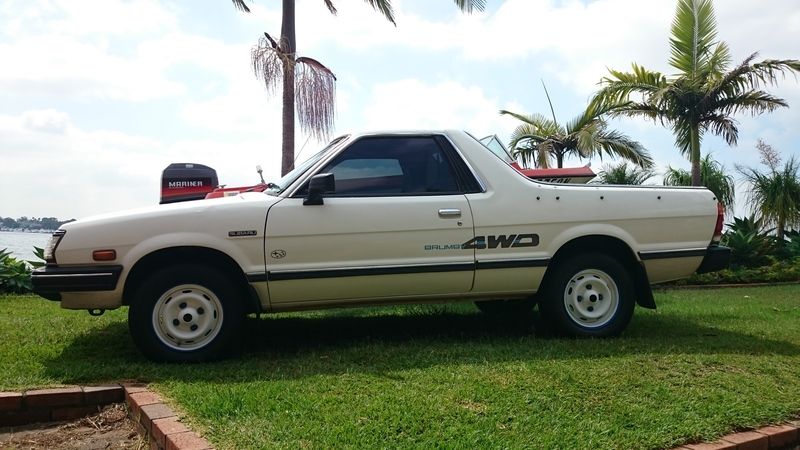
Doesn't do too much in photos but it makes a difference in the metal.
And that's it. After all the work I decided to sell her, so brumby is off to a new home and to hopefully continue it's restoration. Thanks to those who helped with advice along the way. Enjoy your Brumbys!!!
I miss mine already.
Long time no post so a quick update. Sorry for the delay Willy but here are a couple of fairly useless pics to show how I rigged the throttles.
And
I also got about putting some new seats in the old girl, though probably went a bit overboard...
They are comfy though. The only issue is they are juuust too wide on the shoulder sides so it brushes against the door and can squeak when I'm blowing starlets *cough off the line and get pushed back into the seat. Not much I could think of that would fix that so I just let squeak occasionally (they're not a quiet car anyway as you all know).
I also re-painted the rims. I went with white again but with a blue edge around the circumference and blue wheel nuts.
I like the outcome but it also needed more colour so added a thin blue strip down the door line. It's hard to see in that photo above
Doesn't do too much in photos but it makes a difference in the metal.
And that's it. After all the work I decided to sell her, so brumby is off to a new home and to hopefully continue it's restoration. Thanks to those who helped with advice along the way. Enjoy your Brumbys!!!
I miss mine already.