Wingin' It - Ski Boat

Detailed reference pages on Members special projects ...
Post Reply
User avatar
BaronVonChickenPants
General Member
Posts: 1187
Joined: Tue Oct 04, 2005 10:00 am
Location: Nowra, NSW

Wingin' It - Ski Boat

Post by BaronVonChickenPants » Sun Aug 04, 2013 5:59 pm

To prevent too much of a thread hi-jack I thought I should start a build thread.

If you just want to browse the pic's the rebuild album is here:
http://snides.net/images/index.php?/category/8

The back story:
Image
This used to be my brothers boat, a Peter Williams Walkabout from the late 70's. They were manufactured by Peter Williams in Ulladulla on the South Coast. Peter manufactured approx 250 over the years.

He bought it second hand with a 350 chev, 600 Holley and dog clutch, fairly standard setup for a simple ski boat. It was great for skiing, instantly snapped out of the water and had no problems pulling skiers, biscuits, etc.

Top speed was about 60mph where the hull started to walk, I was told this could be corrected during the rebuild but that is fast enough for a family ski boat.

So my brother had it for about a year before it blew a big end bearing at full noise at the end of a big day for a mates bucks party, video here, not a bad watch of you have 20 mins to spare, it's basically just a collection of high speed biscuit crashes.

After that he made a couple of attempts to rebuild it before realising that there is a lot more hard work involved than he cared to commit to, so sold the pile of pieces loosely resembling a boat to me for $1,000.

The Autopsy:
Image

After spending 5 years in the weather I knew it was in rough shape but had no anticipated how bad it really was.
  • The Bad
    • One of the main stringers was completely rotten front to back
    • The other stringer was rotten for last 1 metre
    • Both cross members were rotten
    • The floatation foam under the drivers seat was water logged and had destroyed the fibreglass floor section for the front section
    • The trailer was completely rusted out
    • All existing seating and flooring was rotten as it was built from standard ply not marine ply
    • vinyl seats were destroyed from environmental exposure
  • The Good
    • The hull and deck were in surprisingly good shape
    • It came with a Volvo Penta AQ225 (This is actually a 305ci chev, marinised and spec'ed at 225 HP) that had been professionally rebuilt and run in with 40 hours in a Volvo 21 foot Cabin Cruiser
    • It came with most of the pieces from the old engine such as marine manifolds, dog clutch, etc
    • I had quite a few favours up my sleeve with some local boat builders
To become old and wise, first you must survive being young and dumb.
Image

User avatar
BaronVonChickenPants
General Member
Posts: 1187
Joined: Tue Oct 04, 2005 10:00 am
Location: Nowra, NSW

Post by BaronVonChickenPants » Sun Aug 04, 2013 6:00 pm

The Build:
Image

By the time we got to this pic all stringers and cross members have been glassed in, all major defects in the deck and hull have been repaired and the whole lot has been stripped and smoothed with a palm sander.

Here we are hoisting it up to be rolled over and placed upside down on a cradle so the bottom of the hull can be filled, smoothed, painted and cleared.

Image

She doesn't normally bank this hard in turns.....

Image

The whole lot was hit with rage gold body filler, block sanded, primer filler, wet and dry sanded to 1200 grit, the the light grey section was done in acrylic and baslac 2k clear.

We then decided on the main colour, which contains a lot of british racing green, applied a few good coats and here we are working out and masking up the main black sections.

Image

Working out design and position of eyes and teeth

Image

Clear coasted, the top coat is actually still wet in these shots.

Image

Finally home on the new trailer. The hull has been wet rubbed, buffed and waxed waiting for the next stage.

Image

I'm very pleased with how well this came out, when the boat is stationary the tips of the top teeth will be below the water line, then once in motion she will be on full attack.

I can't help but laugh when towing it, especially when i have my foot on the brake, all you can see are 2 angry eyes glowing red and staring you down through the back window.

Image

Working out sizing and positioning of remaining details. We're pretty happy with this, will just sit on it for a bit before we commit to it.

The spit fire theme, complete with sharks teeth and Jessica Rabbit were actually my wife's suggestions, I've just fine tuned the design to make them work.

The thinking behind Jessica is that her back is against the centre line, so that she is forward of centre and just ahead of the pilot. as per traditional spitfire, mustang, etc. pin up girls.

She is sitting on the water line, so that when the boat is stationary she is just dangling her legs in the water, she is positioned so only straight lines cross the clinker joins, and the original image has been reduced to line art outline with flat colour fill. We are waiting to see how the final result looks before deciding if she needs any shadowing for depth.
To become old and wise, first you must survive being young and dumb.
Image

User avatar
BaronVonChickenPants
General Member
Posts: 1187
Joined: Tue Oct 04, 2005 10:00 am
Location: Nowra, NSW

Post by BaronVonChickenPants » Sun Aug 04, 2013 6:56 pm

To Do:
Engine:

The "rebuilt" engine came with more pieces missing then anticipated from the rebuilder, it's basically a short block, heads and intake manifold, but it has been stored well and turns by hand with very little play.

This did give me the freedom to build the engine exactly how I want, which is for maximum efficiency and reliability. I have purchased the following:
  • New 600 holley with vacuum secondaries (was actually cheaper than reco'ing one that came with the boat)
  • 1.5 lift ratio roller rockers
  • HEI dizzy with integrated coil
  • Holley self regulating electric fuel pump
  • Standard push rods
  • Standard hydraulic lifters
  • Stainless steel bolts all round
Should be good for ~250hp which will be more than adequate.


Another surprise was that the original exhausts were copper, which has been banned as it expels toxic gases once it warms up, so these will be replaced with rubber exhaust hose and stainless elbows.


The exhaust outlets will be dumpy tips through the rear transom inspired by these:
Image

The variations being 2.5 inch rather then 3.5 inch and straight through rather than silenced.

Appearance:
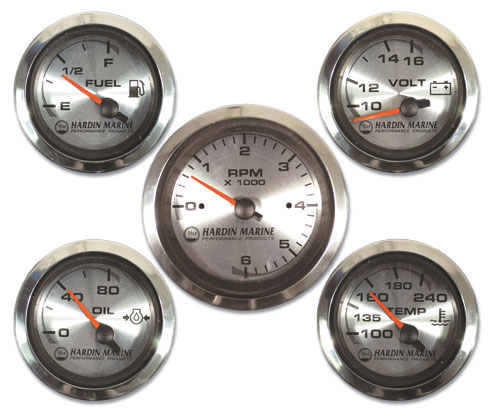
The dash will be rebuilt and skinned with a maple ply veneer, and fitted with Hardin Marine Stainless Gauges:
Image

We'll be mounting a Wanted Wake Jaws polished aluminum tower (coincidentally the only tower I could find that fits such a narrow boat) with black bimini cover, mirror, wakeboard and ski racks to free up space in the boat and get the rope away from the kids in the back.

Image

I will also be cutting a rear platform from 18mm marine ply in the shape of spitfire tail wing to keep in the theme.

I will be sewing up some new vinyl bolstered seats, I'll be make them out of ~4 inch vertical panels to maintain a vintage theme. Primarily light grey with black beading on the bolstered edges.

She's come a long way but there is still a lot of work to go before the summer.

Jordan.
To become old and wise, first you must survive being young and dumb.
Image

User avatar
Rodeo4jake
Junior Member
Posts: 297
Joined: Fri Oct 19, 2012 5:42 am
Location: Tylden Victoria

Post by Rodeo4jake » Sun Aug 04, 2013 10:47 pm

That is lookin awsome, luv the paint. 250hp will be heaps in a boat like that. Looks like you're gonna hav a great summer of boating coming up.

Cheers Jake

User avatar
El_Freddo
Master Member
Posts: 12503
Joined: Tue Oct 04, 2005 10:00 am
Location: Bridgewater Vic
Contact:

Post by El_Freddo » Thu Aug 08, 2013 7:42 pm

Sick ride mate!

I hope it's great to ski behind!! I'm sure it will be.

Glad you've been able to put the time and effort into this - these have much more character than those new "I've got everything that opens and closes" boats!

Cheers

Bennie
"The lounge room is not a workshop..."
Image
El Freddo's Pics - El_Freddo's youtube

User avatar
BaronVonChickenPants
General Member
Posts: 1187
Joined: Tue Oct 04, 2005 10:00 am
Location: Nowra, NSW

Post by BaronVonChickenPants » Fri Jan 10, 2014 8:42 pm

Time for an update:
The goal was to have her ready for Christmas. She's coming along nicely but not quite there yet due to a few set backs and supply issues.

Set back 1:
The of the 2 possible roller rockers I could have purchased, i got the wrong ones, 7/16 inch rockers and 3/8 inch head studs.

Order new roller rockers, delivered in a week, back on track.

A friend who owns an engine building and reconditioning service offered to help me check and assemble everything to make sure I end up with a reliable engine.

Set back 2:
Both of the 305 engines I had were damaged beyond repair. The "rebuilt" engine seems to have only had a fresh coat of paint and sold. There were rusted snapped head bolts and a half inch hole in one of the bores, the others weren't far behind.

The spare engine was an absolute mess, one head was from a 305, one was from a 350, valves were rusted, mains were worn, oil pump was worn out, etc.

As I only intended to do this once, I ordered a crate motor from Eagle. After discussions with them we decided the 260hp would suit me better than the 290hp as it is tuned for more low rev torque.

Image

Specs:
New Small Block Chev 350 cu in
4 bolt main bearins
260hp factory rated
New HEI Distributor
New Holley 600cfm vac sec, manual choke carb
Offenhauser high rise dual plan manifold
Standard chev water pump with Moroso electric drive kit

Meanwhile while I waited for the engine:
The floor was cut and carpeted
Image

and the tower was installed
Image


Set back 3:
10 days before christmas, while preparing the engine mounts so the engine could be installed, I had an angle grinder mishap:
Only click if you don't mind some claret.

The worst part is I wasn't even using it at the time. The 4" grinder fitted with 1mm cutting disc was sitting turned off on the table while I fiddled with some rusted bolts on an engine mount. The grinder fell off the table and instinctively I went to catch it. My hand made just enough contact to hit the on button and spin the grinder around towards my leg. It skimmed down my shin before getting enough angle to cut in, then because it wasn't spinning at full speed the disc shattered upon contact with my tibia, making a step in the disc which made the grinder jump and make 2 additional cuts in the flesh and 1 additional cut in my tibia.

So then off to emergency we go, after waiting 9 hours, I was Xray'ed which revealed a grazed and dinted tibia and lots of bone and angle grinder fragments but no major trauma. I was then seen be an imported female doctor with no idea what an angle grinder was or does who cleaned the wound and stitched it closed.

As it turns out, this is exactly what not to do with an angle grinder injury, the damaged tissue should be cut away and the wound packed open so that it can expel anything that shouldn't be there.

So I have spent most of the last 4 weeks layed up on the lounge, in and out of doctors and hospital with infections, nectrotic/dead tissue and all sorts of fun stuff.

Now I am going in for surgery on Tuesday the 14th (1 month after the incident) to have the whole area (35mm x 80mm) cut away down to the bone, the bone scrubbed of infection, biopsied to identify infection, then packed open so that it can heal slowly and expel any remaining unpleasantness.

I highly recommend not hurting yourself with an angle grinder, consider yourself warned.

I did have some occasional spells of productivity, i managed to get the engine in
Image

Image

There's a 2.5 inch riser coming for the scoop.

The carpeting finished and structural dashboard installed
Image

This will eventually be covered with a maple veneer that curves and covers the main deck structure that can be seen behind the steering wheel.

But for now that's it until I'm mobile again.

Jordan.
To become old and wise, first you must survive being young and dumb.
Image

User avatar
NachaLuva
General Member
Posts: 1930
Joined: Wed Aug 31, 2011 5:05 pm
Location: SE Melbourne

Post by NachaLuva » Fri Jan 10, 2014 9:52 pm

Very bad luck with the grinder. A workmate who refused to wear gloves once cut into his finger bone. Dangerous things...

Boat's looking great, hope the infections clear up & it gets finished off & on the water soon :mrgreen:
[SIGPIC][/SIGPIC]
Owner SubieLiftOz, lift kits for Subarus :twisted:

'97 Forester: EJ22E; 4" Custom Body Lift; JDM STi plated LSD; 20mm WRX RSB; Snorkel; Kings

User avatar
steptoe
Master Member
Posts: 11582
Joined: Thu Oct 06, 2005 10:00 am
Location: 14 miles outside Gotham City

Post by steptoe » Sat Jan 11, 2014 6:30 am

Gees Jordan, the description after the pic link is worse than the pic itself ! Figuring current pics are worse :( Good luck with the surgery. Sounds like you have plenty of boat anchors also :( , and that shed ....envious

User avatar
ktmtragic
Junior Member
Posts: 81
Joined: Sun Nov 17, 2013 7:13 pm
Location: NSW

Post by ktmtragic » Sat Jan 11, 2014 8:22 pm

Tip of my index finger on my left hand miraculously disappeared before I felt it using a 1mm slitting disc on a grinder. I prefer using rechargeable grinders as the speed is not as high. But dangerous never the less. Hope it all goes good after the surgery

User avatar
Silverbullet
Senior Member
Posts: 2868
Joined: Mon Aug 23, 2010 6:20 pm
Location: Adelaide

Post by Silverbullet » Sat Jan 11, 2014 10:08 pm

OUCH! :( That is the worst luck, you went to catch it and your finger flipped the switch :( Sometimes better to over-ride instincts and let some things drop.

That boat looks beautiful, so clean! Are you not worried about having carpet so close to the exhaust pipes?
Will it ever end!?
-EA81 TWIN CARB!!!!
-L series 5 speed
-Custom paint job
-2" lift
-Full custom re-wire
-L series front end
Image

User avatar
BaronVonChickenPants
General Member
Posts: 1187
Joined: Tue Oct 04, 2005 10:00 am
Location: Nowra, NSW

Post by BaronVonChickenPants » Sun Jan 12, 2014 6:36 pm

Thank you everyone for your comments.

I have a new rule of the workshop, when not in use the angle grinder lives on the ground.

The exhaust doesn't actually go through the floor and carpet yet, those stainless bends are just sitting on the floor leaning against the manifolds. I'm still waiting on the flange fittings for the manifolds so that I know where to cut the floor. The edge of the floor and carpet will then be protected by some re-purposed stainless steel cup holders.

Yes the shed is spectacular but unfortunately not mine, my boss is graciously letting me use some of his surplus workshop for the build.

Jordan.
To become old and wise, first you must survive being young and dumb.
Image

User avatar
El_Freddo
Master Member
Posts: 12503
Joined: Tue Oct 04, 2005 10:00 am
Location: Bridgewater Vic
Contact:

Post by El_Freddo » Thu Jan 16, 2014 2:30 pm

BaronVonChickenPants wrote:I have a new rule of the workshop, when not in use the angle grinder lives on the ground.
And switched off/unplugged??

Sorry to hear of your painful encounter - sounds like I "got lucky" when I kissed a grinder at full tilt when it was spat out into my face. I've got a small scar under my lip to show for it - very bloody lucky! All the best with your recovery.

The boat is looking great. A few questions - what's the thing on the front of the engine (rear of the boat) with the cam like belt? I thought all auxiliaries were on the back of the engine at the flywheel.

How will the dog clutch arrangement fit in there with that setup? I presume you'll be running something along the lines of the rolco dog clutch?

The flooring - looks awesome and I'm a *little* bit jealous! The floor section rear of the engine, I'd make this a separate plate between the rails so that if you need to check something out the back of the boat under the floor you can easily remove that panel (after removing the back seat). I've seen this in many factory fitted boats.

Otherwise your boat is looking awesome. I bet you can't wait to get it out there!

Cheers

Bennie
"The lounge room is not a workshop..."
Image
El Freddo's Pics - El_Freddo's youtube

User avatar
BaronVonChickenPants
General Member
Posts: 1187
Joined: Tue Oct 04, 2005 10:00 am
Location: Nowra, NSW

Post by BaronVonChickenPants » Thu Jan 16, 2014 3:21 pm

The gilmer belt on the back is for the Moroso electric water pump drive, this runs the factory chev water pump which will circulate fresh water and coolant from a heat exchanger. The electric drive runs off the same power feed as the distributor and fuel pump.

Yes she's running the rolco/tawco style dog clutch. The water pump needed a set of 1 inch spacers to clear the dog clutch timing case cover.

The alternator and raw water pump run off a pulley on the flywheel.

The original floor had a separate rear section but it meant the side sections were very poorly supported and flimsy. the drivers side floor section comes out fairly easily but there is really nothing under it with the exception of the auto bilge pump, log and dripless gland seal for the prop shaft.

The dog clutch and prop shaft coupling are accessible through the hole for the engine.

Thanks for you compliments on the carpet/floor, I was amazed myself at how much more finished it looks now.

On the trauma front things are going well. I had one session in theater on Tuesday to remove all of the damaged tissue and bone leaving only healthy clean tissue, the wound ended up 3 times it's original size but I did not get a chance to take a picture. Samples, specimens, biopsies and swabs were sent for analysis.

2nd session in theater on Wednesday to have further tissue removed after which the wound was progressively sutured closed layer by layer.

Then a PICC or central line was inserted for delivery of IV antibiotics over the next 2 weeks.

Depending on the results of the analysis I should be home tomorrow with orders to stay off the leg and rest for up to 4 weeks, 2 weeks absolute minimum.

Thanks again,
Jordan.
To become old and wise, first you must survive being young and dumb.
Image

User avatar
El_Freddo
Master Member
Posts: 12503
Joined: Tue Oct 04, 2005 10:00 am
Location: Bridgewater Vic
Contact:

Post by El_Freddo » Thu Jan 16, 2014 3:38 pm

Good to hear you've got it sorted ;)

And great to hear you're further down the recovery path.

More surgery required?

All the best,

Bennie
"The lounge room is not a workshop..."
Image
El Freddo's Pics - El_Freddo's youtube

Post Reply

Return to “Restorations and Project Build Ups.”