Silverbullets' resto: Engine, gearbox, suspension
-
d_generate

- General Member
- Posts: 1529
- Joined: Sat Feb 16, 2008 1:51 am
- Location: Back in Perth and SORing it atm.
Yeah, I like the way he's gone from the mild steel of the reo bar to the high tensile steel of the bolt, must balance out well over the yumps.
98 Libbo with V3 STI running gear. 13.0 @ 105mph with CAI & 3" Zorst:mrgreen:
http://www.youtube.com/watch?v=TKrsF-2JS3M

http://www.youtube.com/watch?v=TKrsF-2JS3M
-
El_Freddo

- Master Member
- Posts: 12502
- Joined: Tue Oct 04, 2005 10:00 am
- Location: Bridgewater Vic
- Contact:
Looking good Silverbullet!
Those front lift blocks are impressive!
I'd recommend trying to have a piece of flat bar welded between the rear block for the two on each side - have it shaped to go over the torsion bar. This will reduce/eliminate any vertical movement that could happen with single blocks. It's something I've wanted to do with Ruby Scoo for a long time now as these are the weak points IMO.
Looking forward to watching this come together!
Cheers
Bennie

-
Silverbullet

- Senior Member
- Posts: 2867
- Joined: Mon Aug 23, 2010 6:20 pm
- Location: Adelaide
Good idea Bennie, although I have no flat bar lying around, had to make do with the small RHS I had (bought waaay too much RHS for some reason ") )
)
Got a surprise week off from work this week (not exactly sure why) And I had plenty of stuff on the to do list. Top of the list was the rear blocks for the torsion bar which would then be 90% of the lift kit installed. Course it was 37 degrees yesterday and 30 today But I press on anyway, had to get it done. Pics below...
Made the 4 blocks with crush tubes from 3mm(?) wall 50x50 RHS with 1.6mm wall crush tubes. Installed them to tack up the reinforcement bars (a challenge by yourself with brakes and stuff hanging off the back!)

Reinforcement bar cut out with another piece bent and welded in to fill in the hole

Both sides welded up, making and welding in all those end pieces to box the ends in took the longest

Installed in the rear, now closer to being level. Was also checking what full lock looked like on the Brumby to roughly compare on the wagon, wasn't sure if the strut was fouling inside the strut tower. Don't think it is.

I did paint them black, forgot to get photos though Notice the overspray galore underneath the rear wheel arches, a bit annoyed about this but good thing I've still got some cans of the underbody rubber left over. That's about all I can do on the lift kit now, until I get the rear shocks. Also L series front control arms coming soon! Along with custom radius rods.
Not sure what to do next actually...thinking I should clean up and re-install the fuel tank and then the rear diff etc etc. Or I should follow an earlier plan I had of getting the interior air tight; install the front and rear windscreens, rear quarter glass, remaining door windows.
Got a surprise week off from work this week (not exactly sure why) And I had plenty of stuff on the to do list. Top of the list was the rear blocks for the torsion bar which would then be 90% of the lift kit installed. Course it was 37 degrees yesterday and 30 today
Made the 4 blocks with crush tubes from 3mm(?) wall 50x50 RHS with 1.6mm wall crush tubes. Installed them to tack up the reinforcement bars (a challenge by yourself with brakes and stuff hanging off the back!)
Reinforcement bar cut out with another piece bent and welded in to fill in the hole
Both sides welded up, making and welding in all those end pieces to box the ends in took the longest
Installed in the rear, now closer to being level. Was also checking what full lock looked like on the Brumby to roughly compare on the wagon, wasn't sure if the strut was fouling inside the strut tower. Don't think it is.
I did paint them black, forgot to get photos though
Not sure what to do next actually...thinking I should clean up and re-install the fuel tank and then the rear diff etc etc. Or I should follow an earlier plan I had of getting the interior air tight; install the front and rear windscreens, rear quarter glass, remaining door windows.
Will it ever end!?
-EA81 TWIN CARB!!!!
-L series 5 speed
-Custom paint job
-2" lift
-Full custom re-wire
-L series front end

-EA81 TWIN CARB!!!!
-L series 5 speed
-Custom paint job
-2" lift
-Full custom re-wire
-L series front end
-
El_Freddo
- Master Member
- Posts: 12502
- Joined: Tue Oct 04, 2005 10:00 am
- Location: Bridgewater Vic
- Contact:
Looking good mate. That reinforcement bar over the torsion bar is impressive! And that's exactly what I'm talking about.
RHS bar will do the job just as well, if not a bit better - flat bar would just be easier...
Keep up the good work, I'd be looking at putting all the window rubbers back in then the interior. That said, if you don't have the dash board installed do this before the front windscreen as the screws closest to the windscreen are vertical - it can be very painful to remove/install these with the windscreen in place! (been there, done that!)
Cheers
Bennie
-
Silverbullet
- Senior Member
- Posts: 2867
- Joined: Mon Aug 23, 2010 6:20 pm
- Location: Adelaide
Dashboard and windscreen was next on the list, but not sure if I can still get all the other stuff under the dash in later? E.g air con, wiring, heating etc etc.
I must admit the project has been stalled lately. A lack of motivation is the main culprit Hopefully I can get back into the swing of things now though.
I dragged my L series 5 speed out of the shed (after about 2 years in storage!) and cleaned it up (was absolutely caked in mud) ready to start figuring out how I'm going to fit this thing up. After much huffing and puffing yesterday I got the box up onto the engine x-member and it was suspended there with straps while I got the gearbox x-member in place. Here is the problem; I've heard of people using the original MY x-member and just forcing the L series mounts into the holes. This just doesn't seem right to me since they are in a horribly twisted position, which results in the box sitting all skewed and twisted in the tunnel (see below) The only way I think to do this properly is to make a custom cross member by cutting up the L series cross member and welding on the MY ends so it will still bolt up. What are everyone's thoughts on this? Or is it possible to use MY gearbox mounts? I don't have any old ones spare to see for myself.
I certainly can't leave it this way, those mounts are sure to bust at any second! Am I missing something here?

Not sure if it's really visible, but the gearbox mounts are terribly contorted here


It's so out of position that the box isn't even sitting flat on the engine cross member, see the gap under the right hand side?
I must admit the project has been stalled lately. A lack of motivation is the main culprit
I dragged my L series 5 speed out of the shed (after about 2 years in storage!) and cleaned it up (was absolutely caked in mud) ready to start figuring out how I'm going to fit this thing up. After much huffing and puffing yesterday I got the box up onto the engine x-member and it was suspended there with straps while I got the gearbox x-member in place. Here is the problem; I've heard of people using the original MY x-member and just forcing the L series mounts into the holes. This just doesn't seem right to me since they are in a horribly twisted position, which results in the box sitting all skewed and twisted in the tunnel (see below) The only way I think to do this properly is to make a custom cross member by cutting up the L series cross member and welding on the MY ends so it will still bolt up. What are everyone's thoughts on this? Or is it possible to use MY gearbox mounts? I don't have any old ones spare to see for myself.
I certainly can't leave it this way, those mounts are sure to bust at any second! Am I missing something here?
Not sure if it's really visible, but the gearbox mounts are terribly contorted here
It's so out of position that the box isn't even sitting flat on the engine cross member, see the gap under the right hand side?
Will it ever end!?
-EA81 TWIN CARB!!!!
-L series 5 speed
-Custom paint job
-2" lift
-Full custom re-wire
-L series front end
-EA81 TWIN CARB!!!!
-L series 5 speed
-Custom paint job
-2" lift
-Full custom re-wire
-L series front end
-
Bantum

- General Member
- Posts: 1923
- Joined: Sun Jul 29, 2012 4:30 pm
- Location: Northern Territory + QLD
- Contact:
Yep - you'll need to use MY member on the chassis ...  ( if you want to use L series mounts, they will need to be modified )
+ will need to modify the MY Rubber mount bracket to suit - you should look at L series the 2 piece rear drive shaft as well ...
P.S. - there's some examples on here somewhere ...
Cheers, Bantum ...
Edit : correction made ... thanks Steptoe ...
+ will need to modify the MY Rubber mount bracket to suit - you should look at L series the 2 piece rear drive shaft as well ...
P.S. - there's some examples on here somewhere ...
Cheers, Bantum ...
Edit : correction made ... thanks Steptoe ...
-
steptoe
- Master Member
- Posts: 11582
- Joined: Thu Oct 06, 2005 10:00 am
- Location: 14 miles outside Gotham City

Well, some few hundred thousand km ago I used the L box and tossed everything L away - mount wise. The MY cross member stayed. There is no forcing.
Get your MY rubber mounts and brackets labeled as left and right, then go about with a rat tail file and elongate the holes in the brackets that bolted between MY box and MY rubber mounts. One one side, the hole (s) are elongated up, the other side, elongated down - from memory. The brackets then bolt nicely to L box.
Cut off that threaded boss at rear, high side, drivers side at back of box with access plate on top or it will annoy the poo out of you - on a std height MY
-
Silverbullet
- Senior Member
- Posts: 2867
- Joined: Mon Aug 23, 2010 6:20 pm
- Location: Adelaide
Oh so its MY mounts on the L box, not L mounts. That's where I was getting confused. I had been told by a knowledgeable person that using the MY mounts is no good because they're so fragile, is this true for you Jonno? You say a few hundred thousand K's, do you ever go through gearbox mounts? Also looking at the L series cross member there is a rubber pad right in the middle of it that the gearbox rests on as well as the two mounts, would there be any downside to not having this?
Bantum there is plenty of waffle on here about L series 5 speed conversions, one or two good threads with words only, only 1 thread with actual pictures and they do not relate to this part of the conversion. Plenty of talk about which tail shaft to use too, some say a piece of flat bar welded to the floor is good enough for the center bearing others say you need a full width cross member fully welded...doesn't bother me anyway since I plan to get a custom one piece shaft made. The potential cost of it doesn't bother me (less than $500, I'm happy) I did have ideas of drilling the spot welded brackets out of an L series, but I no longer have one at home, removing that kind of stuff at a wreckers is too hard basket.
Thanks guys!
Will it ever end!?
-EA81 TWIN CARB!!!!
-L series 5 speed
-Custom paint job
-2" lift
-Full custom re-wire
-L series front end
-EA81 TWIN CARB!!!!
-L series 5 speed
-Custom paint job
-2" lift
-Full custom re-wire
-L series front end
-
Proton mouse
- Junior Member
- Posts: 378
- Joined: Mon Nov 06, 2006 11:35 pm
- Location: Diagonally parked in a parallel universe
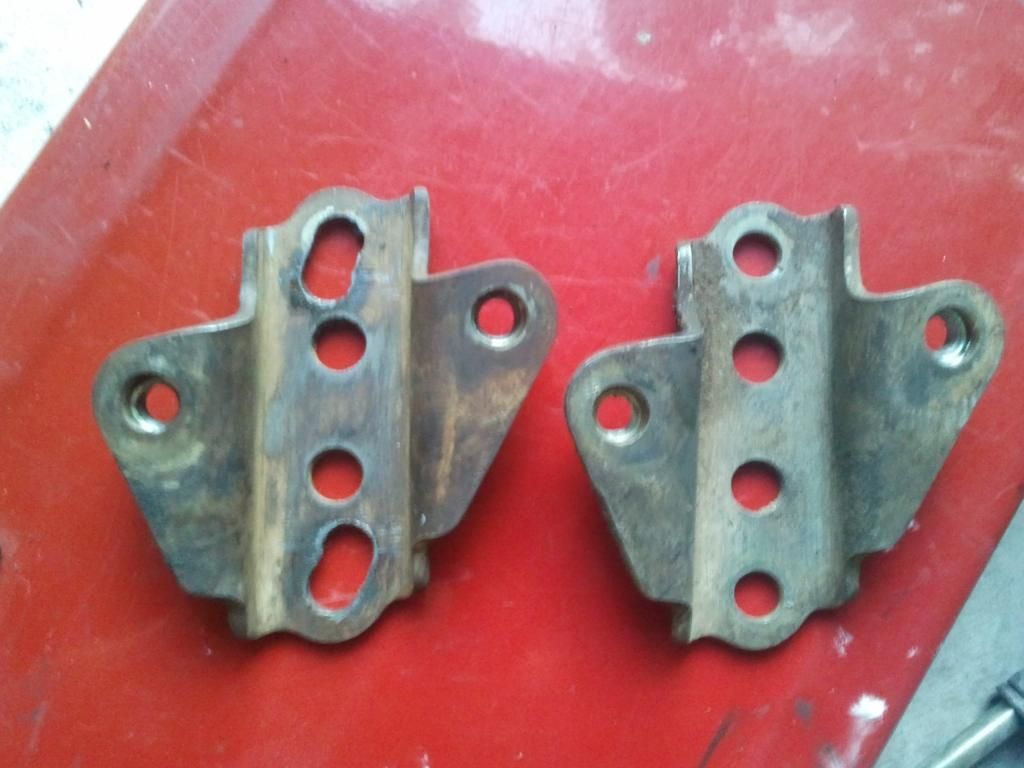
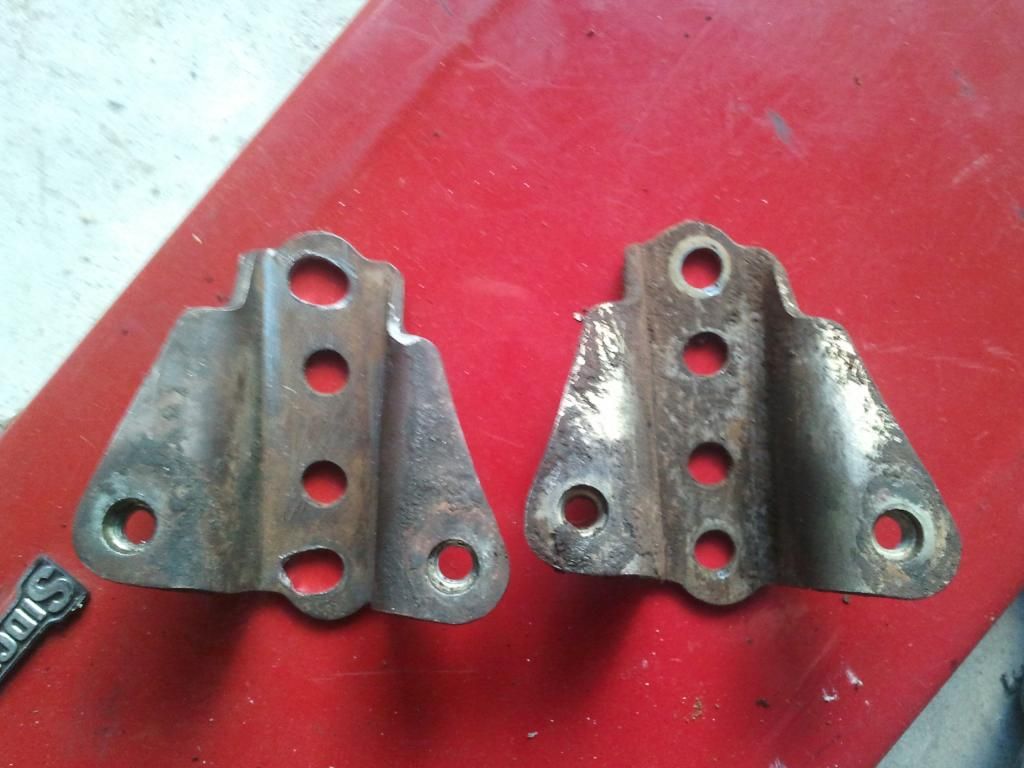
Do as Steptoe has mentioned and you should get your MY mounts looking something like below pics (from my EJ with L box Brumby conversion)
The MY mounts are not as beefy as the L's but it is a far easier job and I'm sure they would suffice under normal conditions.
Unfortunately I wont get to find out as I moved the EJ motor back to accommodate twin thermos, which in turn displaced
the gearbox mounts too far past the box's Xmember so will have to do what you were contemplating using the L mounts and
Xmember but cutting off the ends and welding on the MY ends.
Before and after surgery shots of slotting the MY mounts


-
steptoe
- Master Member
- Posts: 11582
- Joined: Thu Oct 06, 2005 10:00 am
- Location: 14 miles outside Gotham City
I have only had to buy new genuine box mounts once in 350,000km. Buy genuine - have bought from the other end of the price and quality scale for my second Brumby from a US source - a beach to install for some reason.
I also spent wasted brain cells tormented about that central support rubber thing under the box ....no need yet
Make you slots straight up or down, no angle as seen in shots above.
Flat bar BOLTED through floor under seats was method I was shown, copied it myself. So, seats out....but you are spending on one piece though ??
If you have L two piece go for that, spend the money on rego or insurance. Just look at the centre bearing mount and see that the flat bar pieces will be same level bolted to floor, the centre bearing mount will sit on one side flat bar, other side sits under flat bar due to the mounts 'step' from one side to other.
-
Proton mouse
- Junior Member
- Posts: 378
- Joined: Mon Nov 06, 2006 11:35 pm
- Location: Diagonally parked in a parallel universe
-
El_Freddo
- Master Member
- Posts: 12502
- Joined: Tue Oct 04, 2005 10:00 am
- Location: Bridgewater Vic
- Contact:
Will the engine and gearbox cop a coat of paint?
I'd recommend cleaning both of these up so they're spotless - thing hit them with either a choice colour or just an "engine grey". Reason being that a painted engine/gearbox is much easier to clean and dirt/grime is less likely to weld itself to the running gear!
Cheers
Bennie
I'd recommend cleaning both of these up so they're spotless - thing hit them with either a choice colour or just an "engine grey". Reason being that a painted engine/gearbox is much easier to clean and dirt/grime is less likely to weld itself to the running gear!
Cheers
Bennie
-
Silverbullet
- Senior Member
- Posts: 2867
- Joined: Mon Aug 23, 2010 6:20 pm
- Location: Adelaide
The engine has been painted silver or aluminium or something so it looks like new, the gearbox I wasn't planning on it. When I dragged that box out of the shed you could hardly see the metal underneath for all the mud and dust that was caked in every nook and cranny. How it looks now is about as good as I could get it with wire wheels in the drill, degreaser etc but it will still look a bit odd bolted up to the silver engine, I admit. Whether I remove it again and paint it or just leave it is up in the airEl_Freddo wrote:Will the engine and gearbox cop a coat of paint?
I'd recommend cleaning both of these up so they're spotless - thing hit them with either a choice colour or just an "engine grey". Reason being that a painted engine/gearbox is much easier to clean and dirt/grime is less likely to weld itself to the running gear!
Cheers
Bennie
Also forgot, big thanks to John and Jonno for pics of the gear box mounting hole mods, all the descriptive back and forth
The other thing that is in the pipework currently is fitting the L series/Vortex front steering knuckles and lower control arms to fix my quite frankly ridiculous camber (yes, the camber is crazy at the moment, inside of the wheels aren't even on the ground!) Dropping them off to be sand blasted this week and painted next week, new bearings and bushings will be here next week so fitted up soon after that.
Will it ever end!?
-EA81 TWIN CARB!!!!
-L series 5 speed
-Custom paint job
-2" lift
-Full custom re-wire
-L series front end
-EA81 TWIN CARB!!!!
-L series 5 speed
-Custom paint job
-2" lift
-Full custom re-wire
-L series front end
-
Proton mouse
- Junior Member
- Posts: 378
- Joined: Mon Nov 06, 2006 11:35 pm
- Location: Diagonally parked in a parallel universe
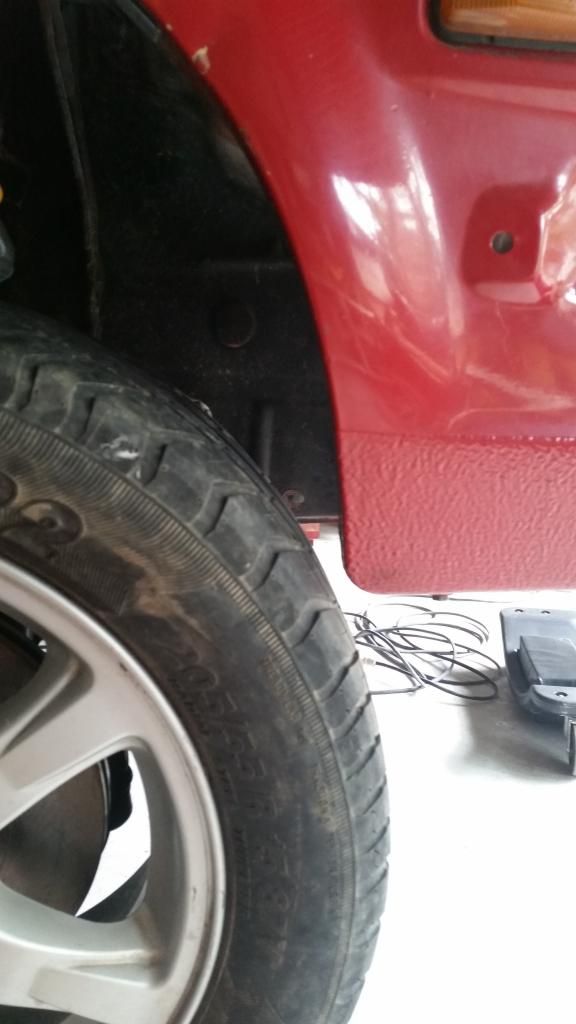
Don't forget SB you WILL be majorly chopping the freshly painted guards when doing the L lower control arm mod 
This will give you an idea by how much, as I found out recently. They are only 24" tyres and I couldn't even lower the car to the ground!!
Benefits negate the horror of hacking through fresh paint though
This will give you an idea by how much, as I found out recently. They are only 24" tyres and I couldn't even lower the car to the ground!!
Benefits negate the horror of hacking through fresh paint though

-
Silverbullet
- Senior Member
- Posts: 2867
- Joined: Mon Aug 23, 2010 6:20 pm
- Location: Adelaide
Well now, I took the foresight of asking the body shop to cut my guards before they painted them Well sort of...My guards end where the stone chip starts in the above pic, or roughly where the bottom of the bull bar/bumper bar would be. I wanted to improve my approach angle, I've seen when that little bit hits the ground you get a big bulge/crease in the guard about half way around the arch. The radius of the arch is still the same though, would my wheels still be rubbing? I guess I will find out soon enough.
Will it ever end!?
-EA81 TWIN CARB!!!!
-L series 5 speed
-Custom paint job
-2" lift
-Full custom re-wire
-L series front end
-EA81 TWIN CARB!!!!
-L series 5 speed
-Custom paint job
-2" lift
-Full custom re-wire
-L series front end
-
El_Freddo
- Master Member
- Posts: 12502
- Joined: Tue Oct 04, 2005 10:00 am
- Location: Bridgewater Vic
- Contact:
If you want to do the L control arm "properly" you need to mount it the way it is on the L series engine crossmember - this means welding the mount point behind the engine crossmember rather than IN the engine crossmember as it is with the MYs.
Then I believe you shorten your radius rod and you're sorted - wheel stays where it should be too. I've seen this done a few years ago on Bratgeebah's EJ25'd Brumby (the original EJ brake conversion recipient) that Hamish71 owned. I don't know if it's changed hands or not.
Cheers
Bennie
Then I believe you shorten your radius rod and you're sorted - wheel stays where it should be too. I've seen this done a few years ago on Bratgeebah's EJ25'd Brumby (the original EJ brake conversion recipient) that Hamish71 owned. I don't know if it's changed hands or not.
Cheers
Bennie
-
Silverbullet
- Senior Member
- Posts: 2867
- Joined: Mon Aug 23, 2010 6:20 pm
- Location: Adelaide
Alrighty then, finally it is nearly time to see what all this L series gear will do to my wagon 
In the last couple of weeks or so I have bought 2 L series front wheel bearing kits, and had all the L series parts sand blasted (steering knuckles, lower control arms, brake backing plates) I had to go to U-pull it for the control arms and they were nice and filthy. Also I cut off the mounting points for the L series sway bar as I won't be using them. Already just holding the L series control arms up to the old MY ones there is a huge difference in length and angle, can't wait to see what happens to my front end geometry Also this means I can bolt up the huge L series vented discs and calipers that I got when I bought the rear disc setup, after I get the calipers rebuilt of course.
Today I have sprayed it all first with enamel primer then chassis black, this gear takes 24 hours to harden properly so the install will be tomorrow. As for the problem of the radius rods, I finally got around to dropping all the stuff off to my machinist friend for him to make me a couple sets of adjustable 4130 chrome-moly radius rods. They will be a maximum of 50mm longer, completely adjustable right back to the stock length if required. Dunno when these will be done though, so I won't be able to drop the car on the ground until I get them back. Also I guess I'm going to need L series drive shafts from now on, better get a couple of those too.
Only one pic today, the rest tomorrow

Also to Bennie: I don't plan on moving the mounting points for the control arms, unless I absolutely need to since it would be a fairly big task, would probably need to remove the engine cross member and I really don't want to have to do that...again!
In the last couple of weeks or so I have bought 2 L series front wheel bearing kits, and had all the L series parts sand blasted (steering knuckles, lower control arms, brake backing plates) I had to go to U-pull it for the control arms and they were nice and filthy. Also I cut off the mounting points for the L series sway bar as I won't be using them. Already just holding the L series control arms up to the old MY ones there is a huge difference in length and angle, can't wait to see what happens to my front end geometry
Today I have sprayed it all first with enamel primer then chassis black, this gear takes 24 hours to harden properly so the install will be tomorrow. As for the problem of the radius rods, I finally got around to dropping all the stuff off to my machinist friend for him to make me a couple sets of adjustable 4130 chrome-moly radius rods. They will be a maximum of 50mm longer, completely adjustable right back to the stock length if required. Dunno when these will be done though, so I won't be able to drop the car on the ground until I get them back. Also I guess I'm going to need L series drive shafts from now on, better get a couple of those too.
Only one pic today, the rest tomorrow
Also to Bennie: I don't plan on moving the mounting points for the control arms, unless I absolutely need to since it would be a fairly big task, would probably need to remove the engine cross member and I really don't want to have to do that...again!
Will it ever end!?
-EA81 TWIN CARB!!!!
-L series 5 speed
-Custom paint job
-2" lift
-Full custom re-wire
-L series front end
-EA81 TWIN CARB!!!!
-L series 5 speed
-Custom paint job
-2" lift
-Full custom re-wire
-L series front end
-
steptoe
- Master Member
- Posts: 11582
- Joined: Thu Oct 06, 2005 10:00 am
- Location: 14 miles outside Gotham City
Huge L Series discs ?? There is a bout 5mm in the diameter over MY ? Maybe the vented system makes them look huge ? What is a lot more is the pad surface area - like an extra square inch of it !
Don't give up if things don't seem to work together at first. And don't forget the tambox wheel alignment method to get things reasonably straight before venturing out.
Don't give up if things don't seem to work together at first. And don't forget the tambox wheel alignment method to get things reasonably straight before venturing out.
-
Silverbullet
- Senior Member
- Posts: 2867
- Joined: Mon Aug 23, 2010 6:20 pm
- Location: Adelaide
Well when you gold them up next to the original solid discs that were on it, they look alot chunkier. Main difference is in the calipers as you said, much bigger and beefier I guess I should see if this Vortex/L series brake master/booster fits in as well.
Will it ever end!?
-EA81 TWIN CARB!!!!
-L series 5 speed
-Custom paint job
-2" lift
-Full custom re-wire
-L series front end
-EA81 TWIN CARB!!!!
-L series 5 speed
-Custom paint job
-2" lift
-Full custom re-wire
-L series front end