I probably won't be getting any other bushes until the new year so that is annoying, was hoping to have it all on the wheels by the end of my holidays. Also the L series LCA's are about 5mm narrower in the mounting area so I will probably need to make some washers to put either side of the bushing as packing.
Silverbullets' resto: Engine, gearbox, suspension
-
Silverbullet

- Senior Member
- Posts: 2870
- Joined: Mon Aug 23, 2010 6:20 pm
- Location: Adelaide
Annoying news  Once again I am flummoxed by LCA bushings, in other words none of the 2 kits I had fitted in the L series control arms. So that stopped me in my tracks for assembling the L series front end
  I did get all the wheel bearings and seals installed in the knuckles though, but now they are wrapped up and away from dust since they are open type bearings not sealed. Also installed the remaining 2 pieces of door glass, figured out I need to adjust the passenger front door some to get it closer to the fender.
I probably won't be getting any other bushes until the new year so that is annoying, was hoping to have it all on the wheels by the end of my holidays. Also the L series LCA's are about 5mm narrower in the mounting area so I will probably need to make some washers to put either side of the bushing as packing.
I probably won't be getting any other bushes until the new year so that is annoying, was hoping to have it all on the wheels by the end of my holidays. Also the L series LCA's are about 5mm narrower in the mounting area so I will probably need to make some washers to put either side of the bushing as packing.
Will it ever end!?
-EA81 TWIN CARB!!!!
-L series 5 speed
-Custom paint job
-2" lift
-Full custom re-wire
-L series front end

-EA81 TWIN CARB!!!!
-L series 5 speed
-Custom paint job
-2" lift
-Full custom re-wire
-L series front end
-
steptoe
- Master Member
- Posts: 11582
- Joined: Thu Oct 06, 2005 10:00 am
- Location: 14 miles outside Gotham City

you were hoping .....
aren't the ID, OD and length matching up between bushes and their intended homes ?
Nearly had a swear moment installing my SOLEX locks just then ...all is good
would look god with a set of these
showthread.php?p=236301#post236301
aren't the ID, OD and length matching up between bushes and their intended homes ?
Nearly had a swear moment installing my SOLEX locks just then ...all is good
would look god with a set of these
showthread.php?p=236301#post236301
-
Proton mouse
- Junior Member
- Posts: 378
- Joined: Mon Nov 06, 2006 11:35 pm
- Location: Diagonally parked in a parallel universe
-
Silverbullet
- Senior Member
- Posts: 2870
- Joined: Mon Aug 23, 2010 6:20 pm
- Location: Adelaide
Well when I went to buy L series LCA bushes the Nolathane catalog listed the same part numbers as what I already had in the MY LCA's...I've had it up to here with Nolathane so from now on Super pro all the way.
Will it ever end!?
-EA81 TWIN CARB!!!!
-L series 5 speed
-Custom paint job
-2" lift
-Full custom re-wire
-L series front end
-EA81 TWIN CARB!!!!
-L series 5 speed
-Custom paint job
-2" lift
-Full custom re-wire
-L series front end
some of those urethane bushes need to be guided and pressed in - not sure entirely with the subes stuff - memory thing , but silicone grease, press, press plates - may as well be a jelly wrestler sometimes, so much resistance, pressure, grease, frustration then flubber - stuff pieces off the press, flies about and picks up dirt where it lands, start again . My general rule of thumb was if a bush comes in two halves instead of a whole thing between brands, the two halves always got my money
member since 10january2014 #6191
-
Silverbullet
- Senior Member
- Posts: 2870
- Joined: Mon Aug 23, 2010 6:20 pm
- Location: Adelaide
I should have updated this thread a while ago! Guess it skipped my mind. I ended up getting the correct L series LCA bushings in the end from Superpro. Fitted in properly and it all fitted into the cross member nicely, L series lower control arms installed!  With the L series struts in there as well I put the steering knuckle on and admired my new caster angle
  But something not quite right; the car was way up there on jack stands but the steering knuckle was nearly on the ground!
  With the wheel on it would have looked ridiculous, and no amount of weight would have brought it down.
Then I figured out the L series struts are about 30mm longer than MY struts! Now I'm trying to find a place that can help me mix and match struts/springs or find suitable parts to make this work. I thought MY springs on the L series shock and top mount would bring the height down again, but then again maybe not. L series lowered springs from Kings? would these still perform okay offroad? and would they be 30mm lower than standard springs? Or perhaps cut some out of the L series spring. Will figure this all out when I get to a decent suspension place.
Also in the works, related to this thread; I plan on dropping off my power steering rack for rebuild this week as well as the L series front brake calipers (to a different place) for rebuild and see if they can make my L series/Vortex master cylinder work with a smaller or the stock MY booster so it fits in the position of the stock booster. Also need to work out how I'm going to get L series outer tie rod ends to work on the MY steering rack and L series steering knuckle, fun fun Big bucks are about to be spent!
And lastly, I should see my custom adjustable radius rods back any day now so the front end will be on the ground again very soon. Oh, I also need 2 L series drive shafts before I drop it down. Anybody know of some good shafts? Or are rebuilt genuine ones the way to go?
Then I figured out the L series struts are about 30mm longer than MY struts! Now I'm trying to find a place that can help me mix and match struts/springs or find suitable parts to make this work. I thought MY springs on the L series shock and top mount would bring the height down again, but then again maybe not. L series lowered springs from Kings? would these still perform okay offroad? and would they be 30mm lower than standard springs? Or perhaps cut some out of the L series spring. Will figure this all out when I get to a decent suspension place.
Also in the works, related to this thread; I plan on dropping off my power steering rack for rebuild this week as well as the L series front brake calipers (to a different place) for rebuild and see if they can make my L series/Vortex master cylinder work with a smaller or the stock MY booster so it fits in the position of the stock booster. Also need to work out how I'm going to get L series outer tie rod ends to work on the MY steering rack and L series steering knuckle, fun fun
And lastly, I should see my custom adjustable radius rods back any day now so the front end will be on the ground again very soon. Oh, I also need 2 L series drive shafts before I drop it down. Anybody know of some good shafts? Or are rebuilt genuine ones the way to go?
Will it ever end!?
-EA81 TWIN CARB!!!!
-L series 5 speed
-Custom paint job
-2" lift
-Full custom re-wire
-L series front end
-EA81 TWIN CARB!!!!
-L series 5 speed
-Custom paint job
-2" lift
-Full custom re-wire
-L series front end
-
steptoe
- Master Member
- Posts: 11582
- Joined: Thu Oct 06, 2005 10:00 am
- Location: 14 miles outside Gotham City
well, I know a dude who has recently fitted up (puck, where has the last month gone ??) L Series struts in a Brumby, took very crude measures due to angle, surface variation etc got a healthy ~15mm increase in 'ground' to 'eyebrow' height once suspension sort of settled. Allow for maybe original MYs sagged a bit - it looks right, and I have an engine in place more weight coming and so do you in the form of an extra carb, PS stuff, maybe a Falcodore size battery ....
Oh, threw a lot of L shafts out recently - keeping up that chuck now, someone want later trend
You need some 23 or 25 spline stuff you need to also declare Sam
Oh, threw a lot of L shafts out recently - keeping up that chuck now, someone want later trend
You need some 23 or 25 spline stuff you need to also declare Sam
-
Silverbullet
- Senior Member
- Posts: 2870
- Joined: Mon Aug 23, 2010 6:20 pm
- Location: Adelaide
Well you're probably right, that was roughly 30mm with both struts un-loaded lying on the ground. Still, too high considering I already have a 50mm lift block in there. It's hard to judge this stuff with no weight in the car, maybe I should just leave it until it's loaded up properly? keep the silly high L struts as they are for now.
I planned on getting new drive shafts, 23 spline as far as I know just standard carbie 3.7, 5 speed box. Just my last experience with after market shafts has made me weary of anything but genuine units. Finding old genuine ones to get rebuilt is a hassle, but dunno which after market ones are any good.
I planned on getting new drive shafts, 23 spline as far as I know just standard carbie 3.7, 5 speed box. Just my last experience with after market shafts has made me weary of anything but genuine units. Finding old genuine ones to get rebuilt is a hassle, but dunno which after market ones are any good.
Will it ever end!?
-EA81 TWIN CARB!!!!
-L series 5 speed
-Custom paint job
-2" lift
-Full custom re-wire
-L series front end
-EA81 TWIN CARB!!!!
-L series 5 speed
-Custom paint job
-2" lift
-Full custom re-wire
-L series front end
-
Silverbullet
- Senior Member
- Posts: 2870
- Joined: Mon Aug 23, 2010 6:20 pm
- Location: Adelaide
I love looking at reconditioned parts picked up these little prezzies after work today, reconditioned MY P/S rack and beefy L series calipers. All up cost less than I anticipated which was nice, leaves a little extra for next week  The guys at the steering joint kindly modded the new inner tie rods a bit for me; extended the threaded section inwards and gave me new, thinner lock nuts. This is because I explained my situation with L series steering knuckles, needing L series tie rod ends which are longer than MY so need more thread, thinner nuts, maybe some cutting required. Or maybe not because the L series LCA's push the wheel further out anyway.
*This picture is missing*
Still uhm-ing and arrr-ing about the front struts; since last week I've found out the Kings spring listing for L series and MY are the same, so no height variation there. Must be in the strut itself which means mixing springs wouldn't help me. Where does the extra 30mm come from? Is it in the top bearing assembly? I can't find out since I took my old MY struts and springs apart. If I need a shorter strut, I could go with new MY struts but would these mount up to the L series top bearing assembly? And if yes, I bet the top bearing would bump the height of them up by 30mm Maybe I just give it up and go back to MY struts with no top bearing, since I will have power steering anyway...I think I will hold off on buying new struts and springs next week, spend the money instead on 2 new drive shafts so I can bolt the front end together and put it on the ground! Put my mind at ease about getting dirt in my new bearings too...
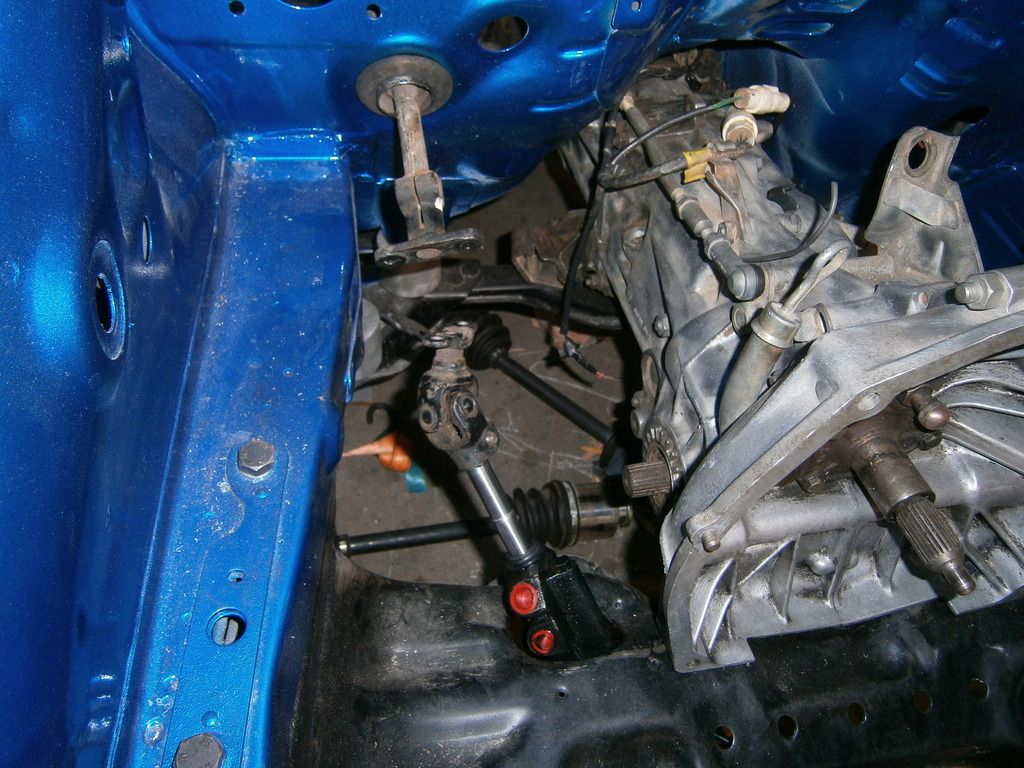
Gearbox mounts are on the way and I have 2 MY gearbox mounting bracket thingies on hand, the L series box will be properly mounted soon! What with the shafts and brakes and steering in there as well it will look nearly finished")
*This picture is missing
Still uhm-ing and arrr-ing about the front struts; since last week I've found out the Kings spring listing for L series and MY are the same, so no height variation there. Must be in the strut itself which means mixing springs wouldn't help me. Where does the extra 30mm come from? Is it in the top bearing assembly? I can't find out since I took my old MY struts and springs apart. If I need a shorter strut, I could go with new MY struts but would these mount up to the L series top bearing assembly? And if yes, I bet the top bearing would bump the height of them up by 30mm
Gearbox mounts are on the way and I have 2 MY gearbox mounting bracket thingies on hand, the L series box will be properly mounted soon! What with the shafts and brakes and steering in there as well it will look nearly finished
Will it ever end!?
-EA81 TWIN CARB!!!!
-L series 5 speed
-Custom paint job
-2" lift
-Full custom re-wire
-L series front end
-EA81 TWIN CARB!!!!
-L series 5 speed
-Custom paint job
-2" lift
-Full custom re-wire
-L series front end
-
Silverbullet
- Senior Member
- Posts: 2870
- Joined: Mon Aug 23, 2010 6:20 pm
- Location: Adelaide
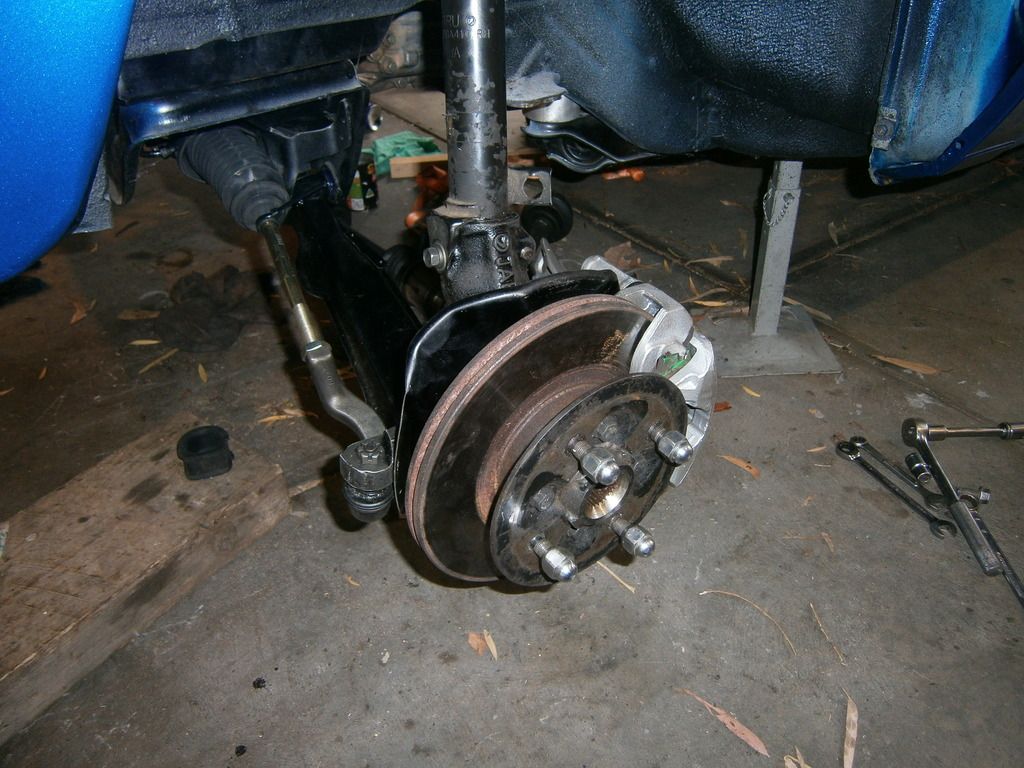
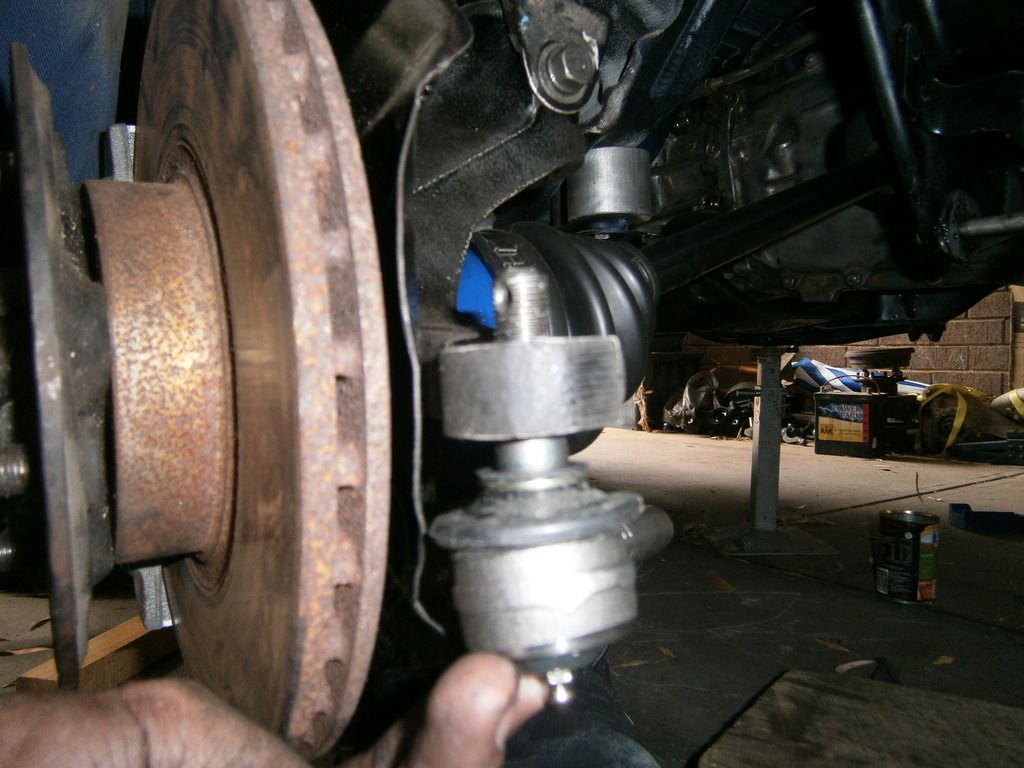
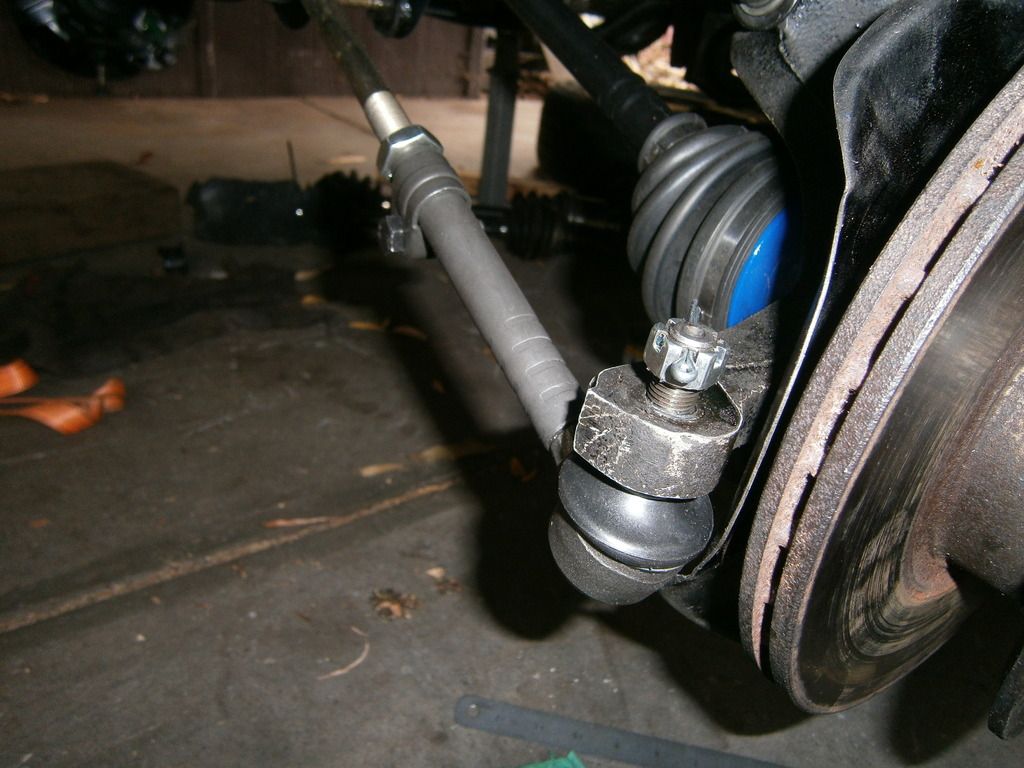
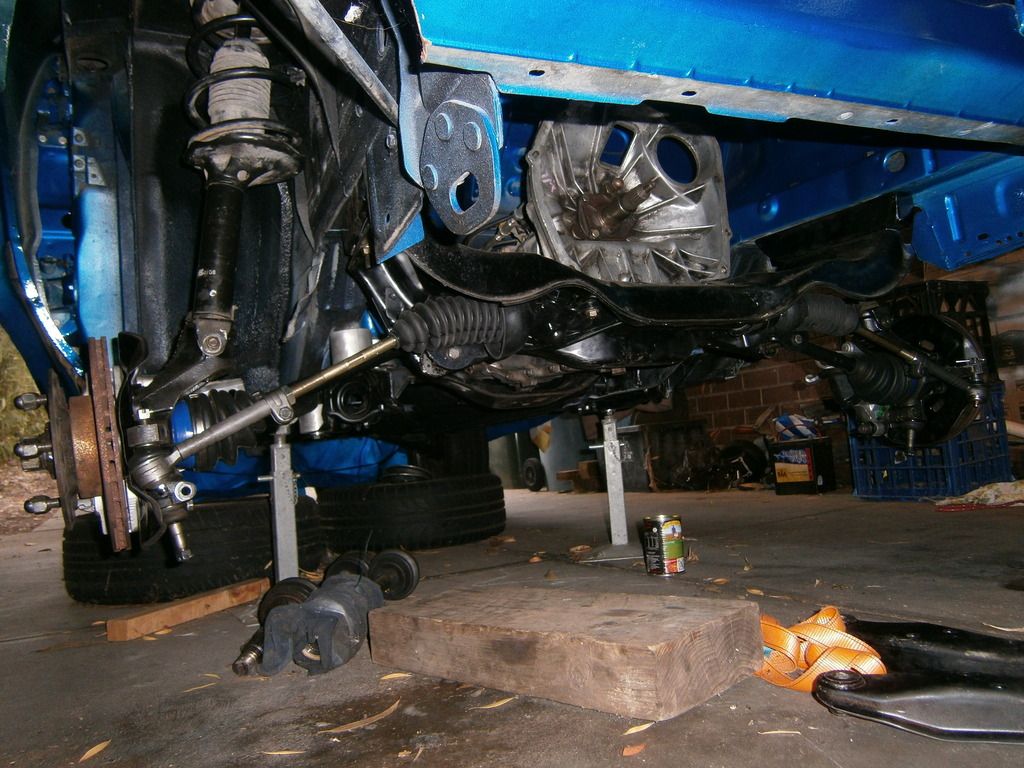
And here is todays progress; steering rack and brakes in place! I am still missing the special P/S mounting bracket for the passenger side, so I temporarily used the old bracket which is too short/small just to hold it up there so I can see how the tie rod ends would work out. Turns out I didn't need more threads and thinner nuts...the tie rod ends are only just threaded on to the tie rods owing to the L series LCA's being longer...I needed longer tie rods! They are on there though, probably no danger of them getting ripped off but I would have liked them to be threaded on a bit more.
With the drive shafts missing I can't bolt the wheels on as the discs are just sort of sitting there. But I did put a wheel on the studs just holding it there to get some kind of idea where the wheel will sit...not liking how much I'm going to need to cut out of the front of the guards Wish I'd done this before it was painted but oh well, when it was being painted I still thought I was using all MY front end bits. The Super pro LCA bushes are quite squidgy, I should be able to pull the arms back a bit with my adjustable radius rods when I get them, maybe 10mm or so without putting huge stresses on everything. OR! put Proton mouses' idea into action of swapping the control arms around, left on right and right on left...would need to hockey stick shape the end of the radius rod though and re-locate the hand brake cable mount...
Anyway new drive shafts next week and hopefully radius rods so it will be on the ground next week
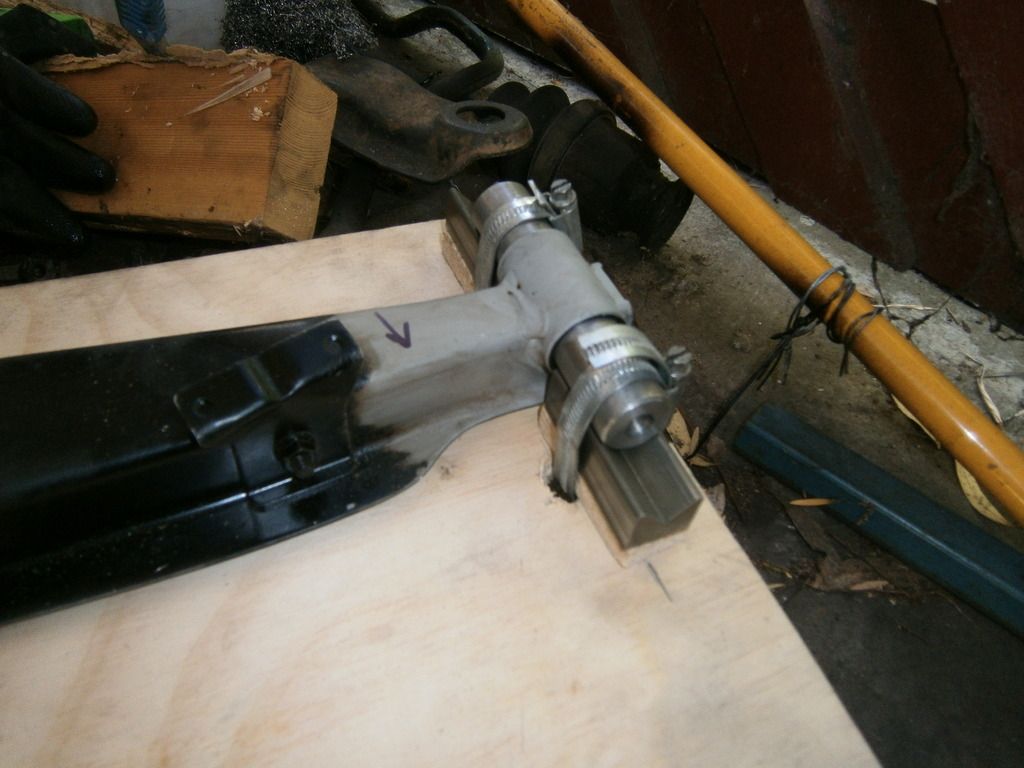
Also could anyone could post a pic of their lifted Brumby/wagon steering extension I would be grateful; I need exactly 50mm of extension but not sure exactly how to do it...If I could get my hands on another uni-joint I might be able to put it on the steering column and with one on the rack as well with the fat 15mm rubber disc it might reach.
With the drive shafts missing I can't bolt the wheels on as the discs are just sort of sitting there. But I did put a wheel on the studs just holding it there to get some kind of idea where the wheel will sit...not liking how much I'm going to need to cut out of the front of the guards
Anyway new drive shafts next week and hopefully radius rods so it will be on the ground next week
Also could anyone could post a pic of their lifted Brumby/wagon steering extension I would be grateful; I need exactly 50mm of extension but not sure exactly how to do it...If I could get my hands on another uni-joint I might be able to put it on the steering column and with one on the rack as well with the fat 15mm rubber disc it might reach.
Will it ever end!?
-EA81 TWIN CARB!!!!
-L series 5 speed
-Custom paint job
-2" lift
-Full custom re-wire
-L series front end
-EA81 TWIN CARB!!!!
-L series 5 speed
-Custom paint job
-2" lift
-Full custom re-wire
-L series front end
-
steptoe
- Master Member
- Posts: 11582
- Joined: Thu Oct 06, 2005 10:00 am
- Location: 14 miles outside Gotham City
L Series strut tops and MY strut tops are not interchangeable as they left the factory due to the size of the D shaped hole in them being larger in L Series tops. MY would swim in there and the flat of the D shape is there to stop shaft piston spining as tighten top nut
What about a solid spacer with four holes all way through and say 75mm grade 8 bolts to join the two bits ?
What about a solid spacer with four holes all way through and say 75mm grade 8 bolts to join the two bits ?
-
Proton mouse
- Junior Member
- Posts: 378
- Joined: Mon Nov 06, 2006 11:35 pm
- Location: Diagonally parked in a parallel universe
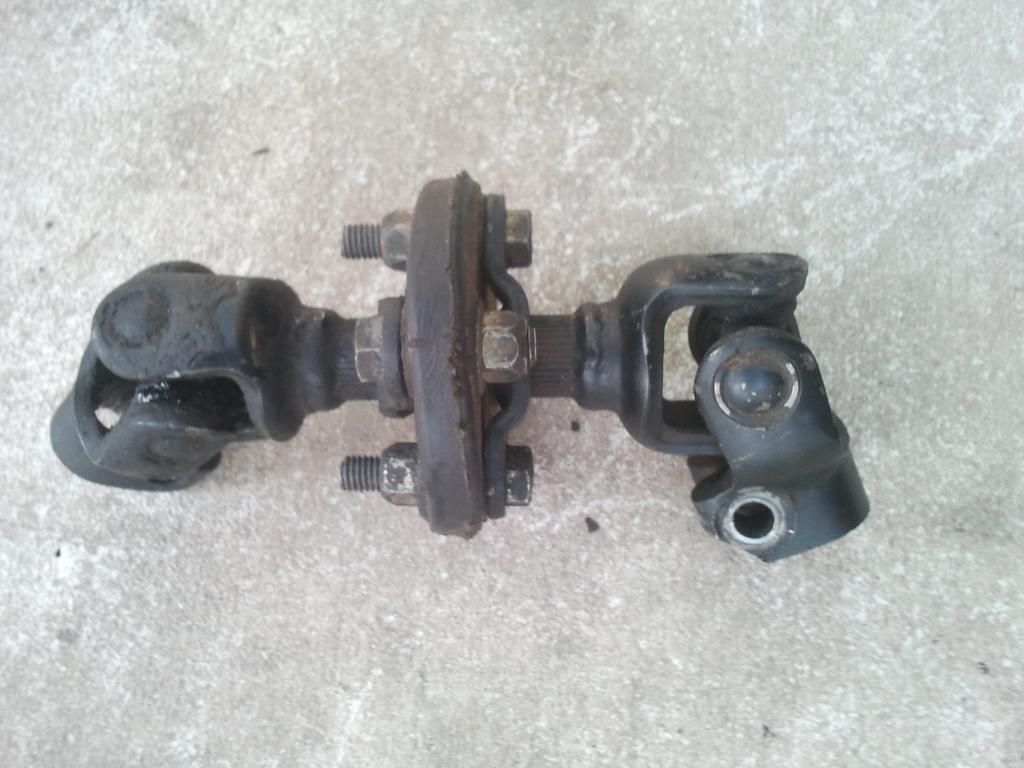
Here you go SB. The first one is a combo of 2 power steer rubber uni's, joined back to back.
I have also made an extension using 2 standard uni's, joined with some splined rod, which I cut from the end of a spare old steering column.
Oh, and I gave up on the idea of swapping LCA's from left to right as I had already drilled the holes for, and modded, the XD strut bars, so it remains a theory
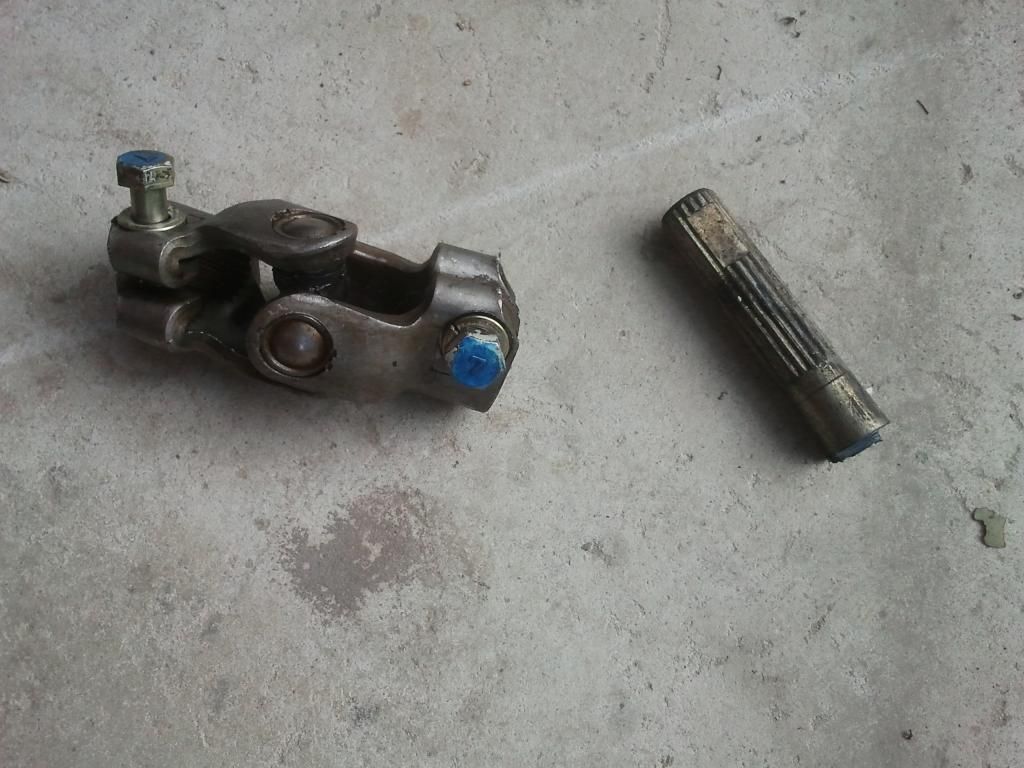


-
El_Freddo

- Master Member
- Posts: 12506
- Joined: Tue Oct 04, 2005 10:00 am
- Location: Bridgewater Vic
- Contact:
SB I'm not sure why you're going for the L series control arm swap. You're not going to have a huge wrx performance MY so the stock geometry should suffice. Personally I would not want to see you cut those beautiful guards, there's a lot of work involved in it and to me it never seems to be right anyway.
I'd still look into the engine crossmember modification so that the control arm mount is the same as the L series. This way the wheel will sit where it should in the guard. Like I said I've seen it done on BratGeebah's Brumby (the original xbread kit creation!).
Engine crossmembers are easy to come by and to mod compared to a very nicely painted guard, plus it'd keep the original look while running the L series front end
Cheers
Bennie

-
Silverbullet
- Senior Member
- Posts: 2870
- Joined: Mon Aug 23, 2010 6:20 pm
- Location: Adelaide
You are right Bennie, I don't want to see me cut those beautiful guards eitherEl_Freddo wrote:SB I'm not sure why you're going for the L series control arm swap. You're not going to have a huge wrx performance MY so the stock geometry should suffice. Personally I would not want to see you cut those beautiful guards, there's a lot of work involved in it and to me it never seems to be right anyway.
I'd still look into the engine crossmember modification so that the control arm mount is the same as the L series. This way the wheel will sit where it should in the guard. Like I said I've seen it done on BratGeebah's Brumby (the original xbread kit creation!).
Engine crossmembers are easy to come by and to mod compared to a very nicely painted guard, plus it'd keep the original look while running the L series front end
Cheers
Bennie
The other issue is what I can get away with legality wise; as it is all these suspension mods I'm doing are going to need special modification exemption paperwork before roadworthy test at least, if not engineer approval as well. Even the brake upgrade needs to be documented and signed off. If I go welding alternative mounts onto the X-member I would probably never get it past an engineer. SA laws are stupidly strict on modifications, the worst in the country and they keep changing the rules pretty much every year (web pages I've put in my favorites folder over the years are now all defunct, non-existent, they change every year) even my adjustable radius rods will be an issue if the inspectors notice them, not allowed under current rules. Whatever happens I can't really go back to stock MY configuration without getting hubs and brakes back together for stock MY config...more $$$ and time. Unless I throw any old rubbish on there in the stock config for rego, then change it back afterwards
Never fear! guard cutting is going to be my last resort.
Oh also, thanks John for the pics! The double-uni joint idea was exactly what I had in mind.
Will it ever end!?
-EA81 TWIN CARB!!!!
-L series 5 speed
-Custom paint job
-2" lift
-Full custom re-wire
-L series front end
-EA81 TWIN CARB!!!!
-L series 5 speed
-Custom paint job
-2" lift
-Full custom re-wire
-L series front end
-
Silverbullet
- Senior Member
- Posts: 2870
- Joined: Mon Aug 23, 2010 6:20 pm
- Location: Adelaide
Hehe, seems like a long way around to me but you're right it would probably be easier to register interstate. Don't think I'll be trailering it too NSW just for rego thoughhenpecked wrote:If you are having to get it inspected before you can register it (?) - get it registered and inspected in your name interstate, then its just a numberplate transfer/exchange for it to be registered here in SA afterwards.
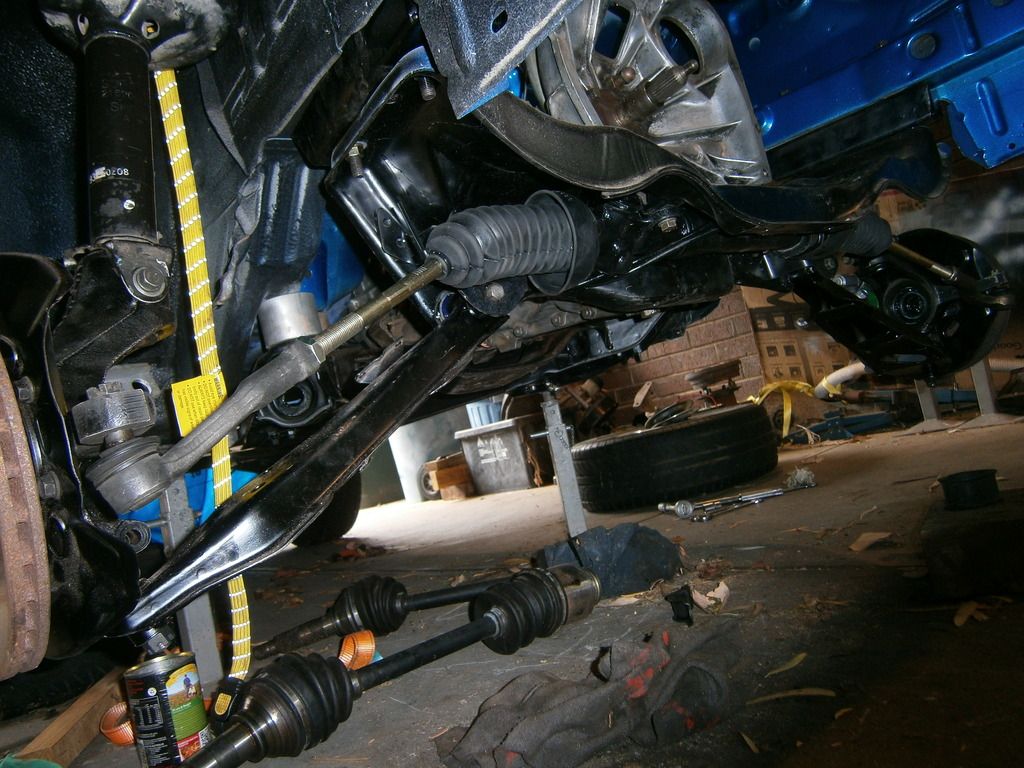
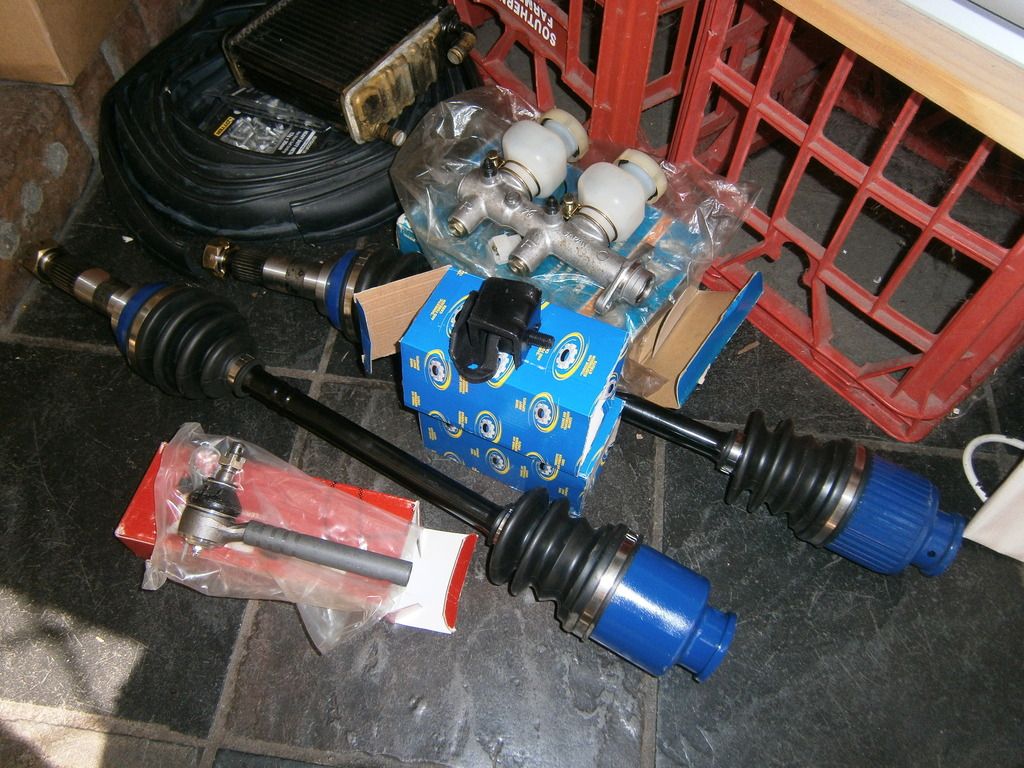
Here's this weeks haul of parts: New brake master cylinder (new old stock, very very old) New gearbox mounts (not genuine, lets see how long these last) Re-conditioned genuine L series drive shafts and...one 86' Camry tie rod end
Oh and ignore the dud heater core and by-the-meter fender flares in the background
Will it ever end!?
-EA81 TWIN CARB!!!!
-L series 5 speed
-Custom paint job
-2" lift
-Full custom re-wire
-L series front end
-EA81 TWIN CARB!!!!
-L series 5 speed
-Custom paint job
-2" lift
-Full custom re-wire
-L series front end
-
Silverbullet
- Senior Member
- Posts: 2870
- Joined: Mon Aug 23, 2010 6:20 pm
- Location: Adelaide
A little more talk since I've been talking to a good engineer friend of mine and shown him my control arms, asking his advice on possible mods to bring the wheel back a bit. Looks like we're going to cut through 90% of the control arm up at the bushing end, the inverted U shape pressed 2mm steel. Leaving one "upright" of the U shape, then tweak/bend the control arm back a few degrees moving the center of the ball joint hole backwards 50mm (using a jig for accuracy and keeping it flat and level) then weld overkill 2mm re-enforcing plates top and bottom and inside the U shape to make it stronger than original as an added bonus.
Other options discussed were swapping the control arms L and R over, and just drilling 2 new holes for the radius rods and hand brake cable mount, also slotting out the holes where the M12 bolt goes through in the cross member, 2mm slot either side would give the adjustment required then when the right angle is found weld 2 thick washers to the X-member with 12mm hole in them to set the bolts at that position permanently.
There's plenty of options out there, all easily achievable without cutting the guards
Will it ever end!?
-EA81 TWIN CARB!!!!
-L series 5 speed
-Custom paint job
-2" lift
-Full custom re-wire
-L series front end
-EA81 TWIN CARB!!!!
-L series 5 speed
-Custom paint job
-2" lift
-Full custom re-wire
-L series front end
-
Silverbullet
- Senior Member
- Posts: 2870
- Joined: Mon Aug 23, 2010 6:20 pm
- Location: Adelaide
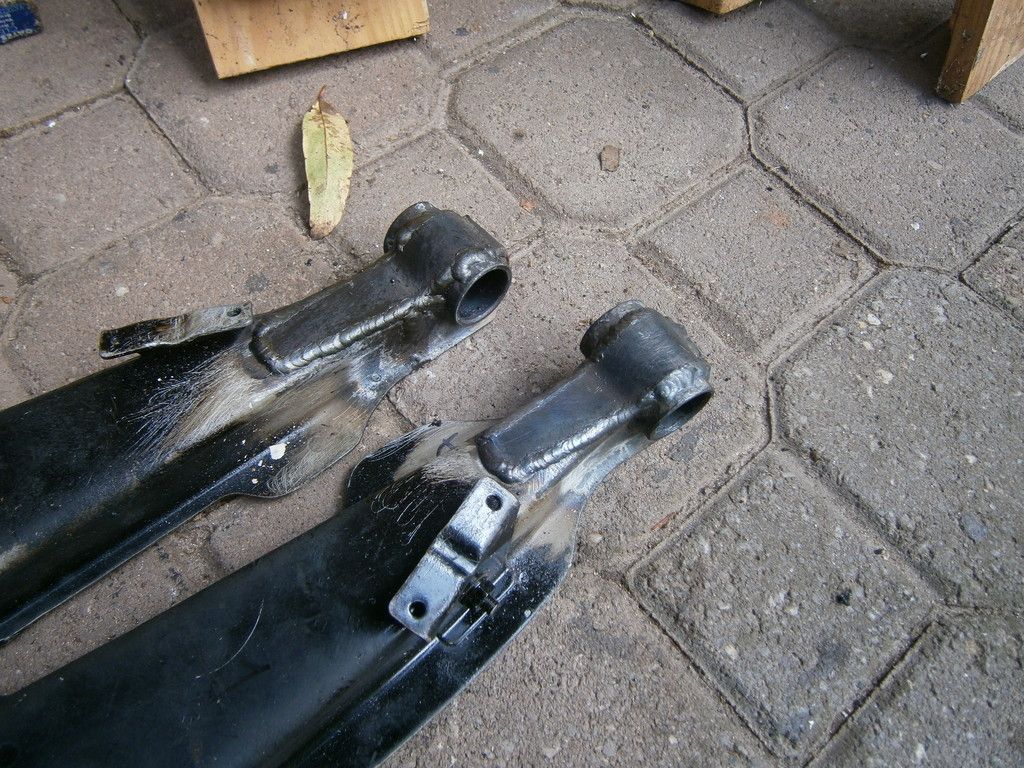
Well here we are 3 weeks later and I've just finished the LCA mods, pics below. I decided to do it myself because it wasn't complicated.
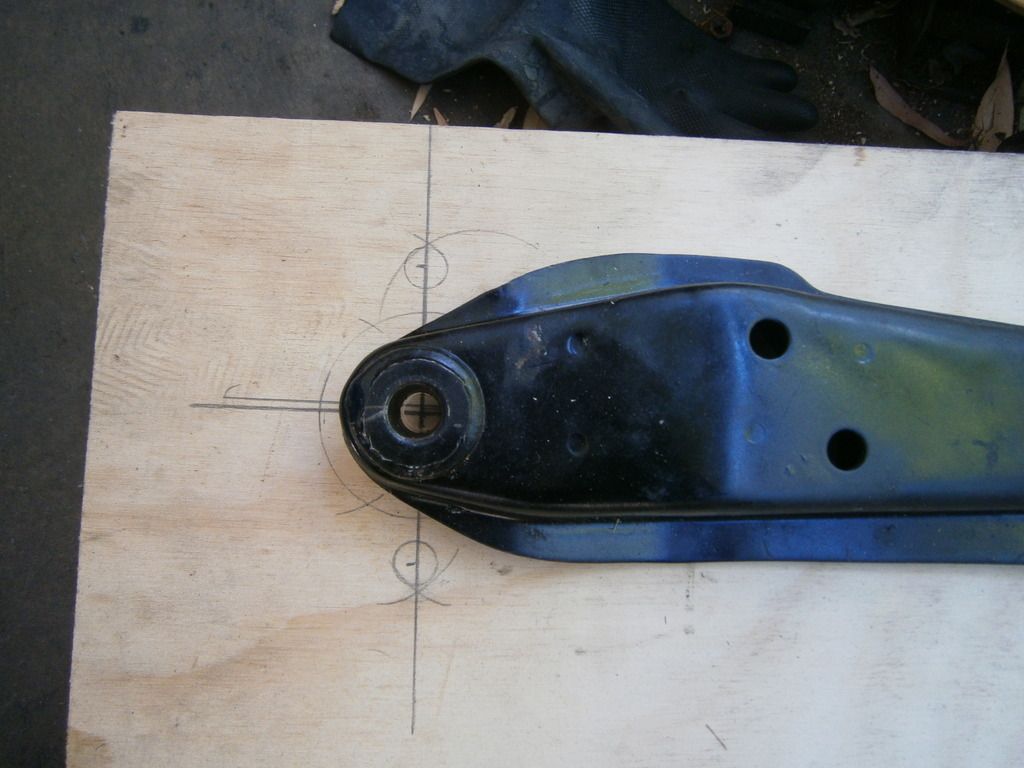
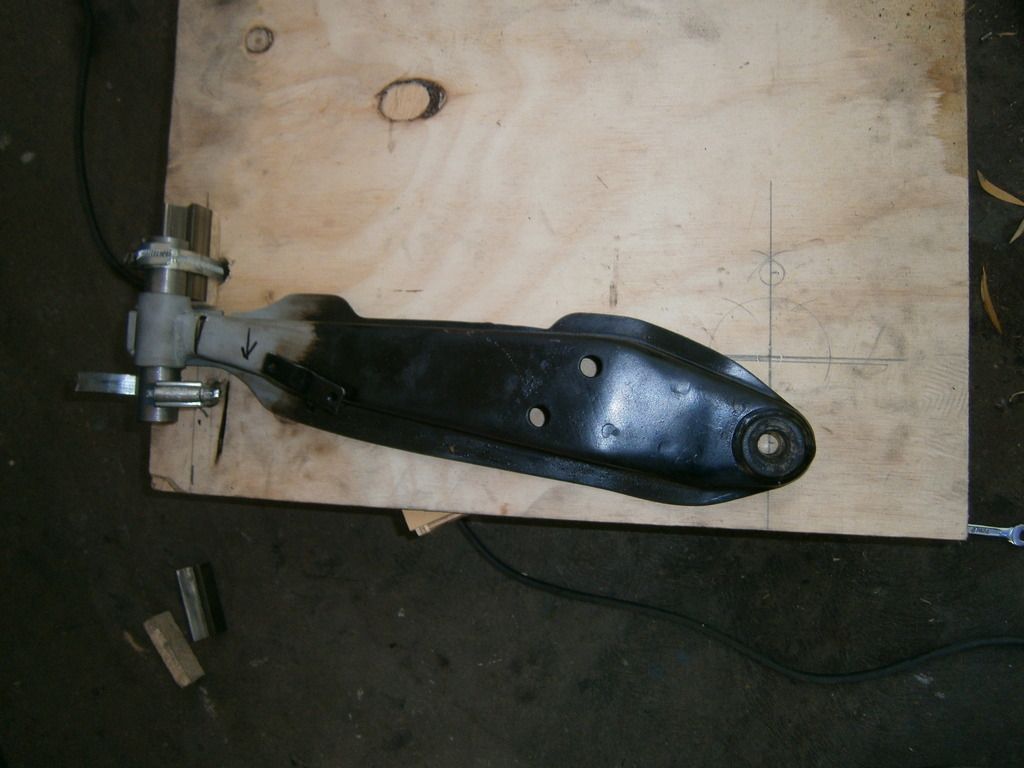
Just had to make a checking jig of sorts to make sure I moved them the right amount. Using a V block and a piece of round bar I turned to be a neat fit inside the LCA bushing hole, I marked out on a board where the V block would be and where the original ball joint hole is. Then I used some basic marking out methods to put a point 50mm either side of the original hole center line on the board and mark a 12mm circle. Needed one either side because left and right LCA's needed tweaking in their respective directions (backwards) I know the board and hose clamps are a bit rough But none of it moved and I was only doing 2 control arms. If I had to do a heap of them I'd make it out of steel and have it all bolted down, to act as a welding jig as well.
Then I cut a slit in the LCA on the opposite side of the bending direction, leaving one piece of the original metal intact to act as a hinge. Took some careful tweaking (not much movement at the bushing hole equals ALOT of movement at the ball joint end) until the ball joint hole lined up with the marked out hole on the board (later found out I needed to tweak it further than the mark, because the welding pulled it back so much)
Made up some simple re-enforcing pieces out of 2mm steel, top piece wrapping up and over the LCA mount tube and tapering off in the other direction. And a simple U shaped section on the underside to weld all around the slit. As I said I had to over-bend the arms so then the shrink in the weld pulled them back to the right position. I'm pretty confident they are almost spot on 50mm adjusted and if they are 1 or 2mm out in either direction it wouldn't matter since it can be adjusted with the radius rods (coming soon) I'll re-paint these and put the bushings back in, looking forward to seeing the results of this mod (if it even works or not)
I worked out the original MY arms are swept back from the mount point by about 75mm, and now these L series longer arms are only 50mm so I should still keep a better caster angle. As for this being an "illegal" mod having not been welded by a certified boiler maker dude (big $$$) I'll cross that hurdle if and when I get to it, if it even gets picked up by the inspector (if it even gets inspected underneath)
Pictures speak a thousand words, so here you go
Checking jig business end
Marked out circles where the ball joint hole should be
Cut a slit in the LCA

Adjust the control arm backwards by 50mm
Re-enforcement piece, you can also see the lower re-enforcement through the gap, this gap was also fully welded through onto the piece underneath.
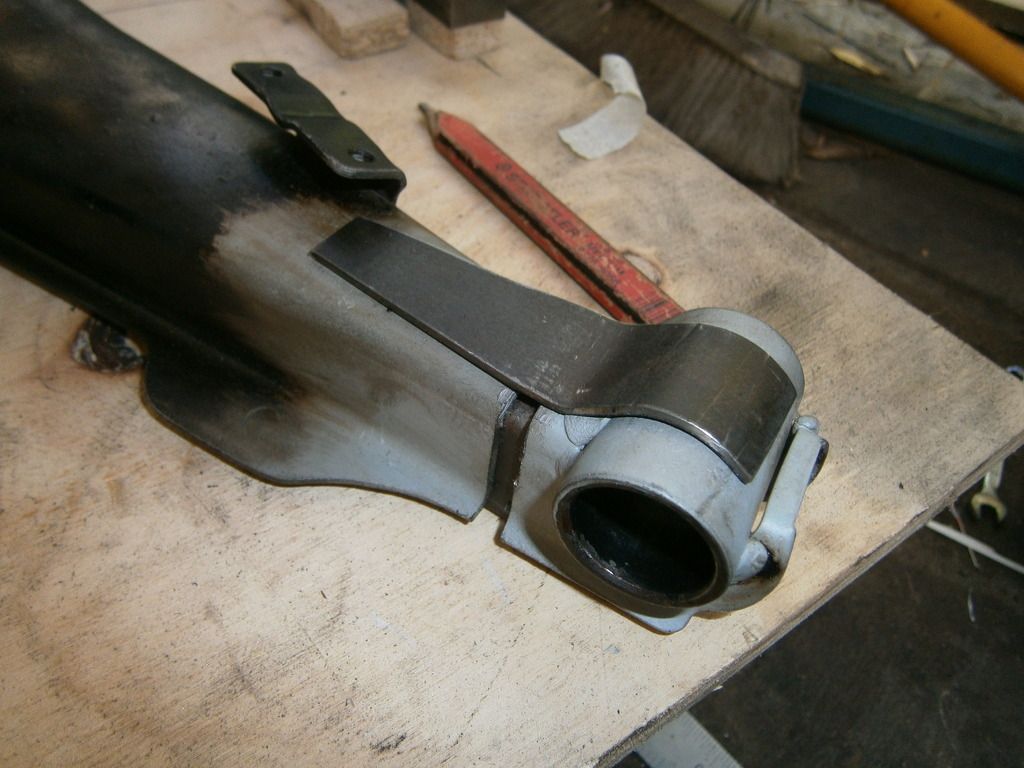
Hot off the welder after a wire brushing, now time to clean all the crap off and re-paint them
Just had to make a checking jig of sorts to make sure I moved them the right amount. Using a V block and a piece of round bar I turned to be a neat fit inside the LCA bushing hole, I marked out on a board where the V block would be and where the original ball joint hole is. Then I used some basic marking out methods to put a point 50mm either side of the original hole center line on the board and mark a 12mm circle. Needed one either side because left and right LCA's needed tweaking in their respective directions (backwards) I know the board and hose clamps are a bit rough
Then I cut a slit in the LCA on the opposite side of the bending direction, leaving one piece of the original metal intact to act as a hinge. Took some careful tweaking (not much movement at the bushing hole equals ALOT of movement at the ball joint end) until the ball joint hole lined up with the marked out hole on the board (later found out I needed to tweak it further than the mark, because the welding pulled it back so much)
Made up some simple re-enforcing pieces out of 2mm steel, top piece wrapping up and over the LCA mount tube and tapering off in the other direction. And a simple U shaped section on the underside to weld all around the slit. As I said I had to over-bend the arms so then the shrink in the weld pulled them back to the right position. I'm pretty confident they are almost spot on 50mm adjusted and if they are 1 or 2mm out in either direction it wouldn't matter since it can be adjusted with the radius rods (coming soon) I'll re-paint these and put the bushings back in, looking forward to seeing the results of this mod (if it even works or not
I worked out the original MY arms are swept back from the mount point by about 75mm, and now these L series longer arms are only 50mm so I should still keep a better caster angle. As for this being an "illegal" mod having not been welded by a certified boiler maker dude (big $$$) I'll cross that hurdle if and when I get to it, if it even gets picked up by the inspector (if it even gets inspected underneath)
Pictures speak a thousand words, so here you go
Checking jig business end
Marked out circles where the ball joint hole should be
Cut a slit in the LCA
Adjust the control arm backwards by 50mm
Re-enforcement piece, you can also see the lower re-enforcement through the gap, this gap was also fully welded through onto the piece underneath.
Hot off the welder after a wire brushing, now time to clean all the crap off and re-paint them
Will it ever end!?
-EA81 TWIN CARB!!!!
-L series 5 speed
-Custom paint job
-2" lift
-Full custom re-wire
-L series front end
-EA81 TWIN CARB!!!!
-L series 5 speed
-Custom paint job
-2" lift
-Full custom re-wire
-L series front end
-
Silverbullet
- Senior Member
- Posts: 2870
- Joined: Mon Aug 23, 2010 6:20 pm
- Location: Adelaide
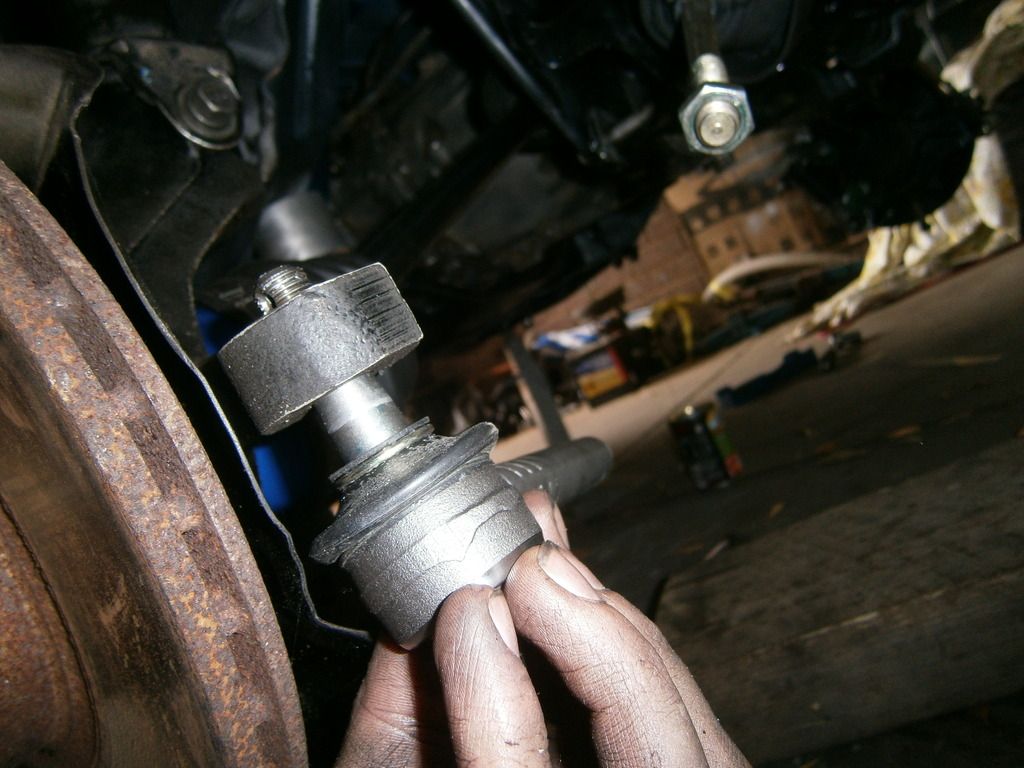
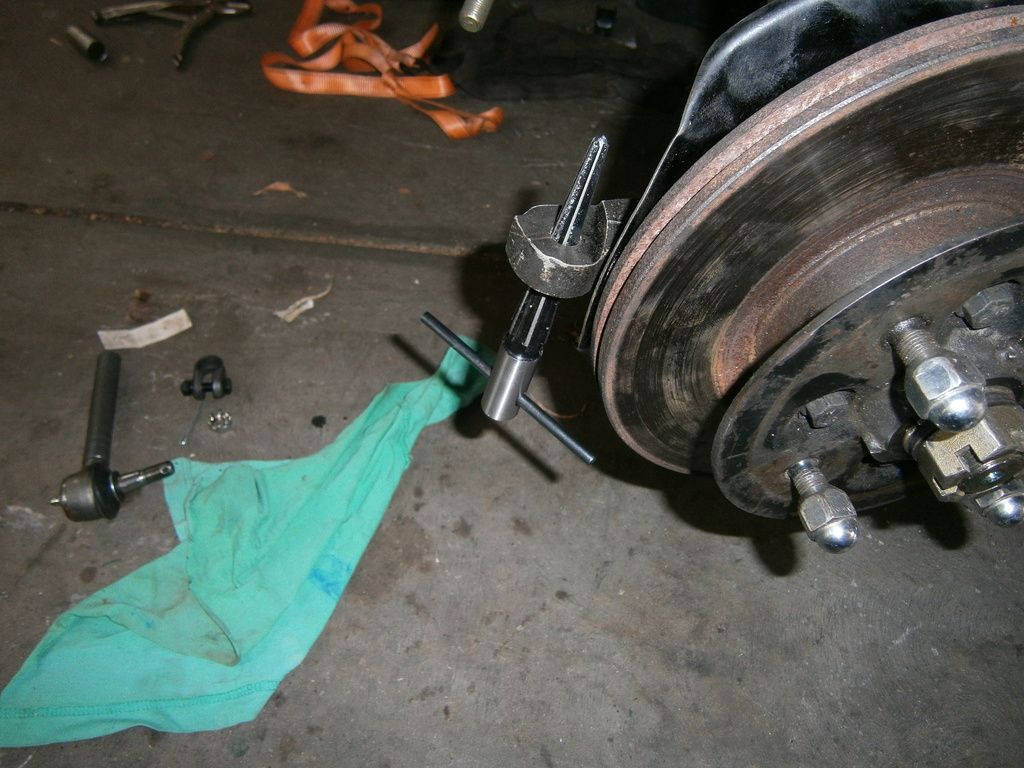
And the other thing I did today; tested out that tapered reamer. I double checked it by running it through an old Brumby steering hub I had, and it cleaned all the rust off the whole length of the taper in a couple of turns, nice When it came to reaming the L series hub it was bloody slow going, since the hub was on the car trying to force the reamer upwards and turning it with that tiny cross bar, hitting the brake backing plate every time...but I wasn't taking the hub off, it was too much effort to put it back again  And after the first one was done the reamer showed it's cheap-ness by being considerably less sharp for the second hole...took about twice as long, what I wouldn't give to have been able to put it in a cordless drill But anyway it's done, Camry tie rods fitted and fitting nicely, plenty of length and adjustment there. Pulling the nut up tight sees the rack end lock into place in the hole, needs a good whack to dislodge it again. Just need some 10mm spacers on the top side now because the nut goes way past the hole for the split pin.
Pics:
Tie rod end does not fit, only half way there
Ream the hole out, slow going and hard work
Now it fits! nearly...a bit more reaming to go on this one
Installed one side
Steering rack with both tie rod ends fitted, looking good
Pics:
Tie rod end does not fit, only half way there
Ream the hole out, slow going and hard work
Now it fits! nearly...a bit more reaming to go on this one
Installed one side
Steering rack with both tie rod ends fitted, looking good
Will it ever end!?
-EA81 TWIN CARB!!!!
-L series 5 speed
-Custom paint job
-2" lift
-Full custom re-wire
-L series front end
-EA81 TWIN CARB!!!!
-L series 5 speed
-Custom paint job
-2" lift
-Full custom re-wire
-L series front end