Silverbullets' resto: Engine, gearbox, suspension

Detailed reference pages on Members special projects ...
Post Reply
User avatar
Silverbullet
Senior Member
Posts: 2870
Joined: Mon Aug 23, 2010 6:20 pm
Location: Adelaide

Post by Silverbullet » Sat Apr 11, 2015 10:00 pm

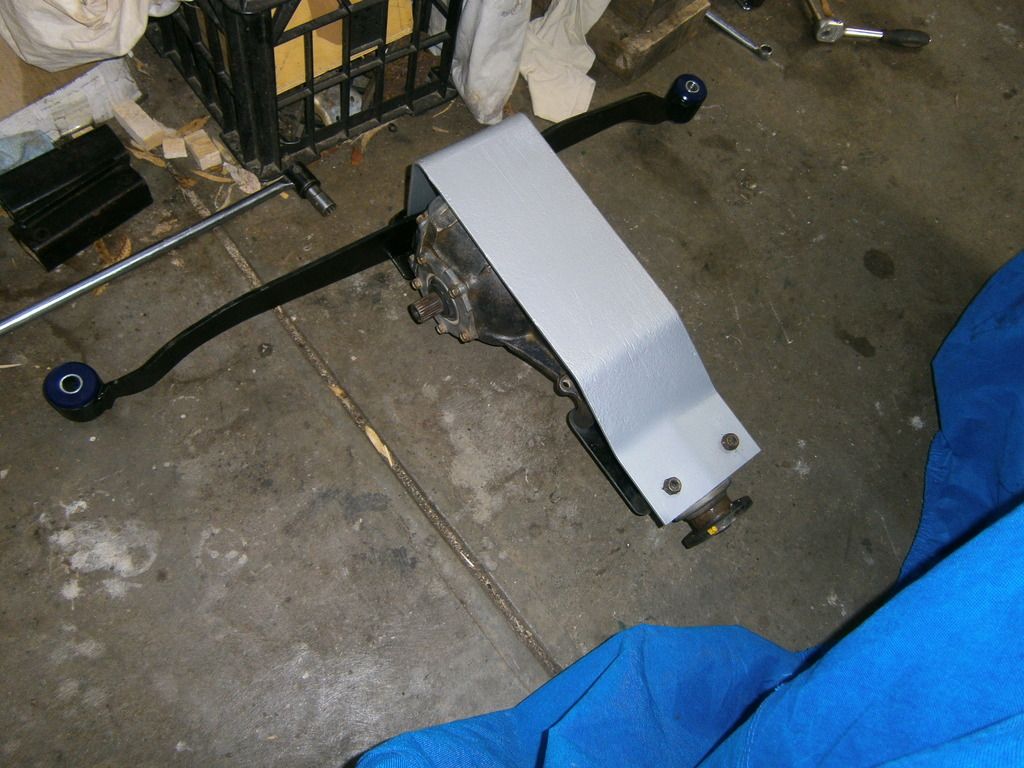
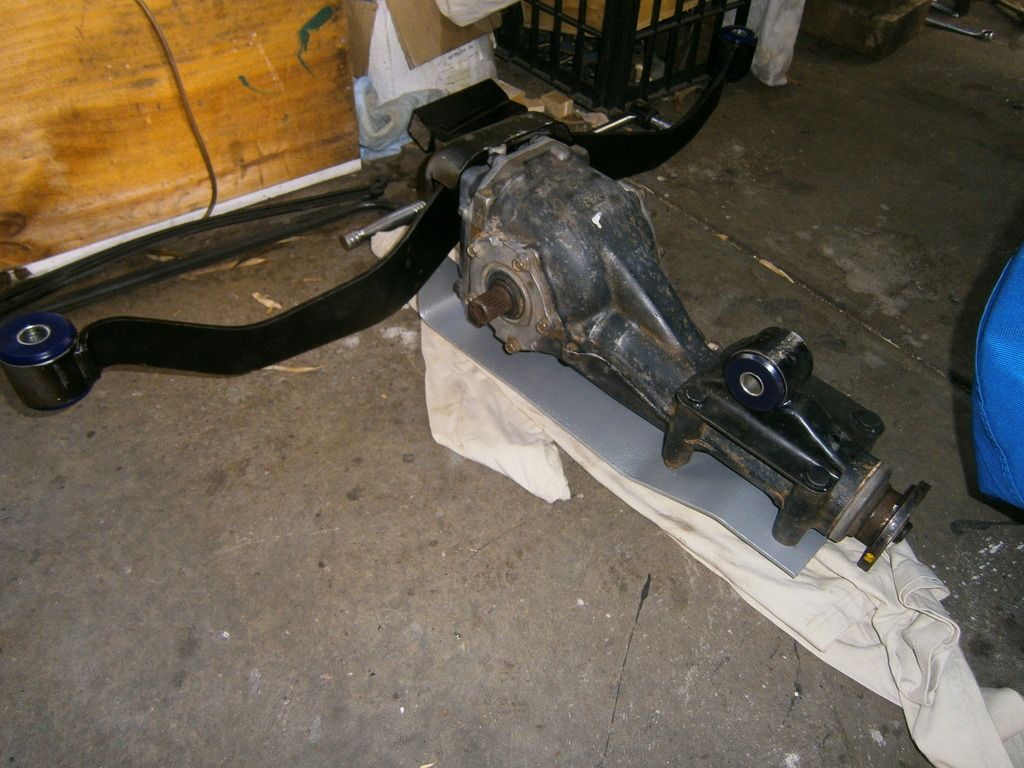
Rear end assembled, painted bash plate and new urethane bushings
Image
Image
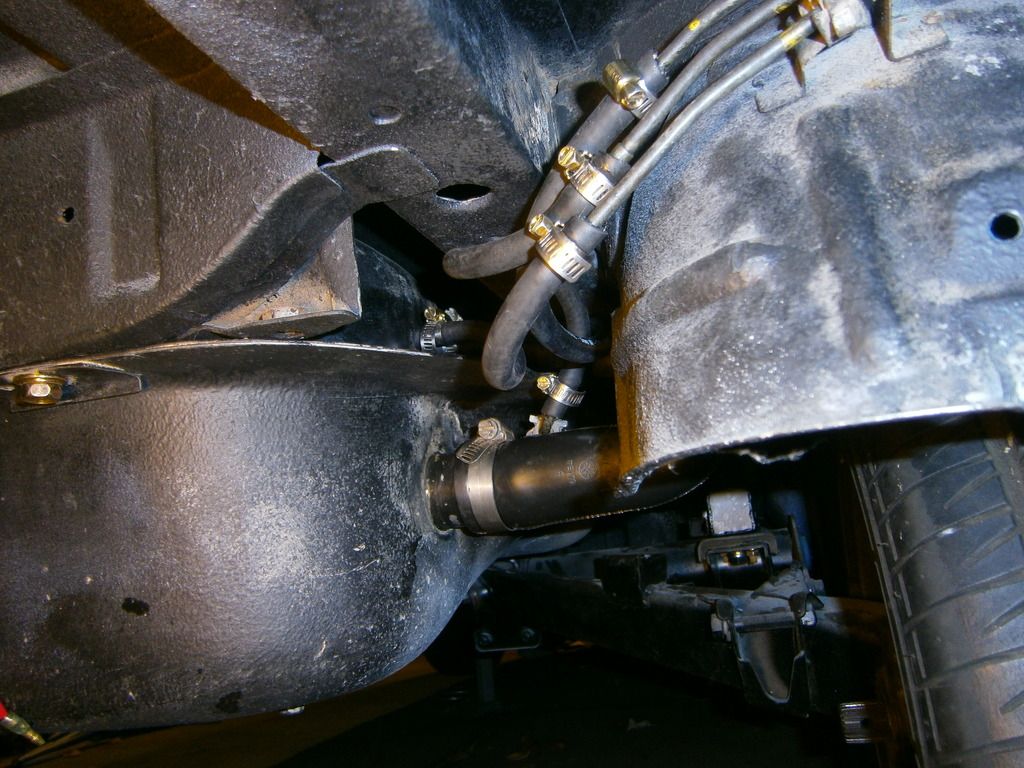
And the business end of the fuel tank...look at all those stainless hose clamps!
Image
Will it ever end!?
-EA81 TWIN CARB!!!!
-L series 5 speed
-Custom paint job
-2" lift
-Full custom re-wire
-L series front end
Image

User avatar
steptoe
Master Member
Posts: 11582
Joined: Thu Oct 06, 2005 10:00 am
Location: 14 miles outside Gotham City

Post by steptoe » Sat Apr 11, 2015 10:43 pm

thanks for including the moustachio bar bush numbers - one pack do the car i suppose ?

Really cannot see how sexy new bushes would be better than cruddy old ones this far back from the performance end?? Maybe they work in polarised harmony with the rest of the new bushes ? The right colour anyway !!

User avatar
Silverbullet
Senior Member
Posts: 2870
Joined: Mon Aug 23, 2010 6:20 pm
Location: Adelaide

Post by Silverbullet » Sun Apr 12, 2015 12:20 am

steptoe wrote:thanks for including the moustachio bar bush numbers - one pack do the car i suppose ?

Really cannot see how sexy new bushes would be better than cruddy old ones this far back from the performance end?? Maybe they work in polarised harmony with the rest of the new bushes ? The right colour anyway !!
One pack = one bush and tube. You need one pack for each end, and another identical for the pinion mount in the middle :) Forget about trying to press them in, or even in a vice as the Superpro video shows. Snowflakes chance in hell I think is the right way to put it. The only way to do it with the cotton reel style bushings is a long bolt, nut and some big ass washers. As soon as the big flange on the bush pops into the bore, you can push it the rest of the way by hand :rolleyes:

You're right, probably no difference in performance this far back but I'm putting new everything else in anyway ;)
Will it ever end!?
-EA81 TWIN CARB!!!!
-L series 5 speed
-Custom paint job
-2" lift
-Full custom re-wire
-L series front end
Image

User avatar
Bantum
General Member
Posts: 1923
Joined: Sun Jul 29, 2012 4:30 pm
Location: Northern Territory + QLD
Contact:

Sealed ...

Post by Bantum » Sun Apr 12, 2015 1:35 am

Nice work Sam ... :D

There's a much easier way to get that up there - put it on a trolley jack ... !

P.S. - While you have got it out - Don't forget to do the diff seals ... ;)

Cheers, Bantum ...

User avatar
Subydoug
Junior Member
Posts: 988
Joined: Wed Feb 08, 2012 10:19 pm
Location: Carlisle WA

Post by Subydoug » Sun Apr 12, 2015 10:50 am

I remember Wrangling my diff in a similar fashion, but I had the mustache bar in place already. You got to remember, it was early 1980's. Getting stuff CNC fab'd would have been more expensive then a monkey with a drill press and a torch. Becides, I cant have seen many people wanting a diff guard or more subies would have them.

Remember the cv shafts need to be in place when you put the diff in too ;).

Regards

Doug

User avatar
steptoe
Master Member
Posts: 11582
Joined: Thu Oct 06, 2005 10:00 am
Location: 14 miles outside Gotham City

Post by steptoe » Sun Apr 12, 2015 12:17 pm

Back then the ATO also had local content incentives to help overseas makers with lower pricing or more profits, maybe was lower taxs :) , so, if the local manufactuurers could knock up the extras such as tow bar, floor mats bullbars, and say diff guards - the cars were sold with some local content - some tax incentives gained as well as local jobs and profit. That diff guard may have been made just around the corner from Sams parents place at the time. I have one from an UGLY rear diff - I gave it similar bush engineering to make it fit the Brumby diff :)

The way I get those rear diffs in is to have moo bar bolted to back end, hook one end up to one side at lowest thread possible, next side, then the front.

It is comforting to know others get aches the day after :p

User avatar
El_Freddo
Master Member
Posts: 12506
Joined: Tue Oct 04, 2005 10:00 am
Location: Bridgewater Vic
Contact:

Post by El_Freddo » Sun Apr 12, 2015 6:18 pm

Silverbullet wrote: Image
You need to turn that "pinion" diff bush around, you've got it backwards :(

I'm jealous about that rear end, it'll be nice and tight - yet you don't have AWD to make use of it all the time :(

I really need to do this to the rear of Ruby Scoo! Were the bushes expensive?

Cheers

Bennie
"The lounge room is not a workshop..."
Image
El Freddo's Pics - El_Freddo's youtube

User avatar
steptoe
Master Member
Posts: 11582
Joined: Thu Oct 06, 2005 10:00 am
Location: 14 miles outside Gotham City

Post by steptoe » Sun Apr 12, 2015 7:07 pm

prize in the mail for El_Freddo !

User avatar
Silverbullet
Senior Member
Posts: 2870
Joined: Mon Aug 23, 2010 6:20 pm
Location: Adelaide

Post by Silverbullet » Sun Apr 12, 2015 7:19 pm

El_Freddo wrote:You need to turn that "pinion" diff bush around, you've got it backwards :(

I'm jealous about that rear end, it'll be nice and tight - yet you don't have AWD to make use of it all the time :(

I really need to do this to the rear of Ruby Scoo! Were the bushes expensive?

Cheers

Bennie
So you are right! :oops: I thought the longer side of that carrier bracket went towards the front :rolleyes: Well that's probably why the front bushing didn't line up. Yes sadly it doesn't have AWD...yet ;) I'm always on the lookout for an AWD D/R box/diff from an L series as I assume they have all the same dimensions/mountings as the standard g/box? Although...they probably came from EFI only vehicles so would have a different CV spline count. Or even a 3.9 ratio box and diff would be nice. I got the bushes from ebay, $45 each. The hard part is removing the old shells, I turned up a punch and die specifically to hold everything properly, and it took all of my 12T press to pop them out with a loud *CRACK* I'm sick of the hacksaw/BFH method.

Jonno I don't doubt a scheme along those lines was probably in place. I don't mind putting it back as is since it has a bit of a story/history attached to it. There's a few bits like that I am determined to put back on i.e the gear knob and sporty leather steering wheel (after the dried up cracked leather is replaced) Just to keep some reminders of this cars past :) Will probably keep the old log book and user manual in the glove box as well.

I have decided to install the diff this way with the mo bar already attached since the bash plate is a real PITA to install. The rear studs sticking out of the diff must go through the mo bar, through the holes in the bash plate and then put the nuts on. And I wish I had a trolley jack up to this task :rolleyes: I had a close look at the output stub seals as well, no sign of weepage and they look healthy so I wasn't going to touch them for now.

Didn't get any spare time today so no shifter linkages :( Next week definitely.
Will it ever end!?
-EA81 TWIN CARB!!!!
-L series 5 speed
-Custom paint job
-2" lift
-Full custom re-wire
-L series front end
Image

User avatar
El_Freddo
Master Member
Posts: 12506
Joined: Tue Oct 04, 2005 10:00 am
Location: Bridgewater Vic
Contact:

Post by El_Freddo » Mon Apr 13, 2015 10:14 am

Silverbullet wrote:I'm always on the lookout for an AWD D/R box/diff from an L series as I assume they have all the same dimensions/mountings as the standard g/box? Although...they probably came from EFI only vehicles so would have a different CV spline count.
Yeah, not just ANY EFI model - these boxes came in the RXII coupes and in single range in the AWD Vortexes. The RXII didn't come to Oz, and the AWD Vortex is hard to find in the yards! Further to this you have to get a box with a good centre diff. My first purchase was a dud which now basically makes that box redundant unless I can get a new housing machined up - I don't like my chances there.

This box is 90% the same dimensions as the PT L series box. Everything bolts in the same but the linkages need some slight modification (in my experience it did anyway!) and if your exhaust hugs the rear of the gearbox like mine did it'll have to be modified to clear the change in the casing for the housing of the centre diff at the rear of the gearbox... Fun and games.
Also the output stubs can easily be changed by splitting the gearbox. While you're there you might as well drop the good L's 1.59:1 low range in there as these boxes only had 1.19:1 low (turbo box).

IMO the best way to get an AWD box is to go with an early liberty box (3.9 diff ratio) or an impreza box (also 3.9). My idea for Redback is to swap the 3.9 ratio diff to 3.7 to bring the factory gearing into spec with the stock 23 inch tyre diametre. Shove all of this inside a set of L series cases and you've got a box that is AWD and bolts to the engine. Tail shaft and crossmember will have to me made up, as will the linkages. They're the two downer's on this build plan of mine...

Some day it'll happen!

Cheers

Bennie
"The lounge room is not a workshop..."
Image
El Freddo's Pics - El_Freddo's youtube

User avatar
steptoe
Master Member
Posts: 11582
Joined: Thu Oct 06, 2005 10:00 am
Location: 14 miles outside Gotham City

Post by steptoe » Tue Apr 14, 2015 10:49 am

I have a awd single range box from a Vortex (from Adelaide - sorry)just waiting for those 23 spline short shafts to be fitted. Pulled a FWD box apart for practice - seemed to go very smoothly - no low range bits to deal with. Just hope I am lucky in that it was a stolen car with some 300,000km , recovered, then ended up at a wrecker who said box was good - sold it to Disco - excess to his requirements ....

As for the shifter levers that someone did not include with the box. I went the WRX short shifter route that was a direct fit according to someone in here. Calling BS here now on that one or my short shifter was different. I just pulled the hi/lo off and outta the equation - nice shifting on the floor !

User avatar
Silverbullet
Senior Member
Posts: 2870
Joined: Mon Aug 23, 2010 6:20 pm
Location: Adelaide

Post by Silverbullet » Sat Apr 18, 2015 2:43 pm

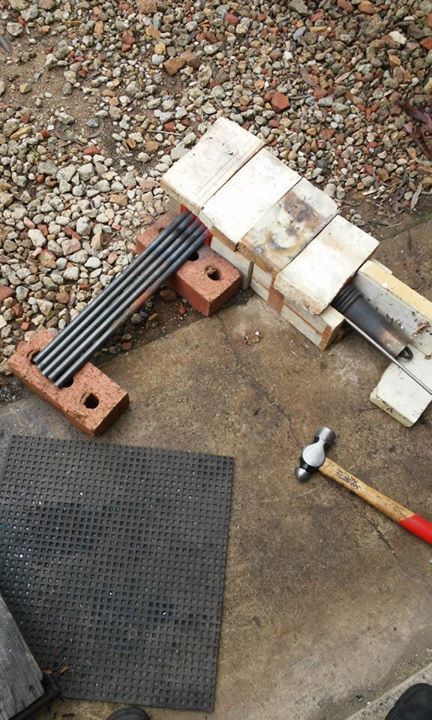
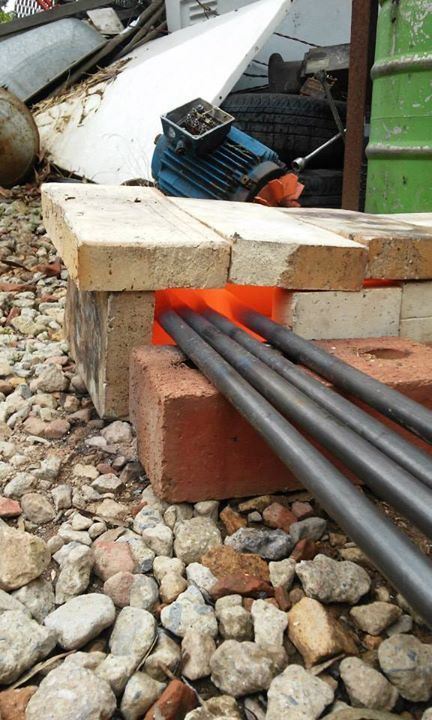
A small update from this morning; my adjustable chromoly radius rods are finally underway :p It took alot more to flatten them out than anticipated; apparently this is aircraft main spar grade A stuff, toughest of this steel he's ever come across...wanted to know where I got it :rolleyes: So I went around there to help out with the BFH to flatten them out (that hammer in the picture was nowhere near enough) even with them glowing bright orange the hammer just bounces off. The fire brick forge and propane torch was only just hot enough. Proper forging charcoal was not available so we just hit it many many times with this set up until the right width was achieved for the bolt holes, then finished them off in a big hydraulic press to smooth them out and then finished off the finer details with a ball pein hammer. These things are going to be monumentally strong, will definitely not bend now so I will be keeping an eye on the mounting bracket at the other end if one of the wheels takes a hard hit.

That was the hard part, and the screw-cutting at the other end will happen early next week and won't take long. Looks like I bought enough steel to make 3 extra pairs apart form mine so depending on how these turn out the extras will be for sale.

Image
Image
Will it ever end!?
-EA81 TWIN CARB!!!!
-L series 5 speed
-Custom paint job
-2" lift
-Full custom re-wire
-L series front end
Image

User avatar
Silverbullet
Senior Member
Posts: 2870
Joined: Mon Aug 23, 2010 6:20 pm
Location: Adelaide

Post by Silverbullet » Sat Apr 18, 2015 7:46 pm

And the other thing I did later on this cold, wet, miserable day; rear diff finally installed. Turned the pinion mount bracket around and it went together in about 10 minutes. Also slotted some holes in the gearbox crossmember (g/box mount holes AND the x-member to body mounting holes) and got the box looking a bit better, still not convinced it will be enough though. Will wait until I have a tailshaft on it and also the engine bolted in because I think this will affect it as well.

Image
Will it ever end!?
-EA81 TWIN CARB!!!!
-L series 5 speed
-Custom paint job
-2" lift
-Full custom re-wire
-L series front end
Image

User avatar
El_Freddo
Master Member
Posts: 12506
Joined: Tue Oct 04, 2005 10:00 am
Location: Bridgewater Vic
Contact:

Post by El_Freddo » Sat Apr 18, 2015 8:56 pm

Looking good mate!

And awesome effort on the radius rods!

I'd love a set of L series units that are about half an inch to an inch longer - or if they're adjustable it wouldn't really matter so long as there was extra thread to play with. That said I really can't extend myself further than I already have - and now I've got an RS turbo dream to let go of as well :(

Glad it was a simple fix to fit the diff in! Simple once it all lines up ;)

Cheers

Bennie
"The lounge room is not a workshop..."
Image
El Freddo's Pics - El_Freddo's youtube

User avatar
Silverbullet
Senior Member
Posts: 2870
Joined: Mon Aug 23, 2010 6:20 pm
Location: Adelaide

Post by Silverbullet » Sat Apr 25, 2015 1:43 pm

L series shifter linkages installed :) I had to spin up a couple of crush tubes at work this week for some of the bushings (missing when I got the g/box) so that's why it has taken this long. Very happy with the results, it's a very tight accurate feeling shifter now compared to the sloppy old MY shifter. The range lever is not done yet but it should be a simple affair using the original MY lever. I can't find the blasted push rod that goes to the gearbox from the 4 speed so I will have to cut and weld the L series one to adapt it to the MY range selector.

Instead of 10 photos explaining it I decided to test out my new phones filming capabilities...and instead of a wall of text you all have to put up with my voice instead :mrgreen: After watching this video I have noticed the gear stick is a fair way back in the hole in the tranny tunnel, I'm digging out the MY rubber boot now to see if this is an issue.

So Geoff (henpecked) here's how I did it, it worked the way I thought it was going to so you're welcome over any time if you're still interested in seeing the car ;)

*edit* rubber boot fits perfectly (with all the wrong screws but)
Image


https://www.youtube.com/watch?v=noeIq6vGByw
Will it ever end!?
-EA81 TWIN CARB!!!!
-L series 5 speed
-Custom paint job
-2" lift
-Full custom re-wire
-L series front end
Image

User avatar
Nubaru
Junior Member
Posts: 165
Joined: Fri Jan 10, 2014 8:02 am
Location: within the girth

Post by Nubaru » Sat Apr 25, 2015 8:56 pm

nice presentation and proof of no need to cut L series components to fit in - keep up the good work. May I ask when you expect all this work will be up and going?

Sort of losing track of this project - EA81 and l series 5 speed ? How you going to make these two work as they are not just a bolt together pair are they ?
member since 10january2014 #6191

User avatar
TOONGA
Elder Member
Posts: 5335
Joined: Sat May 30, 2009 10:15 am
Location: Australind closer to where they divided by zero
Contact:

Post by TOONGA » Sun Apr 26, 2015 9:33 am

Well done SB... but next time hold the phone sideways :)
Nubaru wrote: Sort of losing track of this project - EA81 and l series 5 speed ? How you going to make these two work as they are not just a bolt together pair are they ?
They are bolt together you can even use the EA82 flywheel pressure plate and clutch. the only real problem can be the throw out on the starter motor, which is solved by using a 3-4mm spacer.

TOONGA
Image
PJ Gone but not forgotten
JETCAR AKA the sandwedge Rusted in pieces

User avatar
Phizinza
General Member
Posts: 1444
Joined: Mon Oct 10, 2005 10:00 am
Location: SA
Contact:

Post by Phizinza » Sun Apr 26, 2015 6:21 pm

Nubaru wrote:nice presentation and proof of no need to cut L series components to fit in - keep up the good work. May I ask when you expect all this work will be up and going?

Sort of losing track of this project - EA81 and l series 5 speed ? How you going to make these two work as they are not just a bolt together pair are they ?
I did it. http://offroadingsubarus.com/83-subaru- ... onversion/
Owned - 89 Brumby, 83 Wagon, 83 Leone 4WD Sedan, 83 Touring Wagon, 99 Outback
Own - 87 Brumby, 93 Liberty, 09 Forester
Offroading Subarus Facebook Page


User avatar
Silverbullet
Senior Member
Posts: 2870
Joined: Mon Aug 23, 2010 6:20 pm
Location: Adelaide

Post by Silverbullet » Sun Apr 26, 2015 6:39 pm

Nubaru wrote:nice presentation and proof of no need to cut L series components to fit in - keep up the good work. May I ask when you expect all this work will be up and going?
Christmas last year...looking good for Christmas this year :roll:

So you can use an EA82 flywheel? But no ignition timing marks on it I assume...which might not be an issue if I decide to convert the engine to EDIS and twin point fuel injection...no no no not more work! :o
I was thinking keep the EA81 flywheel and maybe I have to get a step machined or some such as people have mentioned in other threads.
Will it ever end!?
-EA81 TWIN CARB!!!!
-L series 5 speed
-Custom paint job
-2" lift
-Full custom re-wire
-L series front end
Image

User avatar
Tweety
General Member
Posts: 1253
Joined: Mon Jul 04, 2011 9:45 am
Location: ea81 powered trike Victoria

Post by Tweety » Sun Apr 26, 2015 10:00 pm

If you don't have the ea flywheel you can go by the notch on the crank pulley. Its tdc
[SIGPIC][/SIGPIC]Tweety trike- EA81 (full reco 2014) 32/36 weber, SPFI manifold, 9.5:1 CR, VW auto.

Post Reply

Return to “Restorations and Project Build Ups.”