Page 2 of 13
Posted: Tue Aug 20, 2013 10:02 pm
by Subydoug
Here you go,

Doug
Posted: Tue Aug 20, 2013 10:06 pm
by El_Freddo
Thanks Doug,
Sorry I got it backwards as I was referring to the pattern to remove the heads as #9 being the painful one - it's actually #1 as you've correctly stated above.
I was hoping your image would be the tool used to torque up that nut behind the rocker assembly

Cheers
Bennie
Posted: Tue Aug 20, 2013 10:17 pm
by Silverbullet
Hehe it's funny how I'm the one suggesting it to you Bennie when just a couple years ago you suggested the exact same thing to me

That page has the tool you're looking for
showthread.php?t=19634&highlight=EA81+overhaul&page=11
Posted: Tue Aug 20, 2013 10:29 pm
by El_Freddo
Thanks mate, that's just what I needed! I remember giving that advice thinking it was like the EA82 setup where you have to shave a socket to do the job
Now to scout out a cheap socket for the job!
Cheers
Bennie
Posted: Tue Aug 20, 2013 11:04 pm
by TOONGA
MMMMM sludge ... Bennie you could try the diesel trick everyone goes on about, but I wouldn't.
It would probably be better to go with the used oil and filter (filter with out creamy goodness)
The internals look pretty good, but I would be very wary of the other welch plugs.
TOONGA
Posted: Wed Aug 21, 2013 9:04 am
by Subydoug
Full strip down Bennie! makes cleaning the gunk easy
. Gotta pop the pistons anyway. Leave all the case and big end bearings alone, clean it out and put it back together. A Few hours work

.
Regards
Doug
Posted: Fri Sep 13, 2013 9:03 pm
by El_Freddo
Nah I've got everything I need to get this baby on the road - just going to put it back together then decide when the time comes - EJ or rebuild with new bottom end and a mild cam

Just need to find time to put it all back together now.
Got more to post, just need to upload photos
Cheers
Bennie
Posted: Fri Sep 13, 2013 9:31 pm
by steptoe
And an EA82 Y pipe of course, or if adventurous - an EA82T exhaust set up, just run the left to right then down the back to see if you pick up a turbo sound
Posted: Fri Sep 13, 2013 9:56 pm
by El_Freddo
Dad came up with some spares and a welder - the driver's side window is now in and operational again, we had to make a new runner for the bottom of the window as the old one was seriously bent, we also replaced the window regulator as the old was was also bent

I also got onto fixing the sloppy shifter, this is how you do it - maybe a bit over board but it's nice and tight now!
That's it for now.
Cheers
Bennie
Posted: Fri Sep 13, 2013 10:41 pm
by El_Freddo
steptoe wrote:And an EA82 Y pipe of course, or if adventurous - an EA82T exhaust set up, just run the left to right then down the back to see if you pick up a turbo sound
Nah not going to try that turbo setup. And if I went the EA82 Y pipe I'd have to work out how to fit the ERG pipe bit unless I get the Y pipe cut down to fit the cast spacers to sort out the ERG pipe part...
Next up is to get the engine back together, probably over the next 5 or 6 weeks with the way things are playing out
Cheers
Bennie
Posted: Fri Sep 13, 2013 11:39 pm
by Tweety
Some things just take time Scott....ask any inmate lol
Posted: Mon Feb 17, 2014 9:06 pm
by El_Freddo
TOONGA wrote:I would be very wary of the other welch plugs.
All welch plugs have had the same treatment - threaded and plugged. I swear I've got a pic somewhere but I've got to dig it up. Super pissed if I can't find it - see why below.
Tweety wrote:Some things just take time Scott....ask any inmate lol
Too true Tony. I've only just managed to get the engine off the engine stand where it's been for the best part of six months to this:
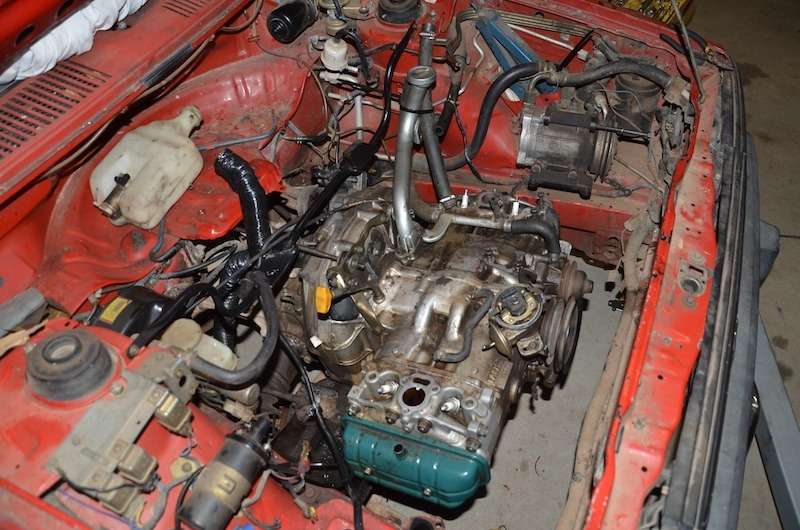
Exciting times. Still moving super slow as I realise what I've still got to do before I can put it up for a RWC check - I'm running out of time to get it sorted for when I want to be paying rego in the year.
But the above is a big move forward
Cheers
Bennie
Posted: Mon Feb 17, 2014 9:12 pm
by Silverbullet
Now there's a familiar sight

How did you go lining the clutch up? did you have a proper alignment tool?
Also, cover those intake holes up! lest a runaway washer or nut decides to make a new home
")
Posted: Mon Feb 17, 2014 9:14 pm
by El_Freddo
No alignment tool. The one I use (EJ input shaft) was too big, which surprised me a bit. So I did it by eye, that didn't work. Next trick was to loosen the pressure plate bolts right off, get it all in and bolted up the then use the starter motor hole to do the bolts up again.
Worked a treat!
And there's a cover over the top of the engine - I only removed it for the pic, otherwise it could almost pass for a cardboard box under there (where's the fun in that?)...
Cheers
Bennie
Posted: Mon Feb 17, 2014 9:47 pm
by RSR 555
El_Freddo wrote:All welch plugs have had the same treatment - threaded and plugged. I swear I've got a pic somewhere but I've got to dig it up. Super pissed if I can't find it - see why below.

how the hell did you thread them?
Posted: Mon Feb 17, 2014 9:56 pm
by El_Freddo
RSR 555 wrote: how the hell did you thread them?
Well, dad sorted all of that out. While the heads were off he got an appropriate sized threat tap and matching plugs - basically a large sized grub screw with a hex bolt head.
Pics would say heaps. But if I can't find the ones I *think* I've taken it's going to be a bit tricky to get others to see what I'm talking about
Cheers
Bennie
Posted: Mon Feb 17, 2014 10:04 pm
by RSR 555
El_Freddo wrote:Well, dad sorted all of that out. While the heads were off he got an appropriate sized threat tap and matching plugs - basically a large sized grub screw with a hex bolt head.
Pics would say heaps. But if I can't find the ones I *think* I've taken it's going to be a bit tricky to get others to see what I'm talking about
Cheers
Bennie
Well there you go.. sounds like a lot of effort but if you have the time, then go for it
Posted: Mon Feb 17, 2014 10:07 pm
by El_Freddo
RSR 555 wrote:Well there you go.. sounds like a lot of effort but if you have the time, then go for it
There's been plenty of time for this sort of thing - too much as not enough has been done in that time - it should be up and running by now
At least I know they'll never come out!
Cheers
Bennie
Posted: Mon Feb 17, 2014 10:12 pm
by RSR 555
El_Freddo wrote:There's been plenty of time for this sort of thing - too much as not enough has been done in that time - it should be up and running by now
At least I know they'll never come out!
Cheers
Bennie
Too true.. never seen one come out but I like the idea
Stop pussyfooting around and get it on the road... to WA

Posted: Mon Feb 17, 2014 10:20 pm
by El_Freddo
RSR 555 wrote:Stop pussyfooting around and get it on the road...
I'm working on it - a little bit every night with any luck. Hopefully I'll have the engine running by the end of the weekend if all goes well. Then I'll be able to assess what the engine internals are like in operation. I'm worried about the rings with blow by or lack of compression...
Cheers
Bennie