Ruby Scoo’s epic build, ten years and counting...

Moderator: El_Freddo

User avatar
El_Freddo
Master Member
Posts: 12506
Joined: Tue Oct 04, 2005 10:00 am
Location: Bridgewater Vic
Contact:

Post by El_Freddo » Wed Aug 14, 2013 7:53 pm

NachaLuva wrote:when are you heading back to Bullock Link Tr hahaha
Hadn't thought about it... until now :twisted: It's probably best to check the forecast before we go there again! And pack a chainsaw/winch etc...
Venom wrote:Awesome work mate. I'm glad you've finally got it in the car!
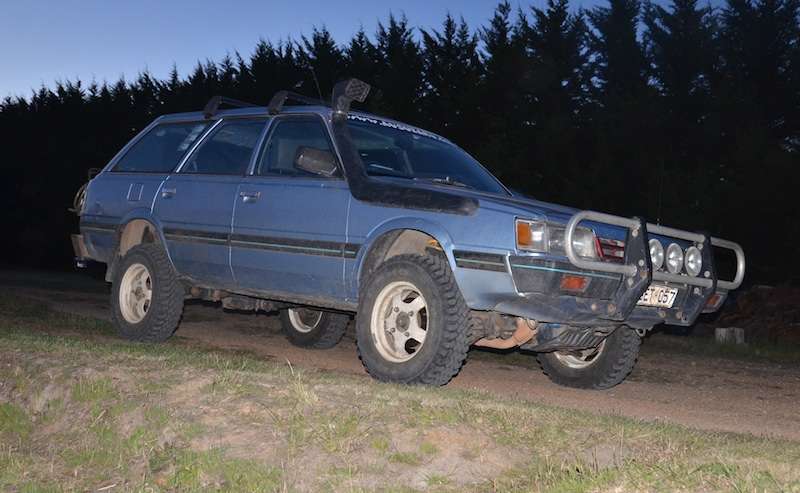
Me too! Can't wait to have Ruby Scoo and the big green machine together in the Wyperfeld again. Could be just a two car convoy again ;)
vincentvega wrote:Awesome work mate. thats gotta be the best gearbox in an L series by far :)
Agree with that, can't wait to have it all hooked up properly to really give it a red hot go offroad!
vincentvega wrote:Couple of next time suggestions though.

where's the extended breather on your rear diff? i know you like river crossings!

and you should have fitted outback speedo gears while you had the box apart!
Rear diff breather - to do list - wasn't a priority during the drive train swap as we were on a time limit. But plans are in motion for this!

There was some debate about the speedo gear before the build. I originally planned to get a 4.11 diff ratio speedo gear from a forester as it runs basically the same tyre size I'm running. But my gearbox builder reckoned there was a change in the number of turns on the drive gear on the lower gearset from the EA series to the EJ series.

So we went with a 3.9 ratio gear. We got that one wrong. But we'll see what happens there...
pezimm wrote:Nevermind the vice... His calendar on the wall is not working anymore! Probably still saying May 2007...
Well, she's still easy on the eyes so I guess it's still working...
Tweety wrote:put 4 of them monster truck tyres on it. then the speedo will be accurate
Problem is I actually need to go to smaller tyres to match the speedo! But for ground speed to revs at 100km/h it's exactly where I want it!

Cheers

Bennie
"The lounge room is not a workshop..."
Image
El Freddo's Pics - El_Freddo's youtube

User avatar
El_Freddo
Master Member
Posts: 12506
Joined: Tue Oct 04, 2005 10:00 am
Location: Bridgewater Vic
Contact:

Post by El_Freddo » Tue Aug 20, 2013 8:16 pm

So I've realised in my excitement of having the gearbox installed that I've forgotten to thank a bunch of people:

First off, Mrs El Freddo who's put up with my crazy planning/ranting/chasing parts over the time of this build. Venom for the talk and info on the LSD. Subaruby for helping me out when I was in need of a replacement centre diff, and for collecting other parts for me at the same time - everything you've done for me (and the family) I'm very greatful for!
Rick who probably is never here, thanks for the gearbox building! Sorry it took me so long to get bits sorted.
Vince, a local mate from our uni days - thanks for the advice and use of your facilities - without them the swap would have been so much harder!

And to anyone I've left out, I apologise!

The gearbox is going well to and from work, I really need to take her for a spin properly! There's a tiny whine in second gear but other than that all is good once warmed up, it's pretty tight when cold!

Last weekend I picked up the vacuum solenoids for the diff lock. Hoping to get these in this weekend. Still need to sort out the low range lever!

Cheers

Bennie
"The lounge room is not a workshop..."
Image
El Freddo's Pics - El_Freddo's youtube

User avatar
El_Freddo
Master Member
Posts: 12506
Joined: Tue Oct 04, 2005 10:00 am
Location: Bridgewater Vic
Contact:

Post by El_Freddo » Fri Sep 13, 2013 11:12 pm

As Toonga posted in some other thread I've also followed his move to buy the $16 fleabay headlight wiring upgrade - it's pretty much plug and play, the only modification I made was a set of fuses to protect the harness and ultimately my vehicle. I've not linked the item as that link and image will eventually disappear with the way fleabay operates.

Huge improvement in light output over stock wiring - so much so that I'd be confident to drive on the stock lights now. But I still love my driving lights so it only adds to the output there too. I also sorted out my driving light wiring properly so they don't come on when I've got the stock lights off, ignition on and the driving light switch on. One wire was the issue!

Also if I have an issue with this wiring I've got one plug to pull and two to connect and I'm back to stock.

Now I've got a "small" list of things to do, but during the week I've managed to get the diff lock solenoids wired in - got it the right way around the first time.

Note to anyone installing the L AWD gearbox: Fit the vacuum lines to the diff lock diaphragm before you install it on the gearbox OR before you fit the starter motor - otherwise it's one VERY PAINFUL job to complete! I found out the hard way!

Next:

Alternator swap - going to see if the square plug alternator can keep up with my touring demands as the round plug one doesn't get a good charge going once warm and loaded up.

Hook up the low range lever - the gearbox I'm using was converted to a dual range some time before I got it, but the rod assembly wasn't installed as factory so no holes drilled in the centre diff housing. I opted not to have these drilled in as I was planning on running the EJ series cable and lever setup on the L series lever - but that doesn't work! So plan now is to make a solid rod to operate the low range lever, even if it's temporary for this upcoming trip.

Finish off the oil feed to the low range gearset. When I did the diff lock wiring I included the wiring to operate the pump - so now it's a case of getting the pump and plumbing sorted.

And to finish off: Set up the camping gear ready to go.

Looking forward to it!

Cheers

Bennie
"The lounge room is not a workshop..."
Image
El Freddo's Pics - El_Freddo's youtube

User avatar
El_Freddo
Master Member
Posts: 12506
Joined: Tue Oct 04, 2005 10:00 am
Location: Bridgewater Vic
Contact:

Post by El_Freddo » Fri Oct 25, 2013 7:03 pm

Time for a new bash plate I think:

Image

So that this never happens!

Image

^ I reckon I got lucky here. I've been driving around like this for about three weeks - I pulled out a couple of bits of stick too. Lucky the cam belt didn't snap out bush!

Got a few other things to sort out too - leaking rear main seal on the gearbox, only just did the one on the previous box :( But for a ~$5 seal I can't complain.

Going to be fun - I've really wanted a new bash plate! Just time and materials again!

Cheers

Bennie
"The lounge room is not a workshop..."
Image
El Freddo's Pics - El_Freddo's youtube

User avatar
El_Freddo
Master Member
Posts: 12506
Joined: Tue Oct 04, 2005 10:00 am
Location: Bridgewater Vic
Contact:

Post by El_Freddo » Tue Nov 05, 2013 5:02 pm

Today Ruby Scoo had her snorkel finally completed - it was currently "just for looks" as I was super (too) keen to get it on her to see what it looks like!

Thanks to my mate Vince for his help again - I'd be no where near this stage without him!

Here's the original adaptor piece from when we first looked at it:

Image

Image

In the hot sun I didn't get multiple angles of the same piece after the modification it withstood today:

Image

Here it is fitted without the guard:

Image

^ Next time I have the guard off I need to put the wiring over the top of this pipe work... next time...

Fitted with guard and snorkel all hooked up - very happy with the results!

Image

While I had this out I shortened the end that's in the air box. The adaptor also copped a lick of matt black paint just to make it look good and stop rust (maybe).

There's less induction noise than what I was expecting - not a bad thing, the exhaust is loud enough!

I spent an extra $60 on this build, $50 for the 90 degree, 3 inch diametre silicone bend and ~$10 on two clamps. I think this brings me up to about $90 all up after you add the nuts and bolts I've purchased as well. Pretty bloody happy with that!

I can only claim that build price due to a mate's Brother, Jesse giving me the snorkel as he didn't need it - it was a hand me along from his mate!

Pretty stoked with the outcome:

Image

Link to other snorkel builds.

Cheers

Bennie
"The lounge room is not a workshop..."
Image
El Freddo's Pics - El_Freddo's youtube

User avatar
NachaLuva
General Member
Posts: 1930
Joined: Wed Aug 31, 2011 5:05 pm
Location: SE Melbourne

Post by NachaLuva » Wed Nov 06, 2013 11:04 pm

Very nice Bennie...bring on the rivers & bog holes! ;)
[SIGPIC][/SIGPIC]
Owner SubieLiftOz, lift kits for Subarus :twisted:

'97 Forester: EJ22E; 4" Custom Body Lift; JDM STi plated LSD; 20mm WRX RSB; Snorkel; Kings

User avatar
El_Freddo
Master Member
Posts: 12506
Joined: Tue Oct 04, 2005 10:00 am
Location: Bridgewater Vic
Contact:

Post by El_Freddo » Thu Dec 19, 2013 1:03 pm

A lot has been happening:

Had a performance issue with the snorkel since having it hooked up properly - lagged big time up inclines at cruise - and that was un-laden!

Turned out that the AFM wasn't reading correctly as I had it disconnected for the snorkel fit out, then hooked it up after already starting the engine - I never got around to a battery dance to sort that out. It bugged me for a few hundred km before I did a battery dance down the street. Drove home like it had another 2 cylinders compared to how it did before!

Now she's got her AC system back together ready for gassing - the wiring checks out which is a positive step in the right direction!

A new windscreen has/is going in - it was badly sand blasted from about 8 years of service, and had a crack in it that I made while removing the dashboard a few months back. Glad I did it as I found more rust than I was expecting, it wasn't bad, just surface in each corner. I also tidied up a bit on each A pillar that was starting to stain the paint.

I've also fitted a set of other thermo fans - a ten inch and a twelve inch - they fit heaps better than my three fan setup and the pull loads more air with the "hand test".

Pics to come later when I get time. And when I say later it could be the new year...

Cheers

Bennie
"The lounge room is not a workshop..."
Image
El Freddo's Pics - El_Freddo's youtube

User avatar
Rodeo4jake
Junior Member
Posts: 297
Joined: Fri Oct 19, 2012 5:42 am
Location: Tylden Victoria

Bennie's EJ conversion into Ruby Scoo, plus some other bits too...

Post by Rodeo4jake » Thu Dec 19, 2013 9:15 pm

Good you got the power sorted mate, or I might have been able to beat you up the mount next time.
I gotta get my aircon gassed up again now. I let the gas out during my battle with the oil pump. Gotta say though, that this year I haven't looked to use it once while Ive been driving the Brumby.

Cheers Jake

User avatar
RSR 555
Elder Member
Posts: 6951
Joined: Sat Nov 10, 2007 10:42 am
Location: ATM... stuck in Rockingham

Post by RSR 555 » Fri Dec 20, 2013 2:21 am

I hope this dodgy snokel setup is failproof.. I'm not wanting any dodgy stuff on my L :p

Even though it might be a while before my L is on the road. I need to get the Outback built for August next year.
You know you are getting old when the candles on your birthday cake start to cost more than the cake itself.

RSR Performance
Home of the 'MURTAYA' in Oz
Subaru Impreza WRX based Sportscar
[SIGPIC][/SIGPIC]

Disclaimer: Not my website but hyperlink here to Subaru workshop manuals

User avatar
Tweety
General Member
Posts: 1253
Joined: Mon Jul 04, 2011 9:45 am
Location: ea81 powered trike Victoria

Post by Tweety » Sat Dec 21, 2013 7:49 pm

snorkel looks great
[SIGPIC][/SIGPIC]Tweety trike- EA81 (full reco 2014) 32/36 weber, SPFI manifold, 9.5:1 CR, VW auto.

User avatar
El_Freddo
Master Member
Posts: 12506
Joined: Tue Oct 04, 2005 10:00 am
Location: Bridgewater Vic
Contact:

Post by El_Freddo » Sun Dec 22, 2013 9:51 pm

Rodeo4jake wrote:Good you got the power sorted mate, or I might have been able to beat you up the mount next time.
I can't have that now!!
RSR 555 wrote:I hope this dodgy snokel setup is failproof.. I'm not wanting any dodgy stuff on my L :p
Meh. You want the template guard or not?
Tweety wrote:snorkel looks great
Thanks mate ;) It really sets off the car. I'll have to get that template guard for Paul, the day he sees it will be the day he'll really really want one like a 3 year old in the supermarket with a lollie they're not allowed to buy :twisted:

Cheers

Bennie
"The lounge room is not a workshop..."
Image
El Freddo's Pics - El_Freddo's youtube

User avatar
El_Freddo
Master Member
Posts: 12506
Joined: Tue Oct 04, 2005 10:00 am
Location: Bridgewater Vic
Contact:

Post by El_Freddo » Fri Dec 27, 2013 8:51 pm

Pics as promised:

The windscreen was removed, more rust was exposed than what was expected, but it was repairable without the need for cutting and welding. The windscreen mating area was scraped clean of the glue that holds it in, then wire wheeled with a grinder wire-wheel :twisted: Then rust bustered for a night before being wire wheeled back again for some patch work with Permaweld:

Image

This side was the "worst" - a bit of a hole but nothing too serious. The Permaweld drooped due to the heat and me not being able to stick around to "supervise" its setting process:

Image

Image

This was left to set for a few hours (came home on my lunch break to do this!). It was then rubbed back smooth before a coat of red oxide was applied:

Image

The area was masked off for a clean line:

Image

The end result after letting it go tacky then removing the tape:

Image

I then masked it off again the night after the above and painted in a black kill rust type paint. The result looked great - no pics, I can't remember if I took any...

The windscreen finally went in after a bit of a saga - it looks great! Just need to source another windscreen sticker:

Image


.
"The lounge room is not a workshop..."
Image
El Freddo's Pics - El_Freddo's youtube

User avatar
El_Freddo
Master Member
Posts: 12506
Joined: Tue Oct 04, 2005 10:00 am
Location: Bridgewater Vic
Contact:

Post by El_Freddo » Fri Dec 27, 2013 8:52 pm

And a couple of pics of the snorkel:

Image

Just need to tweak the angle of the head as you can see:

Image

Very happy with the result!

Cheers

Bennie
"The lounge room is not a workshop..."
Image
El Freddo's Pics - El_Freddo's youtube

User avatar
Bantum
General Member
Posts: 1923
Joined: Sun Jul 29, 2012 4:30 pm
Location: Northern Territory + QLD
Contact:

:like:

Post by Bantum » Sat Dec 28, 2013 1:56 am

Looking good ... :)

Image

I notice you have relays under the gutter there, what are they for ?

Ciao, Bantum ...

User avatar
RSR 555
Elder Member
Posts: 6951
Joined: Sat Nov 10, 2007 10:42 am
Location: ATM... stuck in Rockingham

Post by RSR 555 » Sat Dec 28, 2013 11:39 am

El_Freddo wrote:Meh. You want the template guard or not?
Hahaha.. sorry.. yes I do :)

Where's the pics of the rust in your front window frame??? That's not rust !! That's a minor flesh wound ;)
You know you are getting old when the candles on your birthday cake start to cost more than the cake itself.

RSR Performance
Home of the 'MURTAYA' in Oz
Subaru Impreza WRX based Sportscar
[SIGPIC][/SIGPIC]

Disclaimer: Not my website but hyperlink here to Subaru workshop manuals

User avatar
El_Freddo
Master Member
Posts: 12506
Joined: Tue Oct 04, 2005 10:00 am
Location: Bridgewater Vic
Contact:

Post by El_Freddo » Sun Dec 29, 2013 8:57 pm

Bantum wrote:Looking good ... :)

Image

I notice you have relays under the gutter there, what are they for ?
They're an overkill that I used for the switching of the centre diff lock. I don't need them so I may use them for something else later on, but for now they'll switch the lock
RSR 555 wrote:Where's the pics of the rust in your front window frame??? That's not rust !! That's a minor flesh wound ;)
It is a flesh wound compared to what WayneO's got :( The rust pics are on my phone...

The engine lifting has begun. But I need a higher hoist, seems the old A frame is getting old and shorter.

I've found lots of coolant leaks in various places, the most recent one is on top of the block at the crossover pipe on the passenger's side. I'm looking forward to opening this engine up and seeing what's going on.

Cheers

Bennie
"The lounge room is not a workshop..."
Image
El Freddo's Pics - El_Freddo's youtube

User avatar
RSR 555
Elder Member
Posts: 6951
Joined: Sat Nov 10, 2007 10:42 am
Location: ATM... stuck in Rockingham

Post by RSR 555 » Mon Dec 30, 2013 1:16 pm

Glad to hear about finding the leaking spots. I'd also look at making sure the radiator and heater core are cleaned out.

It's also a good time to check and replace any suspect hoses.. especially those 2 small hoses that feed cooland up to the throttle body.
You know you are getting old when the candles on your birthday cake start to cost more than the cake itself.

RSR Performance
Home of the 'MURTAYA' in Oz
Subaru Impreza WRX based Sportscar
[SIGPIC][/SIGPIC]

Disclaimer: Not my website but hyperlink here to Subaru workshop manuals

User avatar
El_Freddo
Master Member
Posts: 12506
Joined: Tue Oct 04, 2005 10:00 am
Location: Bridgewater Vic
Contact:

Post by El_Freddo » Mon Dec 30, 2013 1:28 pm

Down to a short block now. Those heads were a real PITA to get off.

I can't see any signs of a suspect head gasket :( With that said most head gaskets I've done are well and truly gone by the time I pull the heads off... One downer is that the bores look a little too shiny for my liking. Going to wait for dad to get home for his opinion before I do anything else. On the Crankcase ventilation system that has the PCV in the system, there's a hose that comes up from the crank into the intake - when pulling the engine out I noted that there was an oily mark at each joint and a bit of a streak into the throttle body - possibly blow by due to the glazed bores?

The engine is filthy too - there's so much muck under that intake manifold! Pics will show why cam covers are so important - they're coming later.

Been a good exercise so far. Hopefully all goes well when it comes to putting it all back together.

Cheers

Bennie
"The lounge room is not a workshop..."
Image
El Freddo's Pics - El_Freddo's youtube

User avatar
RSR 555
Elder Member
Posts: 6951
Joined: Sat Nov 10, 2007 10:42 am
Location: ATM... stuck in Rockingham

Post by RSR 555 » Mon Dec 30, 2013 3:05 pm

Some blowby is ok but when oil comes up, then it's probably time to hone and re-ring. If you can't see any hone marks then it's also time to rebuild.

Can't wait for the pics.. which reminds me.. must email Andy about some covers :)
You know you are getting old when the candles on your birthday cake start to cost more than the cake itself.

RSR Performance
Home of the 'MURTAYA' in Oz
Subaru Impreza WRX based Sportscar
[SIGPIC][/SIGPIC]

Disclaimer: Not my website but hyperlink here to Subaru workshop manuals

User avatar
El_Freddo
Master Member
Posts: 12506
Joined: Tue Oct 04, 2005 10:00 am
Location: Bridgewater Vic
Contact:

Post by El_Freddo » Mon Dec 30, 2013 8:31 pm

RSR 555 wrote:Some blowby is ok but when oil comes up, then it's probably time to hone and re-ring. If you can't see any hone marks then it's also time to rebuild.

Can't wait for the pics..
Pics:

The damaged cam cover and oil filter from the bucks weekend in October:

Image

The damaged sump - the bash plate copped a beating and deformed into the sump. I'm not sure when this happened exactly:

Image

Inlet manifold removed exposing this coolant leak:

Image

Top of the engine filthy, you can't see it when the inlet manifold is installed:

Image

This is why your cam covers and good seals are so important - mud/sludge flow off the block over the cam cover:

Image

The cam belt was clean with no mud/sludge getting past the seal.

The heads took some work to remove after the head bolts were removed. I couldn't see anything obvious. Dad was looking for a cracked head - didn't find one but we found some suspect areas on the lower side of the passenger's head, the one under the coolant leak in the crossover pipe. Here we can see a tiny carbon trace into the coolant passages as indicated, the photo doesn't do it justice:

Image

The bores:

Image

This is why I thought they were glazed - you can see the reflection of the piston in the bore:

Image


But...


.
"The lounge room is not a workshop..."
Image
El Freddo's Pics - El_Freddo's youtube

Post Reply

Return to “El Freddo”