Page 7 of 8
Posted: Sun Feb 17, 2013 7:40 pm
by El_Freddo
RSR 555 wrote:Nice work Bennie.. going to be one very nice Brumby
Thanks mate, and I certainly hope so! I'd love to give it the rotisserie treatment with a full respray - but don't have the time, money or facilities to do so. Plus I need to give this car back to it's real owner - it's taken far too long to get the bits done on it!
chridk wrote:I really need to do this to the grumpy, Its windscreen & tray are in the same condition as sunnie.
Plan for four times longer than you originally thought you'd need to do it properly. I've done some mechanical stuff to it early last year, then the windscreen - I wish I knew about this process back then!
Cheers
Bennie
Posted: Sun Feb 17, 2013 8:12 pm
by Rodeo4jake
G'day Bennie
You might have taken your time, but look at all the effort you put into a car that is for someone else. Your pics had me inspecting certain areas of my Brumby very closely this morning. Looks all okay except for where the tonnaeu cover rubs the paint off. A couple of those spots will be gone thru in a few years I reckon.
Cheers Jake
Posted: Tue Feb 19, 2013 7:18 pm
by El_Freddo
Thanks Jake. I dream of my own brumby while I do it

Cheers
Bennie
Posted: Thu Feb 21, 2013 7:52 pm
by El_Freddo
Ok, so after doing the rear tray and cab wall area I really needed to get stuck into the seam across the top of the firewall that skirts around behind the spare tyre as this was showing signs of rust:

Here is the Driver's side up close - this is the area that caught my attention in the first place, unfortunately I've only got after wire wheeling photos:

And the Passenger's side. I also found rust under the rubber grommet into the cab and to access the area the wiper motor had to be removed - pretty easy but the plastic clips are pretty US


I've got more pics coming, having uploading issues with the attachment manager
Also all areas have been acid treated ready for prep for painting on the weekend. I'm looking forward to this part!
Cheers
Bennie
Posted: Thu Feb 21, 2013 8:17 pm
by El_Freddo
I also wired the LHS bonnet hinge and acid treated it:

I also attended to some rust in the air vent area behind the firewall below the windscreen. It's totally out of focus but I think you get the idea of where it is - the shiny/grey area is what I've worked on - managed to get the drill with the wire wheel in there too!

Then I had some fun getting to a very rusty area that is quite amazing - it's high up above the above image, directly under the windscreen. I couldn't get the drill in there so have scraped it out with a screw driver then acid treated these areas tonight - I used an art paint brush that was long and skinny to get in there; also removing the wiper arms out of the way helps with access:

And the passenger's side:

Good fun. I'm really looking forward to prepping and painting all of these areas! There's also a massive bit of rust under the tray, directly above the prop shaft that I attacked. It hollowed out to quite a hole that I'm not really happy with but not much I can do anyway - I'll be wiring it again soon then another acid treatment before getting a couple of coats of paint to seal it all up.
Now to go get the paint, turps, wet and dry, brushes etc...
Cheers
Bennie
Posted: Sat Feb 23, 2013 11:43 pm
by El_Freddo
Had a busy arvo in the shed. Made a tool to help get at the rust in the air vent area under the windscreen:


Other pics can be found
here.
So this is what Sunnie now looks like:


It may not look like much but after wire wheeling the whole lot, sanding the edges with 240 grit, vacuuming the dust then prepping the surface with some thinners it was finally time to paint!
Long process! I've also got a patch of rust I'm dealing with on the underside of the tray directly above the tail shaft - it's a serious hole that's not gone all the way through thus far, hopefully this work will halt that from moving any further!
I also found a rust hole on the side of the rear RHS guard - rusted from inside the guard through to the tray

I guess 20 something years of mud/road grime build up behind the shock mount will do this... Not happy but not much I can really do other than deal with it.
Cheers
Bennie
Posted: Sat Jun 08, 2013 11:15 pm
by El_Freddo
Still going on this one!
Rear shocks are about to be replaced - the old ones were leaking, well, at least one of them was.
I've been trying to fit this one around other activities that seem to keep getting in the way of progress. The painting is certainly a tough slog. Plan now is to clean up what's visible from the outside and deal with the rest next summer (hopefully) as it's all sealed at the very least.
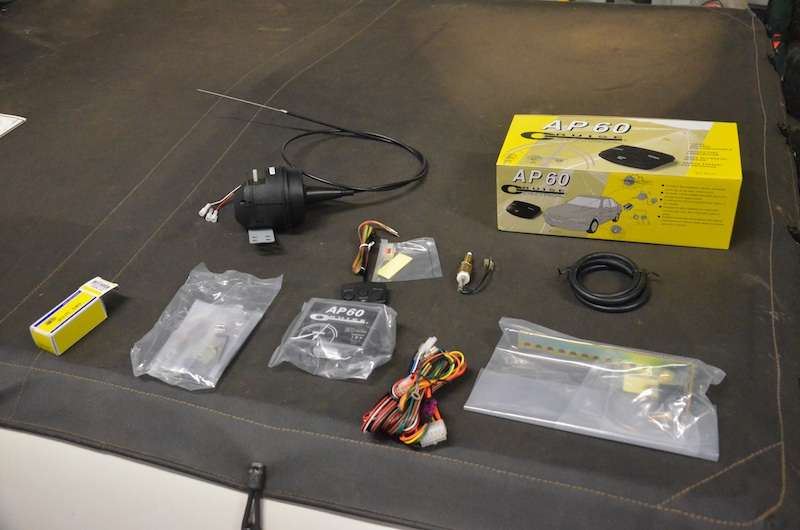
In the mean time I've spent the last couple of days working on fitting cruise control to Sunnie. I've decided to go with this kit as I know it from my install on Ruby Scoo and it's a very simple and effective system to install and to use as well:
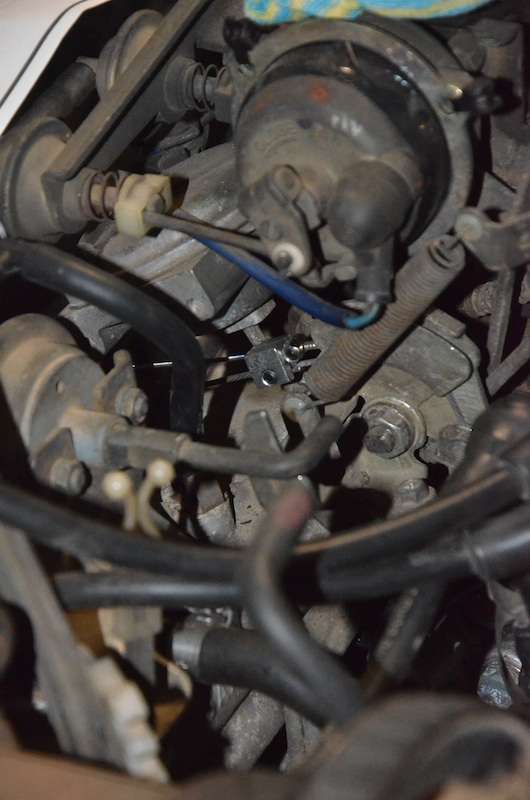
I had a bit of fun working out the best way to hook up the throttle linkage, this is what I've come up with that's also pretty neat too:
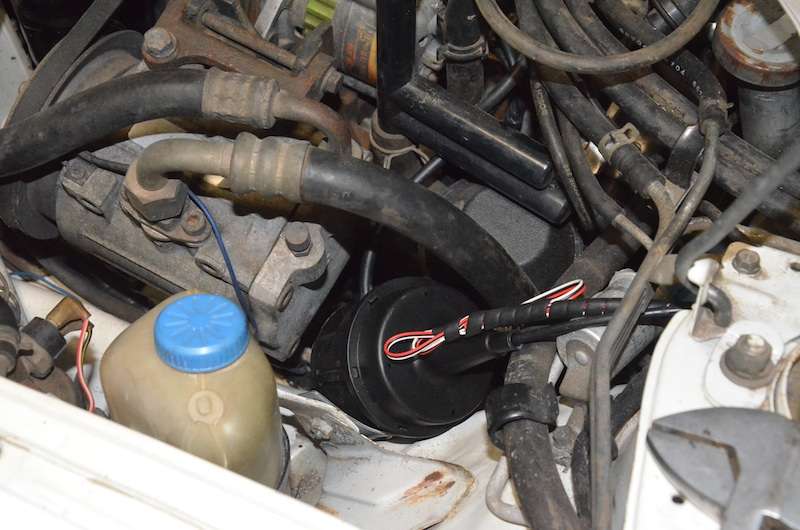
The actuator has been located on the side of the jack's bracket:
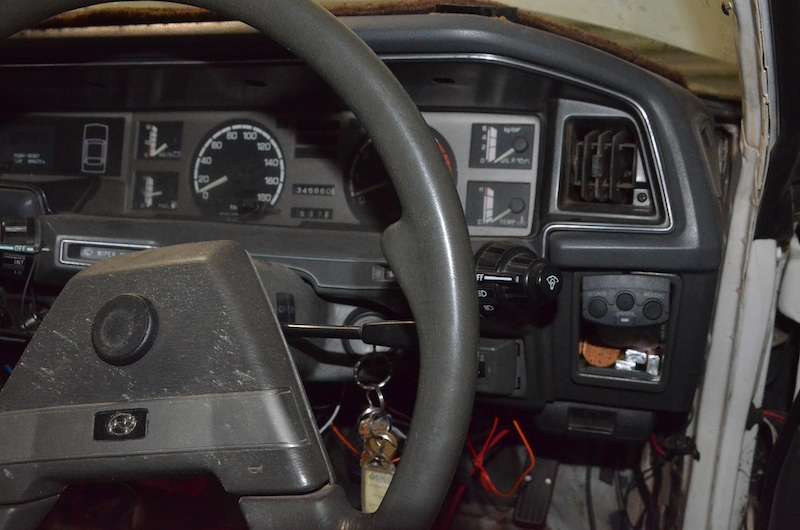
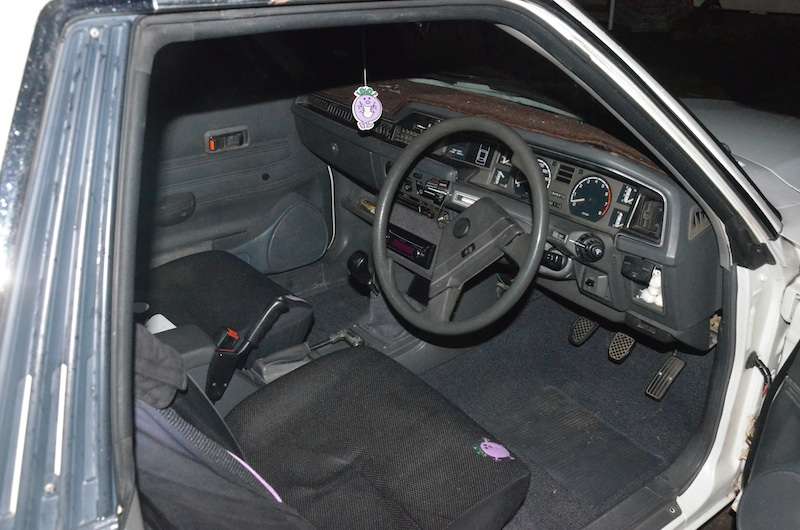
I made up a neat little bracket to mount the control key pad on. I think it fits in very well:
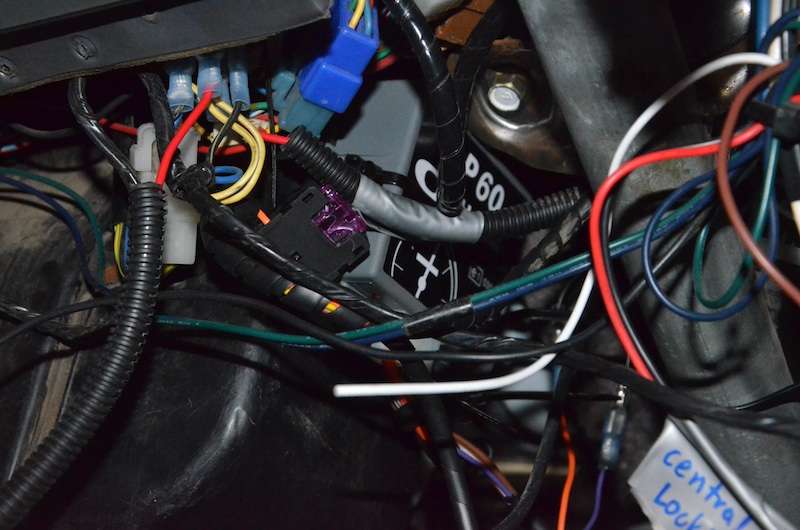
The wiring is pretty easy, locating everything was the fun part. The main box is located on one of the ducts for the heating/ac system - it should be fine temp wise, I'm not worried about that. The wiring looks messy but in person it's not as bad as it seems:
The best bit about this kit is that a) it came from fleabay and was about $50 cheaper than one locally, even including post! b) it came with the optional clutch switch for the manual setup and c) it came in about 3 days rather than the 5-7 as stated on the ad.
I went and got an inline reed switch to make the speed sensor pick up easy - but this didn't fit. Not real happy with that but apparently I've got one of if not THE last unit that matches this system... So with that not going to work I spend quite some time nutting out the pick up system as my usual trick wasn't going to work with the super long 4 speed gearbox. I ended up going for a body mount that I'm very happy with. I looked about about 4 or 5 different setups before I got it right:
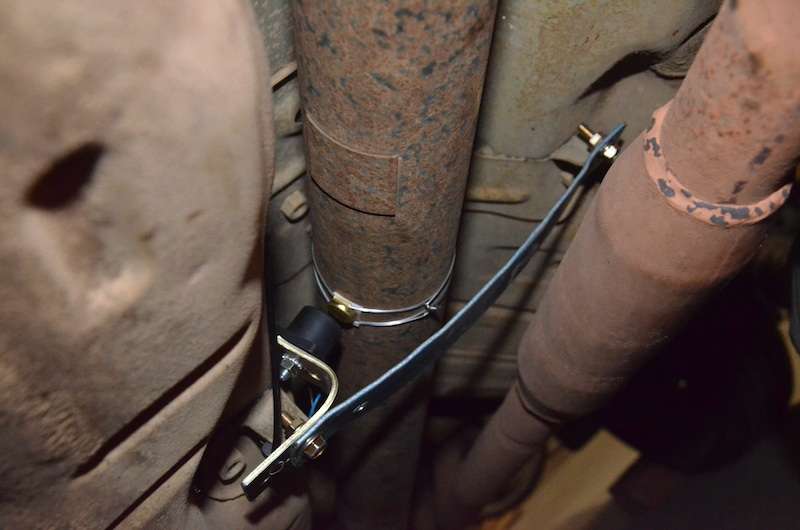
^ With this setup it should be out of the way and the tail shaft shouldn't move too much with the gearbox/engine so it won't effect the pickup signal - something you have to consider when mounting the sensor on the body.
Now to put the rest of the car together and do a test drive to make sure it's all working as it should before I hand it over.
Been a load of fun and I'm looking forward to this being out on the road again!
Cheers
Bennie
Posted: Sat Jun 08, 2013 11:37 pm
by NachaLuva
Nice work on the rust, esp on the tricky places!
You seem to have installing the cruise control down pat! Looking good

Posted: Sun Jun 09, 2013 12:31 am
by El_Freddo
NachaLuva wrote:Nice work on the rust, esp on the tricky places!
You seem to have installing the cruise control down pat! Looking good
Yeah it's all just time and effort. With things like the cruise I enjoy nutting out the install and making it as neat as possible
Cheers
Bennie
Posted: Sun Jun 09, 2013 8:30 am
by steptoe
I have the AP50 made for different retailer, have worn it out! The button functions get confused and cannot set the speed anymore. I originally had sensor mounted up the back end of the tail shaft, think it got scrubbed out, then found the 5 speed, shifter stabiliser bolts at th back of the box provided a great little protected area.
First install tricked myself coz would drop out at about 104kph ! A call to Command Auto Group who designed it advised to snip the little wire loop off the module to change its pulse count attitude - beautiful.
Currently fiddling with a mirror adjust switch to see if it can replace the AP50s control switch.....
The control box and actuator live inside attached to underside of the glovebox to protect from outside grot and environment. I can hear the solenoids clicking inside, so can hear the differences for adding or losing squirt
Posted: Thu Jun 20, 2013 11:13 pm
by El_Freddo
steptoe wrote:The control box and actuator live inside attached to underside of the glovebox to protect from outside grot and environment. I can hear the solenoids clicking inside, so can hear the differences for adding or losing squirt
Interesting that you have the actuator installed in the cab - my instructions seem to insist on mounting it in the engine bay. The only reason(s) I can see this is 1) the vacuum hose could be compromised by rubbing on the fire wall and 2) less of an issue is the same for the actuator cable doing the same thing - but then again they also show an instal that works on the throttle pedal rather than at the carbie/throttle body.
I'm keen to know if the electric mirror control pad works for you - you've got an extra button! But if it's only a signal that the control module needs then in theory it should work if you get the wiring right. Or have you contacted the makers of the kit to see if you can get a new pad? I can get their details to you if need be...
Cheers
Bennie
Posted: Fri Jun 21, 2013 8:16 am
by steptoe
Thinking outside that square I think, knowing it is a cleaner ,more stable environment and just reaches. Imagine they could have suggested under dash but get complaints from those trying - cable too short, no room , etc. Switch is still on kitchen table, car off road anyway. A new switch would be easier - CAG - Command Auto Group in Botany - thanks got contact details - should try them

and use the switch to give me power mirrors

Posted: Sat Aug 03, 2013 11:52 pm
by El_Freddo
Ok, an update: Last weekend I pulled a late nighter to have Sunnie pretty much ready to go - when I started there was basically no interior, I'd half put the new carpet in and there were areas that need to be cut out. It left with only the rear panel staying behind. Looks awesome now:
The Sunday saw me running around like a madman getting those last minute bits - including a battery where it happened to be my lucky day - they were on special with $40 off

Here he is before he left us:
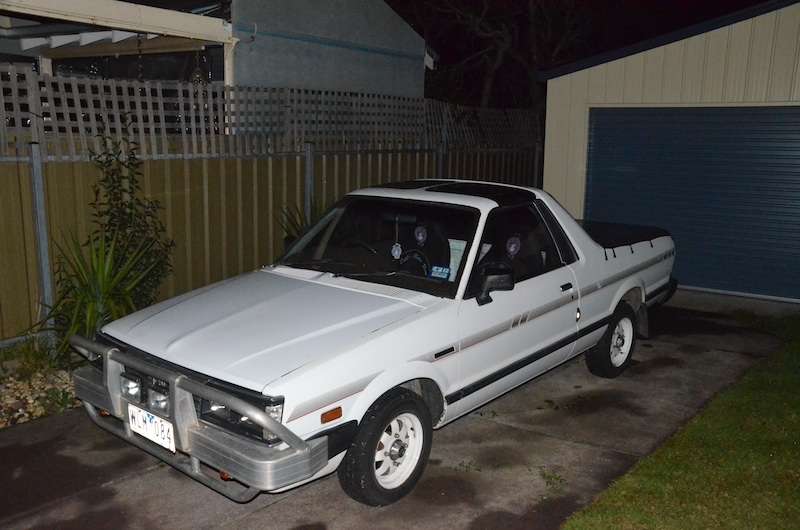
Bummer is that today I found a very slow coolant leak in the radiator but it can wait for a while. The rear main still seams to be leaking though, not happy about that, will most likely deal with it at the same time as the radiator...
Cheers
Bennie
Posted: Sun Aug 04, 2013 9:51 am
by Rodeo4jake
Looks really good in that photo, now on with the red one.
Posted: Sun Aug 04, 2013 12:35 pm
by NachaLuva
Looking very nice
Posted: Sun Aug 04, 2013 4:39 pm
by Silverbullet
Looking great in that last shot, the targa tops are just special I think.
About that oil leak, are you sure it's coming from the rear main? When I had a drip coming from the crossmember I was certain it was the rear main. Only to find out it was actually the oil pump cracked and the wind from driving was pushing the oil back to collect on the x-member. Would be a right pain in the behind if you took the engine out just to find it's not the problem.
Posted: Thu Aug 08, 2013 7:36 pm
by El_Freddo
Silverbullet wrote:Looking great in that last shot, the targa tops are just special I think.
I agree with that mate! Love them!
Silverbullet wrote:About that oil leak, are you sure it's coming from the rear main? When I had a drip coming from the crossmember I was certain it was the rear main. Only to find out it was actually the oil pump cracked and the wind from driving was pushing the oil back to collect on the x-member. Would be a right pain in the behind if you took the engine out just to find it's not the problem.
Not this one. Oil pump has been serviced and the car hasn't been on the road for some time, just moved in and out of the shed/around the yard. No sign of oil on the oil pump and can't see anywhere else it could be coming from in that area. Sticking with the rear main.
Could be a good time to shove a 5 speed in
Cheers
Bennie
Posted: Thu Aug 08, 2013 8:50 pm
by Tigger
Looking great, you've done a great job!
Posted: Mon Aug 12, 2013 7:06 pm
by El_Freddo
Tigger wrote:Looking great, you've done a great job!
Thanks Tigger! Been a long work in progress, still ironing out some issues but hopefully we've got it sorted.
Cheers
Bennie
Posted: Wed Aug 14, 2013 8:35 pm
by El_Freddo
I had the pleasure of driving Sunnie to Melbourne yesterday and back to Shepp today. The cruise is great and I've really enjoyed driving this thing! Can't wait to get mine going now!
Best bit was I returned 9.2L/100km with about 4 hours of at speed cruising and a bit over an hour of city stop start driving
I didn't see a single brumby in Melbs other than the one I was driving, but on return to Shepp I reckon I saw about 5 of them
Cheers
Bennie