Page 3 of 5
Posted: Sun Mar 23, 2008 10:49 pm
by EG33
lookin good man:p
Posted: Tue Mar 25, 2008 8:34 am
by ToyRX
Easter was a good chance to get some more done, I will upload some photos when I get a chance.
I have completed the custom wiring mods I needed to do for the light pod, terratrip computer, terraphone intercom, AF ratio meter, IC water sprayer, oil preasure, boost and water temp gauges.
Gearbox is in, frount hubs, radius rods, shafts, struts, disks, calipers etc are now all in.
Bumpers, lights, grill, horns, washer bottles and radiator fans are all in place.
Basicly the front is just missing an engine and guards!
Rear is eagerly awaiting an Australian blessing in the form of a Crossbred conversion kit (Thanks Jeff!!) before it gets bolted together.
Will keep you guys posted.
Posted: Wed Mar 26, 2008 8:30 pm
by maddog
Awesome Job - What an inspiration to us all!!!!! I want one now! Have started clearing space in the shed... Keep up the good work ToyRX!!!@#$%!!!
Posted: Sun Mar 30, 2008 2:18 am
by maxxair
hey toy, tell me everthing you can about the Hyd. handbrake. it is acting on the rear yea? course. i can do the handle master cyl easy enough, i just dunno wat do do after that. helps appreciated mate. see you out there soon ey?.
Posted: Mon Mar 31, 2008 8:23 am
by ToyRX
maxxair wrote:hey toy, tell me everthing you can about the Hyd. handbrake. it is acting on the rear yea? course. i can do the handle master cyl easy enough, i just dunno wat do do after that. helps appreciated mate. see you out there soon ey?.
I will try and explain this in order,
1) remove one of the rear brake lines from the MC and block off so you only have one brake line going to the rear, I binned the passenger side line.
2) Cut remaining line behind drivers seat flare etc so you can add a new piece in to go to the hydro handbrake.
3) The HH cylinder is a std MC for a Hillman Imp and is perfect for the job and commonly used in this application.
4) The infeed to the Imp cylinder from the main MC is the rear conector.
5) The outfeed of the Imp cylinder is the forward connector - I know this seems about face but it is just the way the cycliner operates.
FYI - when you pull the handbrake the Imp cylinder closes off the rear input so no preasure is pushed back through to the main MC and instead puts all the preasure to the forward outlet to go to the rear brakes. When the handbrake is not operated the cylinder acts just like a small reservoir.
6) Remove all original brake lines. Leave the lines on the arms leaving the flexy bit near the diff through to the rear brakes. So remove the crossover and proportioning valves.
7) plumb in a T conector after the Imp cylinder and fabricate new lines to the two flexi lines by the diff.

Bleed brakes.
9) Bleed again!?!?!?!?
I have not done steps 7-9 yet.
Hope this helps - Shaun
Posted: Tue May 27, 2008 11:03 am
by ToyRX
Well it has been nearly two months since my last post in this thread, sorry for the delay but all my spare time has been thrown into the car (among other things!) and I have only now found some time to update.
So....
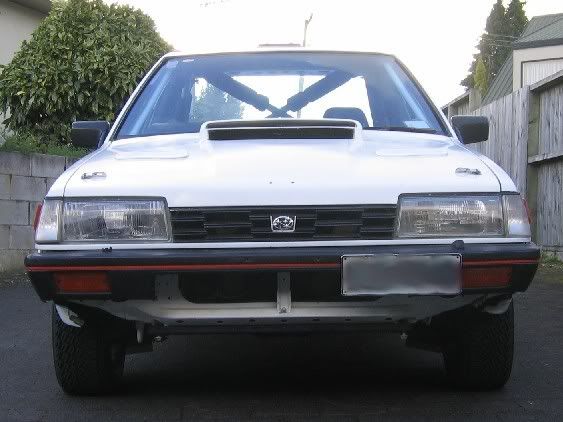
I was concerned about the small frontal area of the car and cooling for the rad so I chopped out a piece of the bumber and test mounted the sump guard.
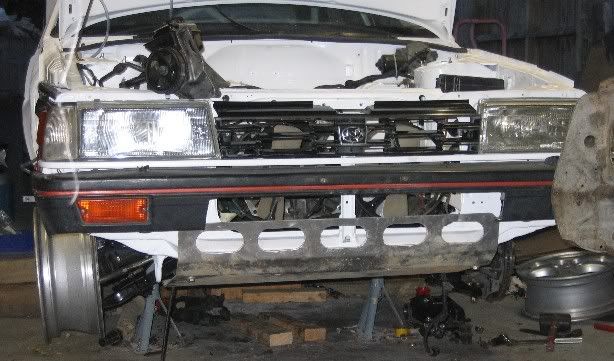
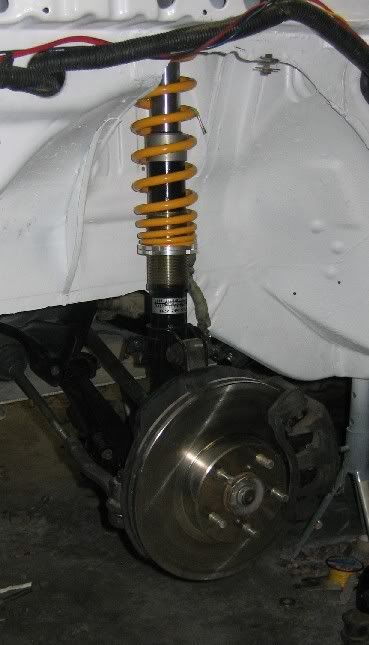
The flash new front shocks were put in as were the Legacy hubs/brakes.
The gearbox/front shafts, crossmember were next to go in, also hooked up the power steering lines.

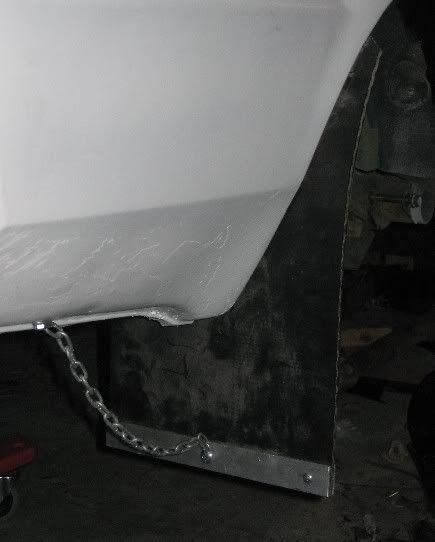
Made up some mudflaps and mounted them, I used conveyer belt material - sorry about the dark photo
Posted: Tue May 27, 2008 11:10 am
by ToyRX
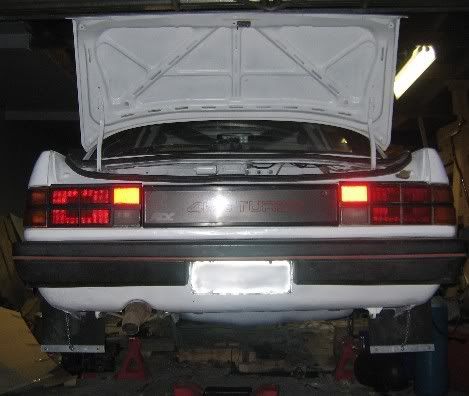
I then put the rear back together, lights, washer bottle, bumper, loom etc
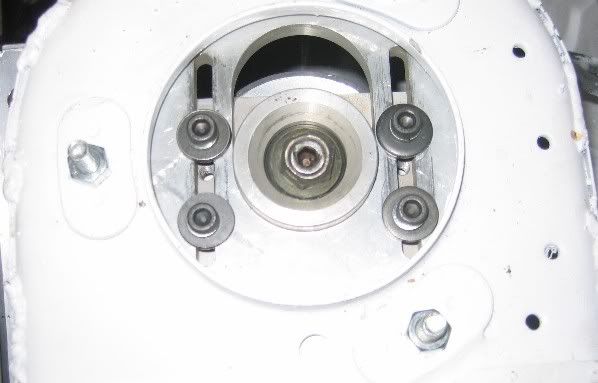
This is what the camber plates look like in the car, they give me the maximum available camber adjustment without modifying the towers
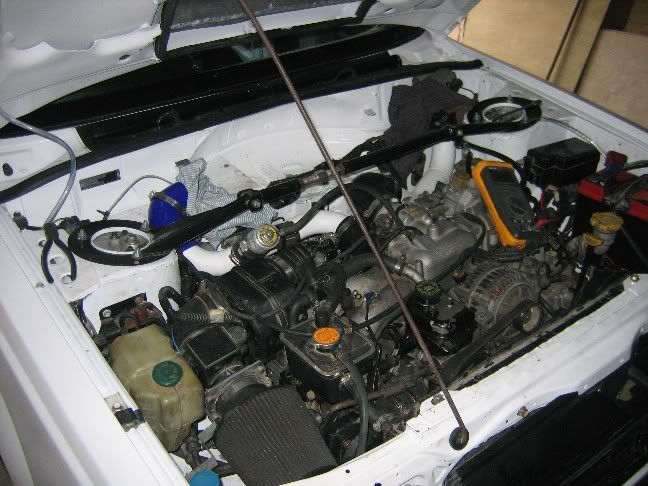
Dropped the engine and strut brace in, mounted power steering pump and plugged up the loom.
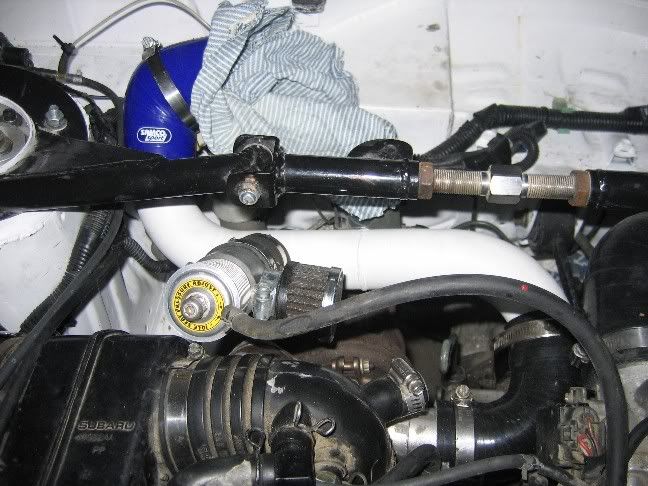
Made/painted and installed the custom Intercooler pipework, this is the turbo to the IC inlet pipe and the BOV, all 2" pipe
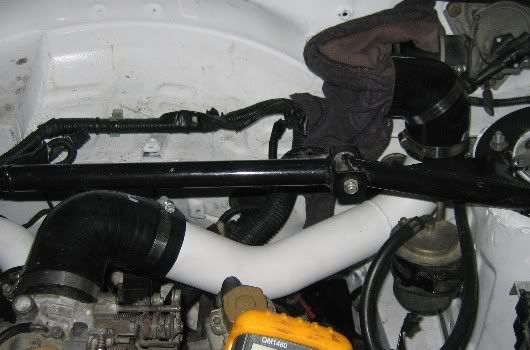
This is the IC outlet to TB pipe - 2.5"
Posted: Tue May 27, 2008 11:16 am
by ToyRX
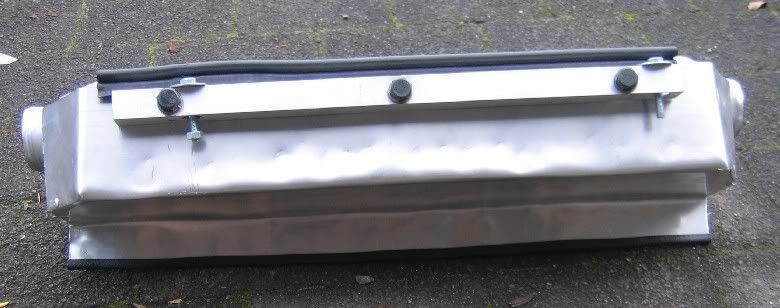
This is the IC I am using, it is an after market front mount designed for a VR4 or Skyline
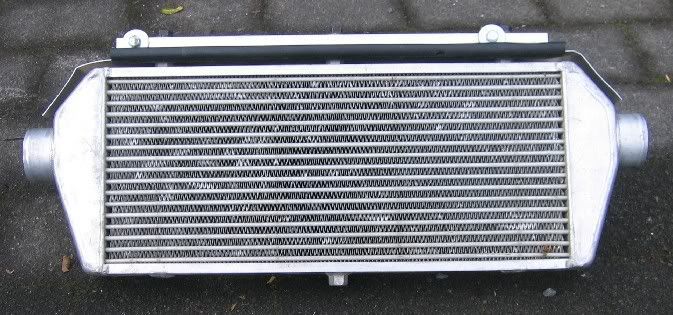
I have made an ali heat shield under the bottom of it to help reduce the heat soak from the engine
The engine is now complete and runs, I will post some photos later of the IC setup on the engine.
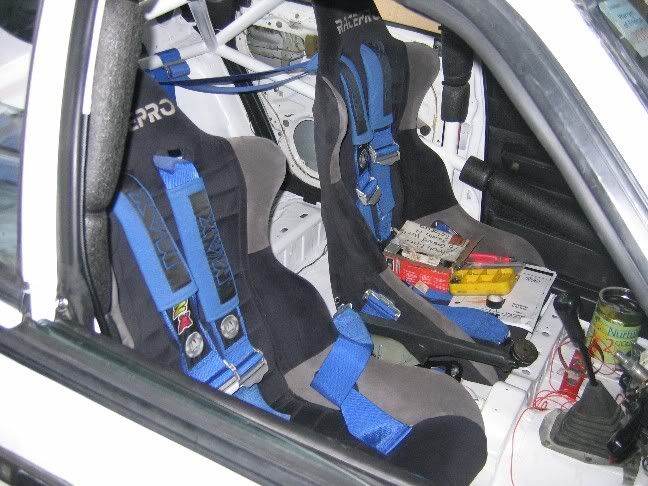
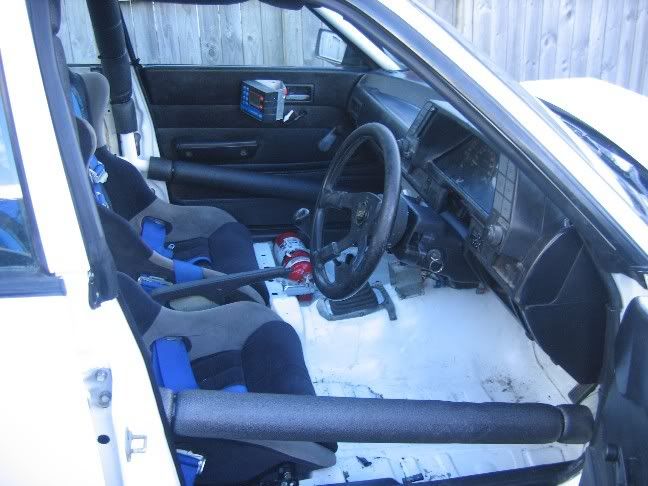
I have put the seats and belts in - excuse the mess!!
And I have installed most of the dash.
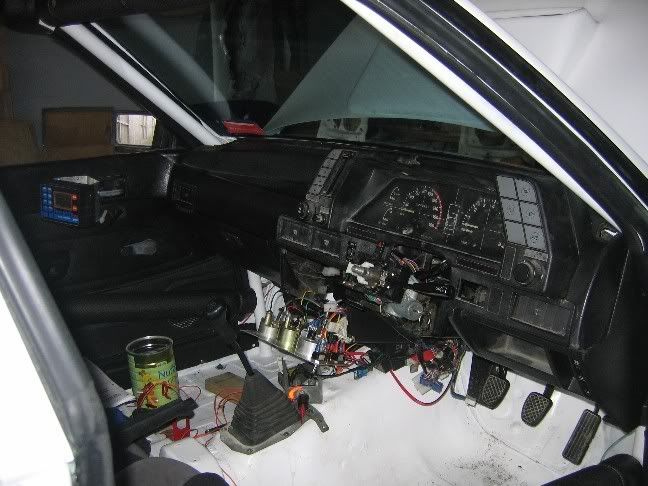
All the doors and external trim is back on as well.
Unfortuinatly I struck an issue when I bolted the wheels on, the RR has at some stage had a big knock and the subframe is bent. I am now in the process of pulling the whole back out of the car so I can replace or repair the bent subframe. Gutted, but still I am getting close now.
Posted: Tue May 27, 2008 12:17 pm
by AndrewT
Wow some awesome progress there!
Where'd you get that strut tower brace? I'm guessing it is off some other car and modified slightly to fit the L series?
I would strongly advise you to upgrade that radiator header tank to an early WRX one made out of metal, you wouldn't want one of those brittle plastic hose connectors busting off in the middle of a race.
Posted: Tue May 27, 2008 12:26 pm
by ToyRX
AndrewT wrote:Wow some awesome progress there!
Where'd you get that strut tower brace? I'm guessing it is off some other car and modified slightly to fit the L series?
I would strongly advise you to upgrade that radiator header tank to an early WRX one made out of metal, you wouldn't want one of those brittle plastic hose connectors busting off in the middle of a race.
Strut brace is a custom Chromemolly one, friend of mine made it up - very cool.
The header tank is on the list to upgrade - horrible plastic brittle things that they are...
Posted: Tue May 27, 2008 12:47 pm
by AndrewT
One day I will get a strut brace made

Yeah my header tank broke before I even drove the car! Pay about $50 for the metal one.
Posted: Tue May 27, 2008 2:19 pm
by El_Freddo
AndrewT wrote:Yeah my header tank broke before I even drove the car! Pay about $50 for the metal one.
Sounds like a worthy investment!
ToyRX, looking really good mate. Keep the pics flowing.
Cheers
Bennie
Posted: Tue May 27, 2008 11:18 pm
by brumbyrunner
It's really coming together now. Bad luck about the subframe though. It looks a million bucks.
Posted: Wed May 28, 2008 6:19 am
by ToyRX
brumbyrunner wrote:It's really coming together now. Bad luck about the subframe though. It looks a million bucks.
I am as confused as sh!t - I pulled the subframe out of the new car and also out of the old crashed shell so i could compare the two.
There are some subtle differances between the two, one has a three bolt mounting plate for the rearward rubbers and the other has a two bolt mounting plate but they are basicly the same.
When I got the tape out and started doing relative measures of distances from between mounting points for body and suspension I found that the subframe I thought was bent from the new car appears to be straight and the subframe from the old car which looked straight on the car appears to be bent!!
So now I am wondering about my trailing arms.... Can anybody tell me if there are different length trailing arms? ie are turbo arms different to N/A etc?
This is getting a little confusing now.....
If it helps it appears that my RR has way to much toe out and also has positive camber, the LR has to much toe out but camber is very slightly negative. - Any ideas on whats bent and how to measure it??
Posted: Wed May 28, 2008 6:45 am
by brumbyrunner
As far as I know, all the 4wd L series rear trailing arms are the same except for sway bar mounts. In fact, they are so close to MY 4wd arms that the engineers must have just modified the jig when they decided to swap from building torsion bar swing arms to coilover.
How are the rear trailing arm bushes? I have noticed that the genuine rubber bush moves inside the sleave, usually so that the arm moves outwards. If they haven't been replaced they are probably shot considering they stopped making RX Turbos over 20 years ago. The ones that Crossbred Performance stock have a lip on the side of the bush to stop the arm from walking around.
Posted: Tue Jun 03, 2008 7:18 am
by ToyRX
Well its in one piece now.... other than the underbody guarding which will go on after the wheel alignment.
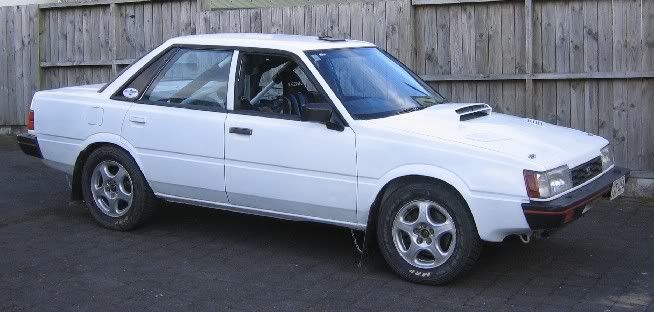
This is the completed interior..
The completer EJ20G goodness...
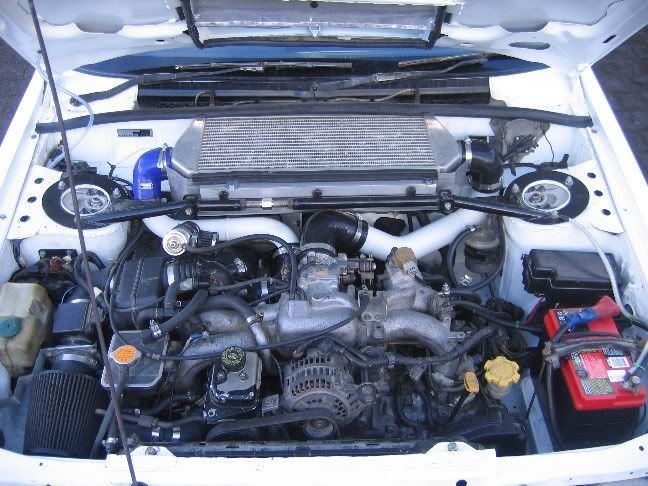
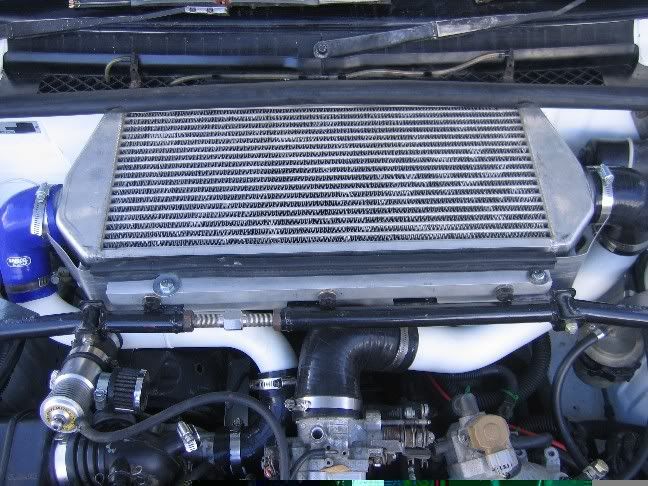
A close up showing how tight the squeese is for the intercooler..
I feel kinda stoked it is nearly there, I have a rallysprint in two weeks i am aiming to enter and use as a shakedown to find the bugs.
Posted: Tue Jun 03, 2008 7:53 am
by Brownster
Had a read of the whole post. Amazing stuff you have done with the whole project. Bet you cant wait to test it all out.
Posted: Tue Jun 03, 2008 8:41 pm
by Gannon
Awesome!!!
Looks great
Thats not a bad idea with the FMIC on the top like that, ive never seen that before.
Posted: Tue Jun 03, 2008 9:08 pm
by subusurfer
looking forward to a youtube vid or two
Posted: Wed Jun 04, 2008 6:22 am
by ToyRX
Thanks guys, I just need to sus out this rear suspension alignment issue and things should be all go. I am dropping the car down to the guru this avo so hopefully he can tell me what needs replacing/fixing/pulling/bending/modifying etc to get it right.
I dont have a youtube account or broadband so vids may be a wee way off, hopefully I can get some photos though.
I am still in the "grinning like a 15yr old at daddies playboys" state of mind whenever I start the car.... Its been a long 20mths and its nearly time to play.