WRX EJ20 Turbo into L-Series Wagon
Posted: Thu Sep 20, 2018 11:21 am
Hi All,
Thought I'd start sharing the build thread for my latest project.
First, some background on me; I am an engineer, with 25+ years experience in the conversion scene, and enjoy doing the unusual conversions that most people don't attempt.
All of my conversions are fully complied through RTA/RMS signatories, and I do as much as possible of the work myself, including the machining, welding and fabrication.
Most of my conversions are still on the road, and it's pretty satisfying to see them pop up at car shows, or just spotted randomly.
Where possible, I use off-the-shelf parts, which keeps costs down, and ensures that the vehicle can be serviced/repaired well into the future.
None of my vehicles are built to be show cars. They are all designed to be reliable, daily drives, that don't draw attention to the owner; classic sleepers.
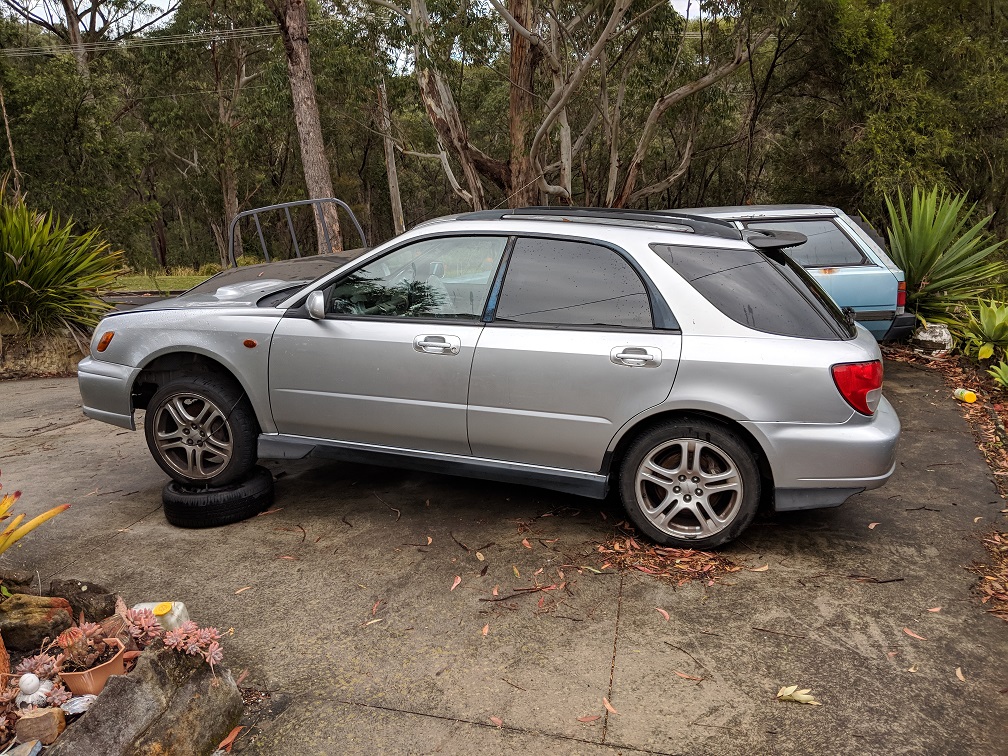
Vehicle; 1992 L-Series EA83 wagon, with a 3 speed auto.

Donor; 2001 Bug-eye WRX, manual.
Planned mods;
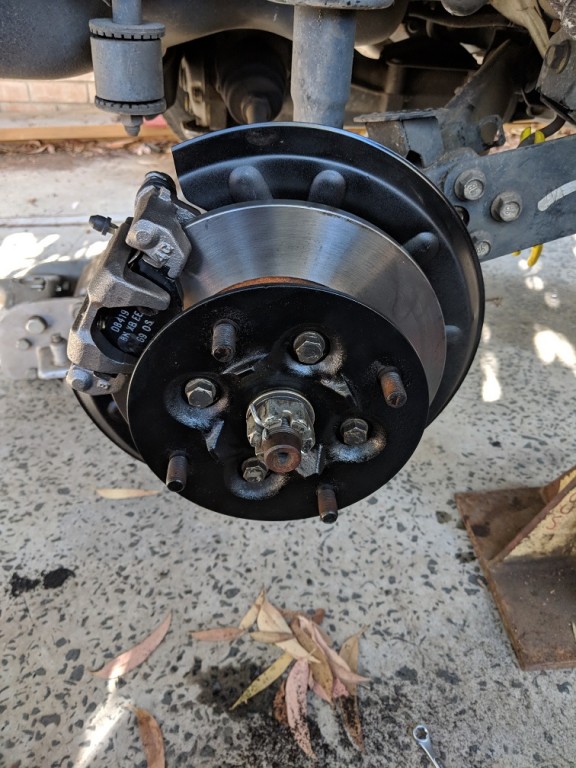
First project; Rear disc conversion.
As many of you know, the L-series was available with rear disc brakes, both here and in the USA.
These were generally found on the turbo models, and also various Vortex vehicles.
There is a difference between the hubs for AWD and FWD, and they are available in 4 x 140 and 5 x 100 PCD.
The 5 x 100 PCD was fitted to the XT6 only (6 cylinder Vortex), and involved further modification to the front hubs to fit the L-Series.
I wanted to keep 4 x 140, so I set about sourcing those.
After ringing EVERY Subaru contact in Australia that I could think of, I received a few promising leads, all of which turned out to be dead ends, or just weirdos.
I finally found a wrecking yard in the good old USA, that had the setup that I wanted. I had them send over the hubs, backing plates and all fasteners.
The backing plates mount the rear calipers, so they are a critical part to source in good condition.
Again from the USA, I bought a set of reconditioned calipers, compete with the bracket that bolts to the backing plate.
The USA also provided a brand new set of NOS discs.
Bendix brake pads were sourced locally.
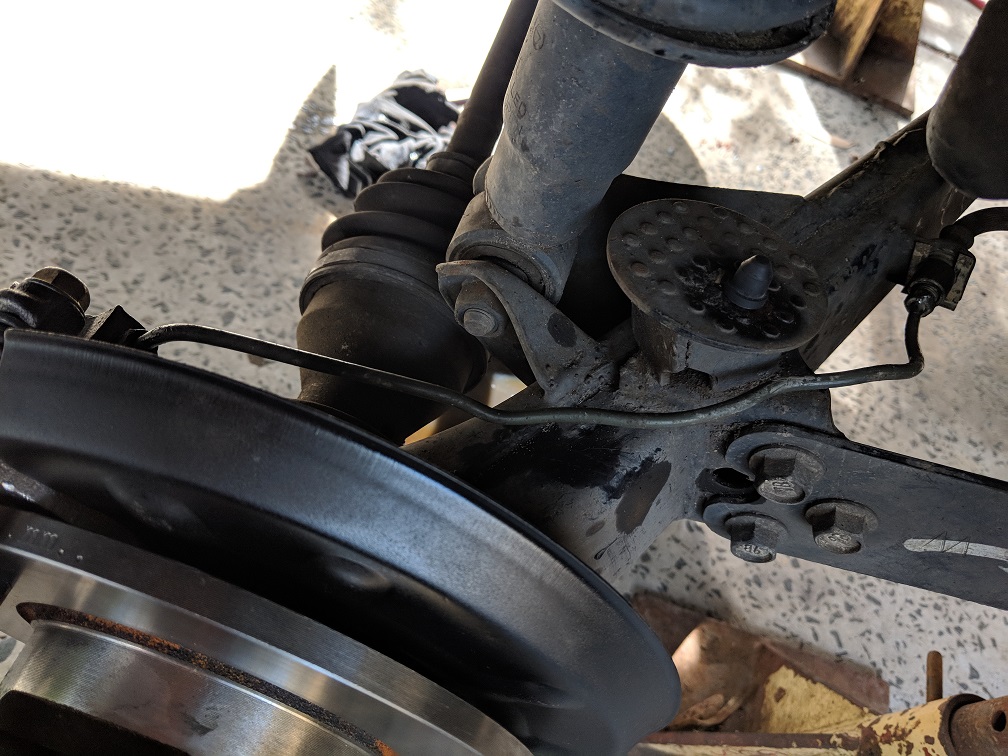
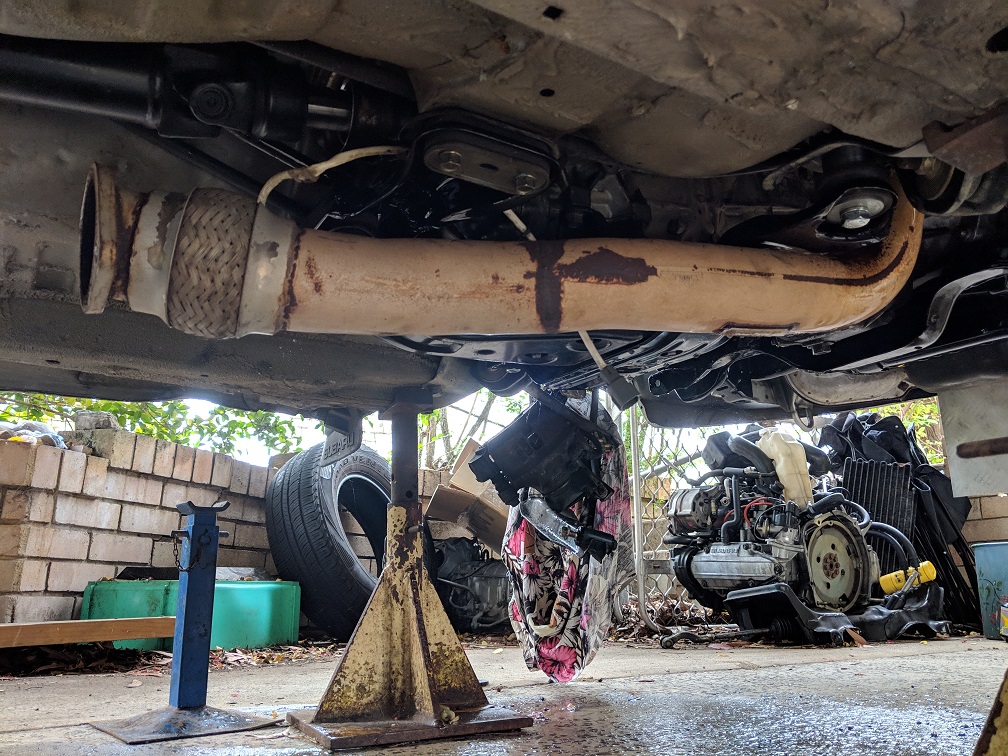
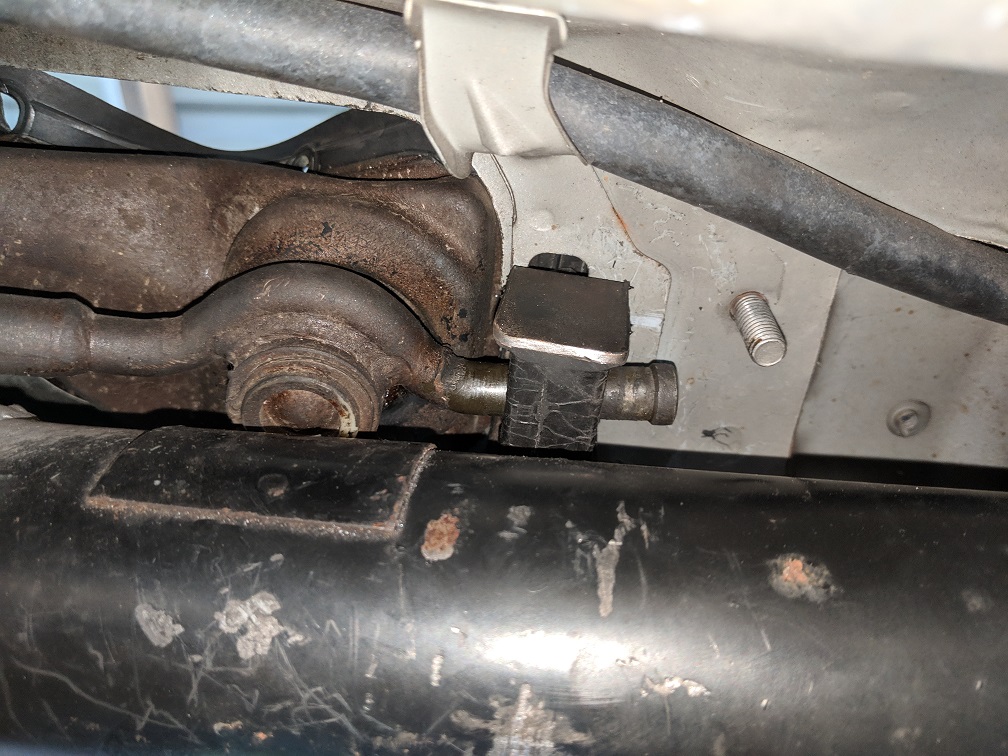
They are a direct fit, the only change required is to re-route the brake line to run over the trailing arm, below the bump stop mount.
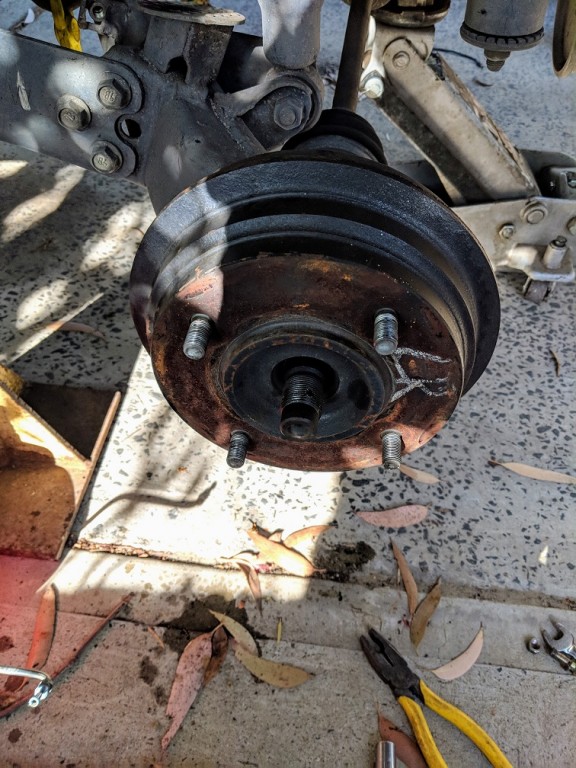
Original drum setup
Disc brake
Brake line routing
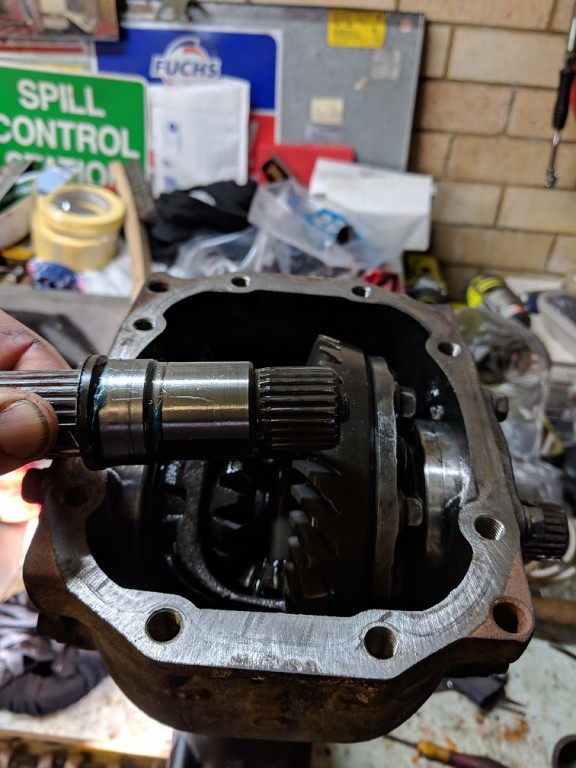
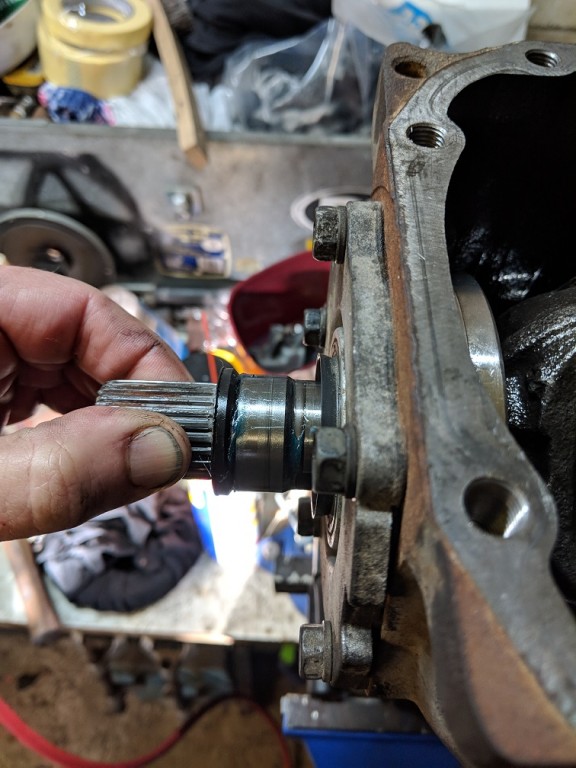
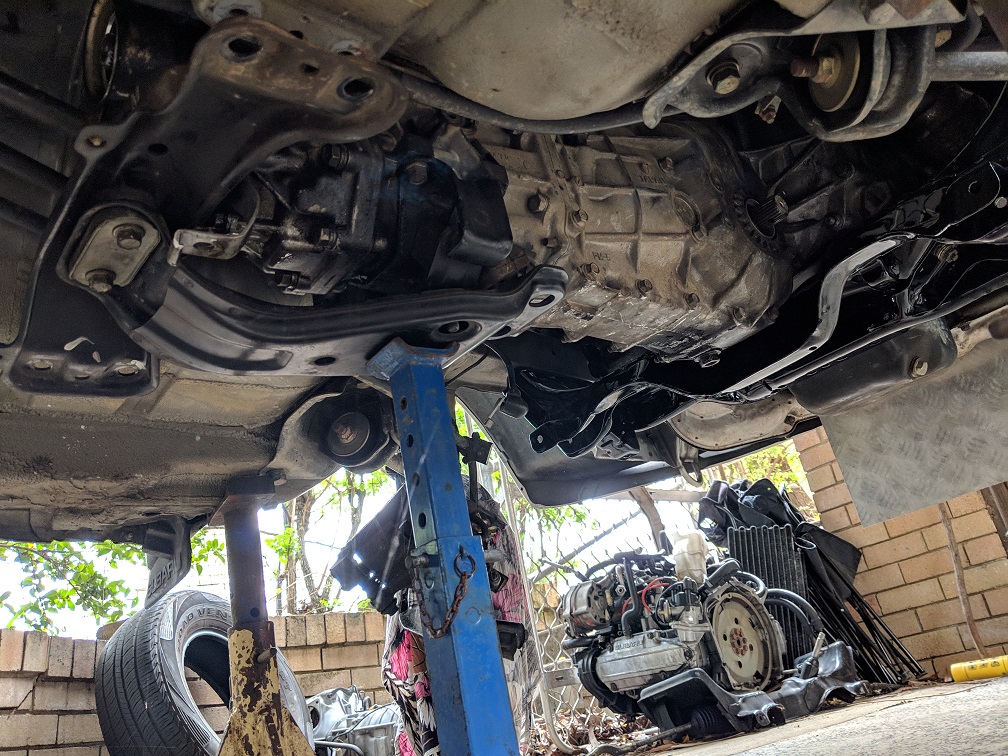
Second project; rear diff
The L-Series and the WRX run virtually the same rear diff; the trusty R160.
However, there are some significant differences when it comes to interchanging them, mainly the pinion flange and the external stubs fitted to the L-Series diff (the WRX has internal splines).
The gearbox I am running is the 3.9 version, which has a 1:1.1 output ratio to the rear diff, so although my automatic L-Series runs a 3.9, the WRX rear diff ratio is not 3.9.
After careful consideration, I decided to fit the L-Series top-hat into the WRX carrier. This essentially gives me a WRX carrier and pinion, with stub axles.
I can then run the L-series rear CV joints, which I have by the bucket load.
Note; a T10 extended E-Torx socket is required to disassemble an L-Series diff.
Stub
Fitting to diff
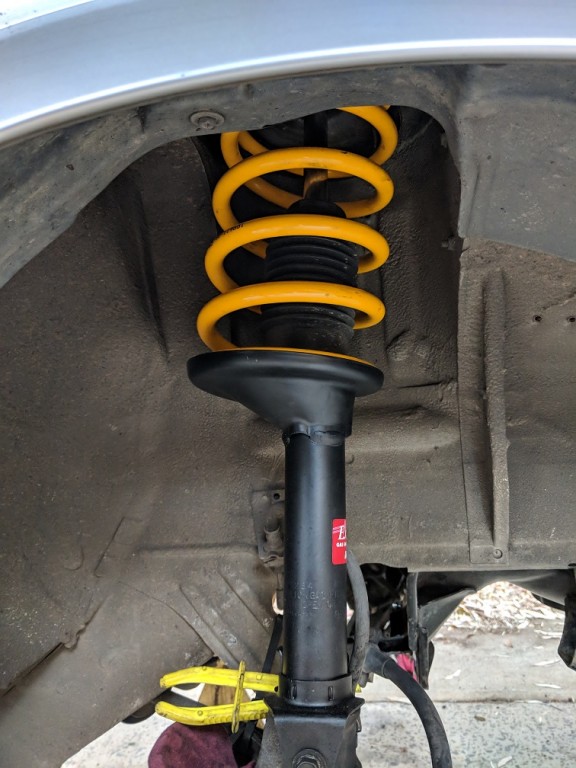
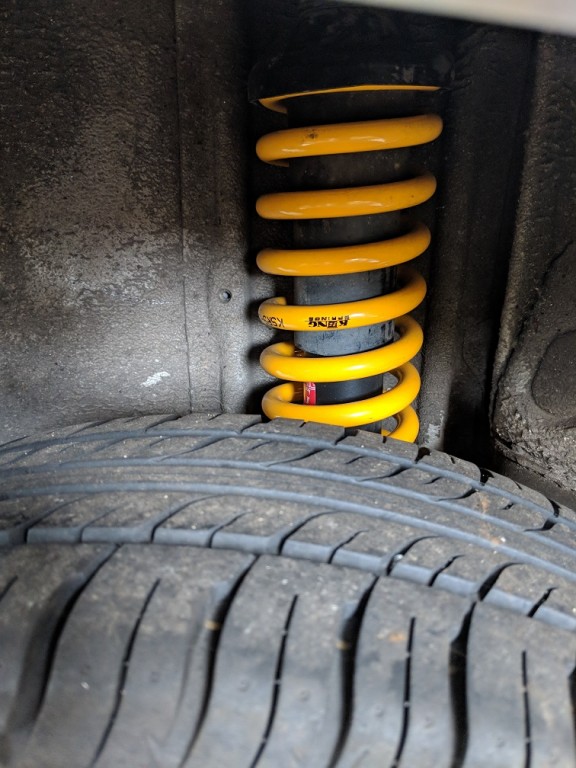
Third project; heavy duty suspension
The OEM suspension in the L-Series is fairly basic. Now, I'm not building a car for track days, but I want a good daily driver.
I could have gone down the path of a complete WRX suspension conversion, but that's not what this car is about. It's a sleeper, that I will use daily, but want to surprise a few people at the traffic lights
It's also important to retain stock height, as I have a goat-track driveway (as does my workplace), and I also want to run 14" tyres that match the rolling radius of the WRX.
I looked at the available options, and decided on King's Springs, and KYB shocks, front and rear.
I'm also looking to source a larger front sway bar, and the rear sway bar off a Turbo Wagon.
Front suspension
Rear suspension
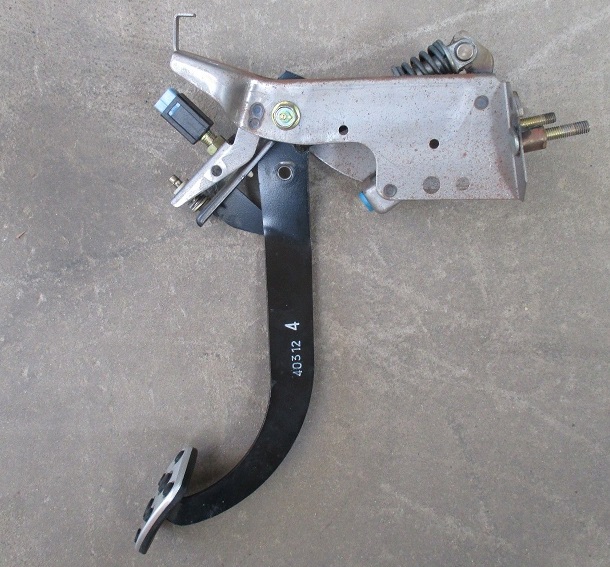
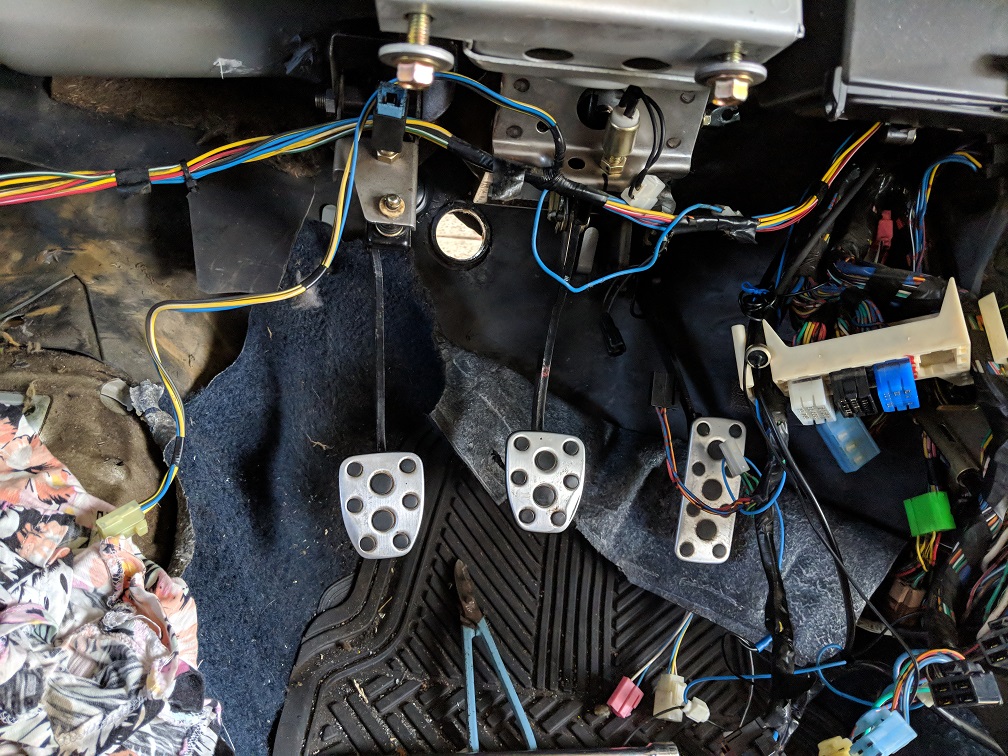
Fourth project; the clutch pedal
This is one of the major jobs with this conversion. The original L-series runs a cable, push-type clutch, whereas the WRX runs a hydraulic pull-type clutch. My car is auto, so it's start from scratch.
The WRX pedal has a spring assembly in the top pivot, which adds a significant amount of height to the pedal box, especially when the clutch pedal is depressed.
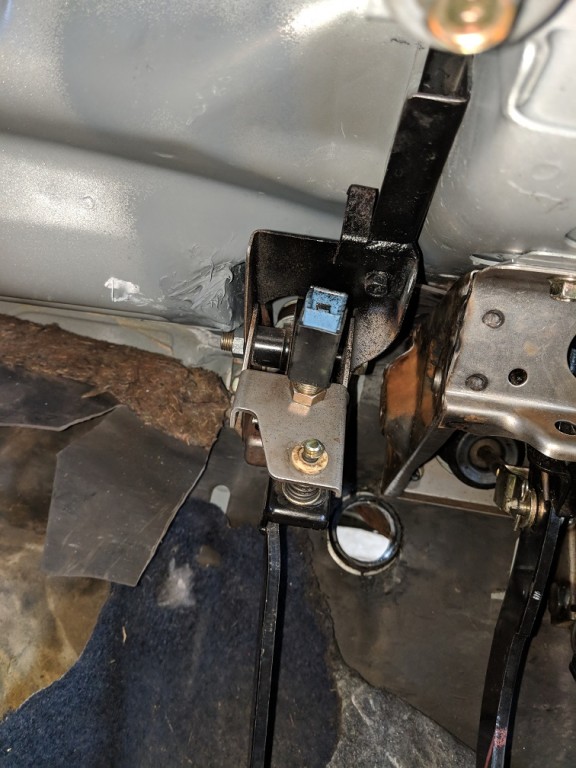
My plan was to use the existing clutch hole in the firewall to mount the WRX pedal box as a complete item. This requires some careful measurement.
One stud hole has to be drilled next to the booster, and a clamping plate has to be made for the other one next to the feedthrough (This is a simple setup of 2 thick washers).
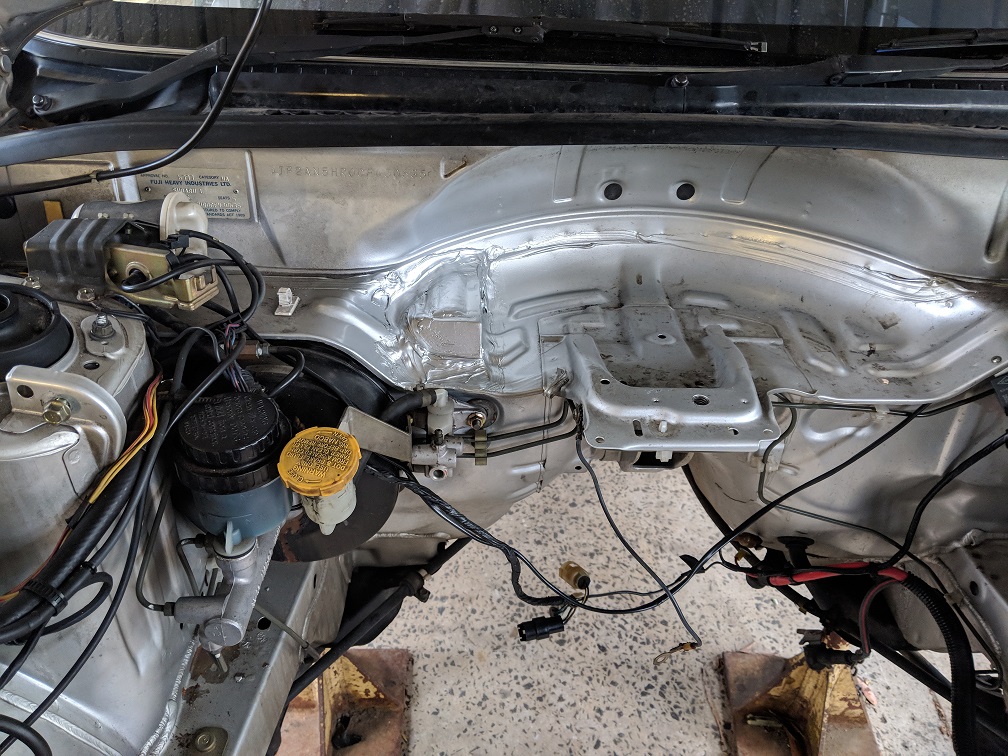
The major part of the job is the firewall cut in the spare wheel well. The spare wheel won't be going back into the engine bay (no room) so I wasn't concerned about loosing this space.
I measured the required dimensions for the pedal box (with clutch pedal pressed), and cut a neat slot.
Then, using a combination of the removed firewall, and some sheet metal, I fabricated a box to cover the slot. This was fully welded on all seams, then coated with a generous amount of seam sealer.
A bracket was fabricated to support the top of the pedal box, welded to the box, and bolted to the steering column mount.
I then applied the required primer, base coat and clear to match the car.
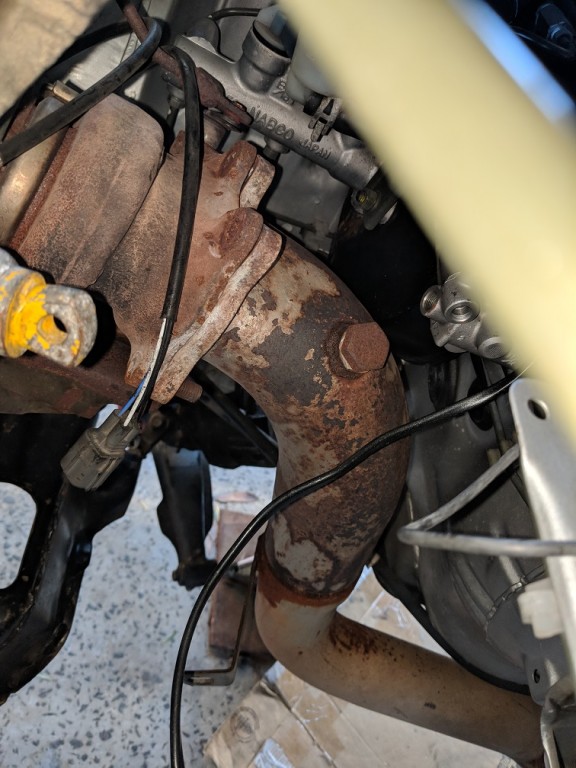
At this stage, the motor has to go in for a trial fit of the dump pipe clearance to the clutch master. I spent a lot of time simulating this with measurement, but the proof is always in the pudding.
Plenty of clearance is evident, and the dump pipe will be wrapped, with the heat shield fitted. The clutch master will also be heat shielded, and the first part of the piping will be wrapped.
The original L-Series brake pedal was cut down, and the WRX pedal welded on, with the throttle pedal receiving the same treatment.
The clutch pedal had to be cut down and re-aligned to suit the new placement (and to ensure full travel). In this picture, I'm still tweaking it to get it the way I want it, but you get the general idea.
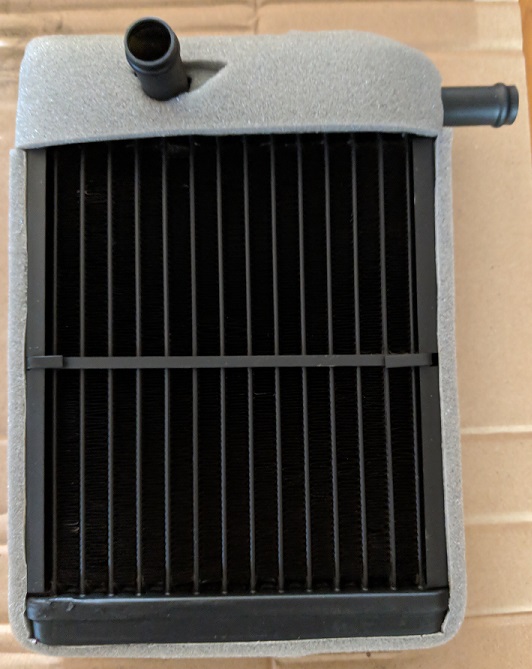
Fifth project; heater
The heater in the L-Series has plastic tanks crimped to a copper core. Mine had started leaking some time ago, and was bypassed.
As I had to take the dash out to do the clutch pedal and wiring loom, I decided to sort the heater issue.
Apon removal, I discovered the plastic tank was cracked (no surprises there). Heat had broken down the plastic, and it had become brittle.
After some ringing around, and a few fruitless visits to various shops, I finally found a place that had some NOS units with brass tanks!
They had 2 available, so I grabbed one straight away. I will fit this into the heater box, but first I plan to strip the heater box and replace all the worn out foam tape that seals the various flaps and components.
New heater
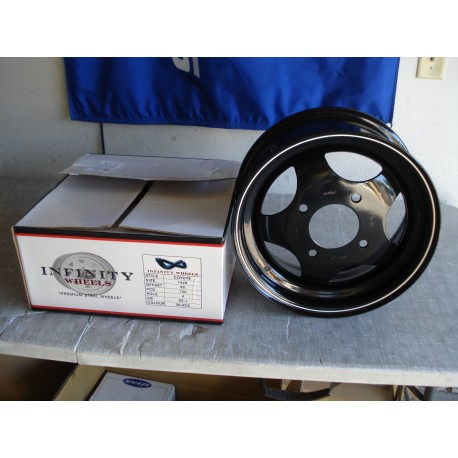
Sixth project; 14", 4 x 140 rims
In keeping with the sleeper look I prefer, I wanted to run 4 x 140 steel rims. The original 13" pizza cutters aren't going to be up to the task, so I set about sourcing some 14" steel rims.
I chose black, as it goes well with the car, and makes it look more stock. These are as close as you can get to the original Scorpion wheels, but are in a 14" x 6" size, and come with new chrome nuts.
They will be shod with 195/70-R14, which makes them the same rolling radius as the original WRX, keeping the speedo accurate, and giving the car a chunky look.
(I borrowed the pic from Google, as mine are still boxed up).
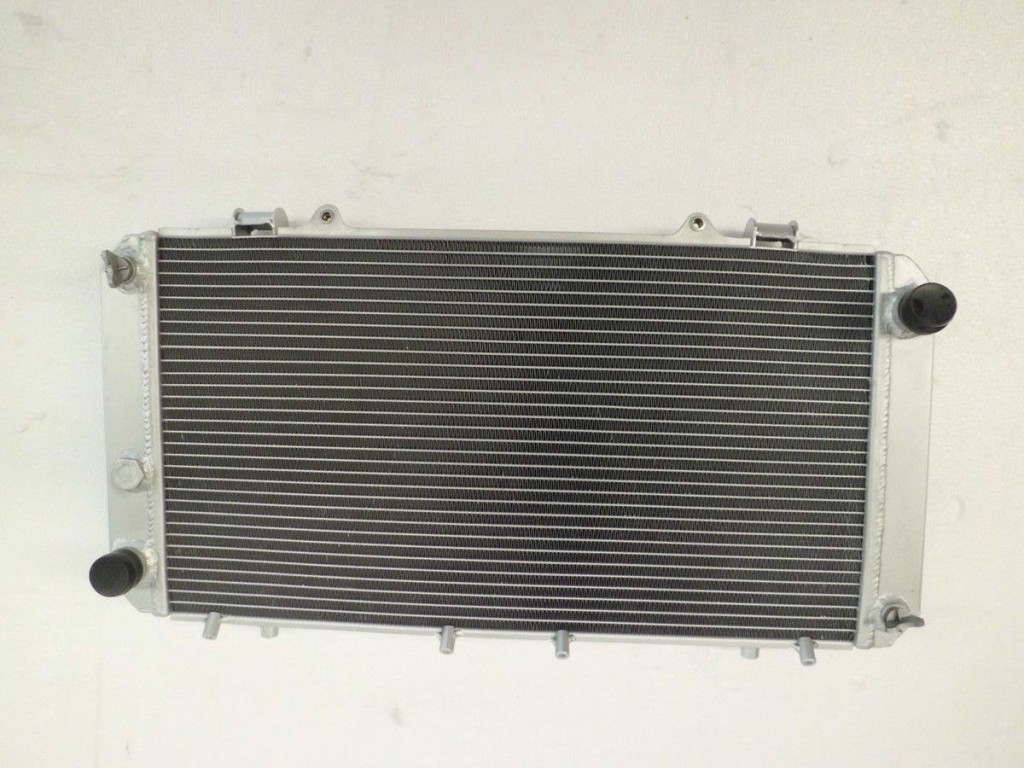
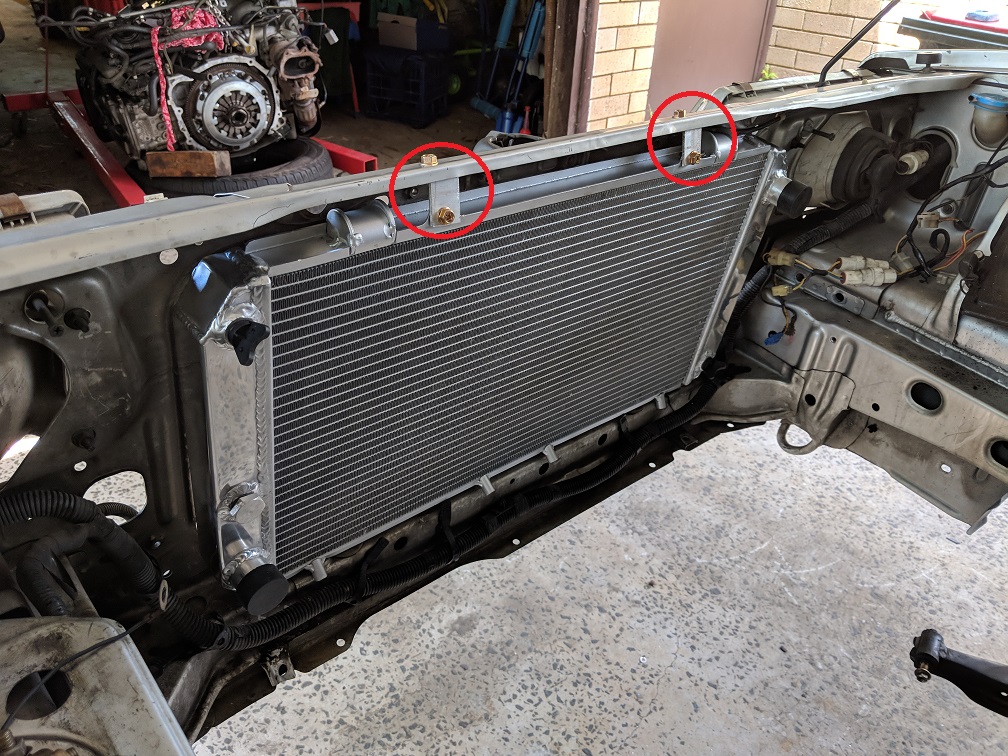
Seventh project; the radiator
The L-Series radiator is not up to the task of cooling the EJ, and the tank fittings are the wrong size (30mm vs 40mm) and location.
The WRX radiator is way too tall to fit in the engine bay, so another solution was required.
I looked at getting a 2-row radiator built in the same style as the L-Series, using brass tanks, with different fittings.
After visiting several radiator shops, they all put it in the can't do/too hard basket, and no amount of cash would persuade them
So, I hit the web, and found the perfect solution; an all alloy radiator to suit a 1989 Toyota MR2.
It will need to have some mounts fabricated, and a couple of 12" Davies Craig thermo fans fitted, but it's the perfect size, with the right inlet and outlet orientation.
There is probably a more elegant solution, but these are cheap and plentiful, in keeping with the ongoing serviceability of the vehicle.
More detail on the fitting process to follow...
The radiator
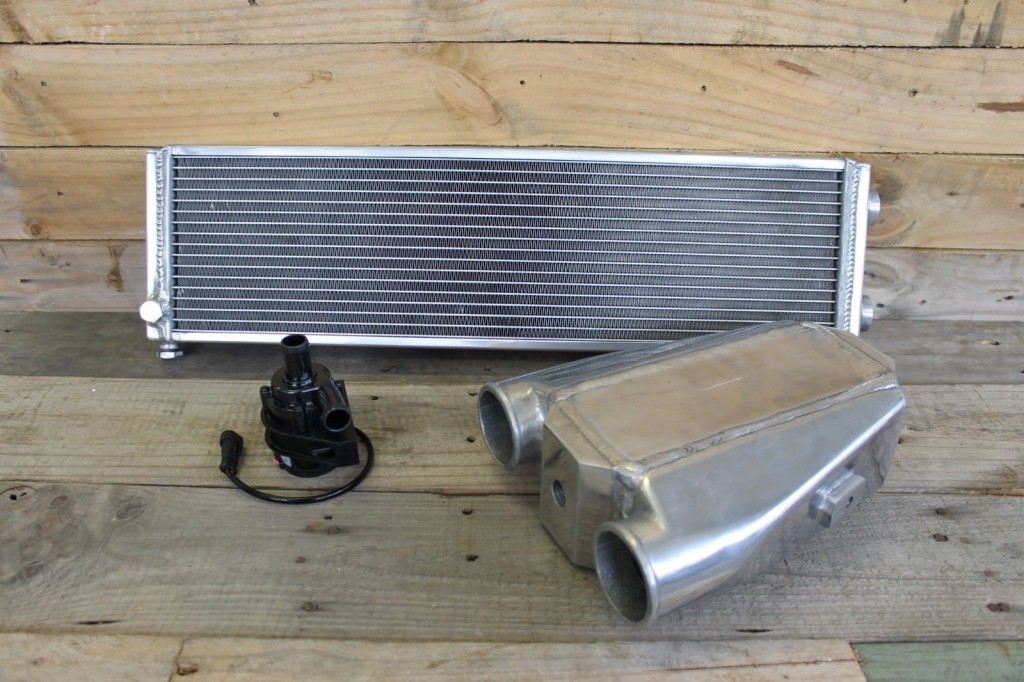
The eighth project; the water-to-air intercooler
A you all know, the WRX runs a top mount intercooler, which requires a bonnet scoop. The existing scoop doesn't fit the L-Series bonnet, and I want more of a sleeper look anyways.
There are plenty of front mount kits available for the WRX, but they take up a lot of room in the L, especially the piping. Based on this, I decided to go for a water-to-air setup. A kit like this will make it a lot easier to fit.
It will require a plumb-back BOV, because I'm not into the sound of an atmospheric (and they are illegal).
This will be fitted in front of the apron, in a bumper cut-out. Haven't ironed out the finer details of this yet, but I will add to the post when I do.
(Image borrowed from the eBay seller, as mine is still in the box).
The front mount
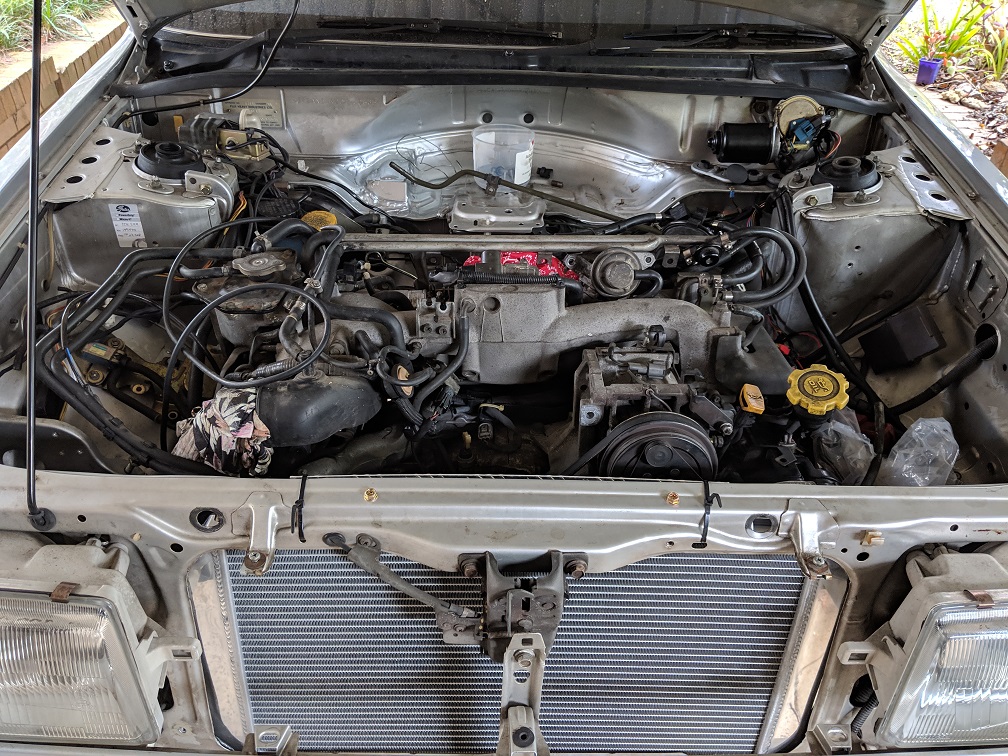
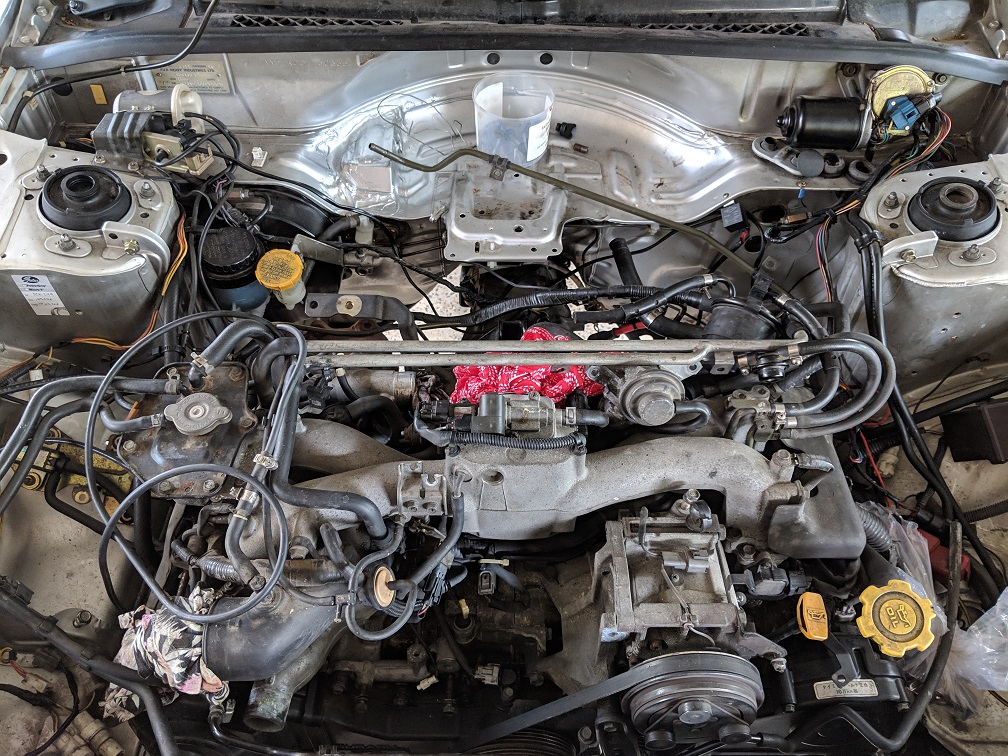
The ninth project; the engine
Having done a lot of the prep work, now it gets down to the fun part; actually getting the EJ to fit in there. The EJ20 turbo is a quad cam motor, with the "Spider" manifold.
Despite what people will tell you, the EJ25 turbo won't fit in there, unless you cut the rails, which introduces approval issues.
The EJ22 turbo will just fit, but it fails the "finger-gap" clearance, which I set for my projects (plus it's a bit of an orphan motor).
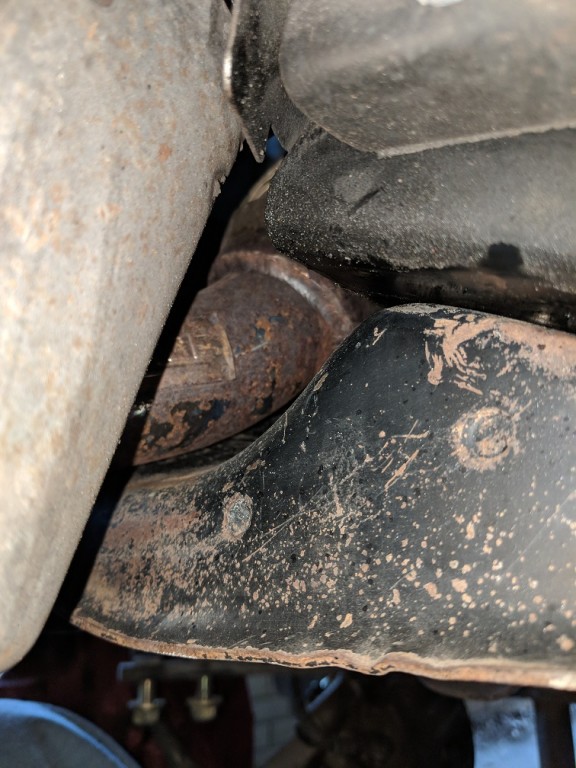
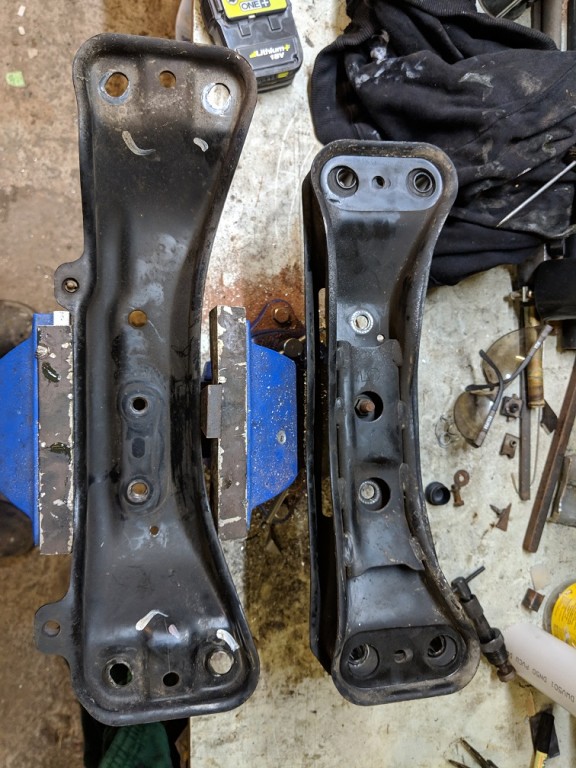
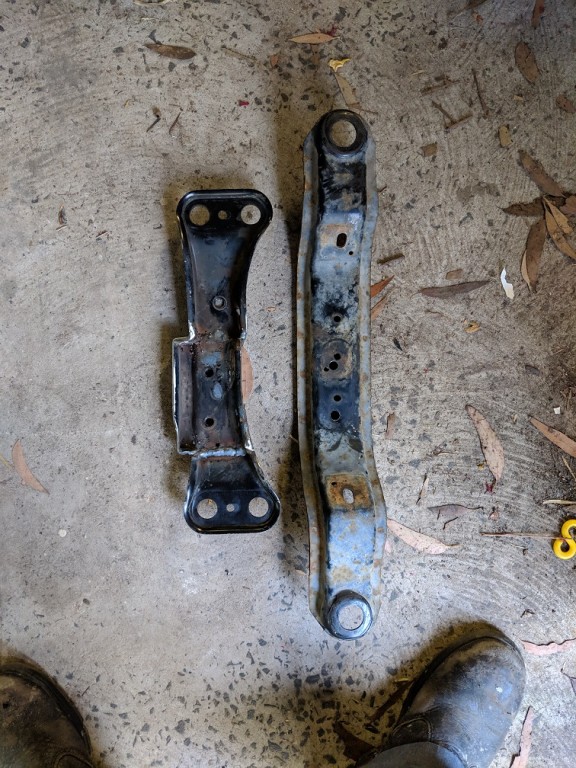
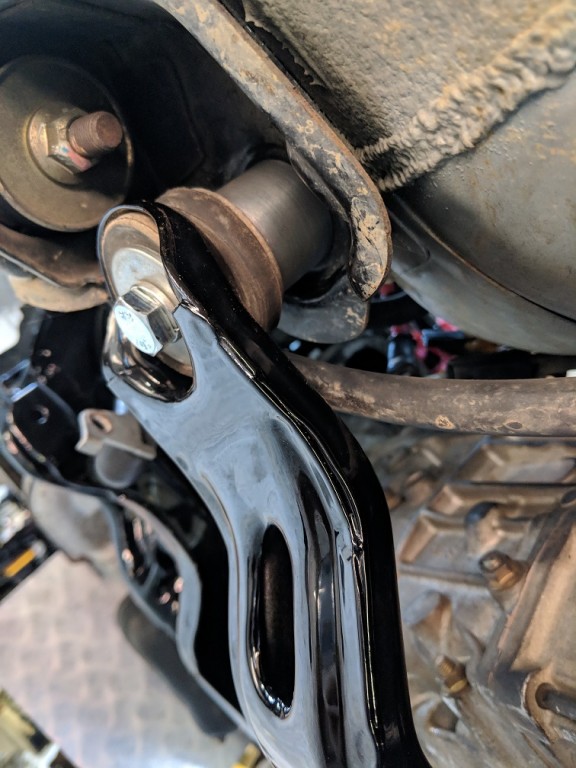
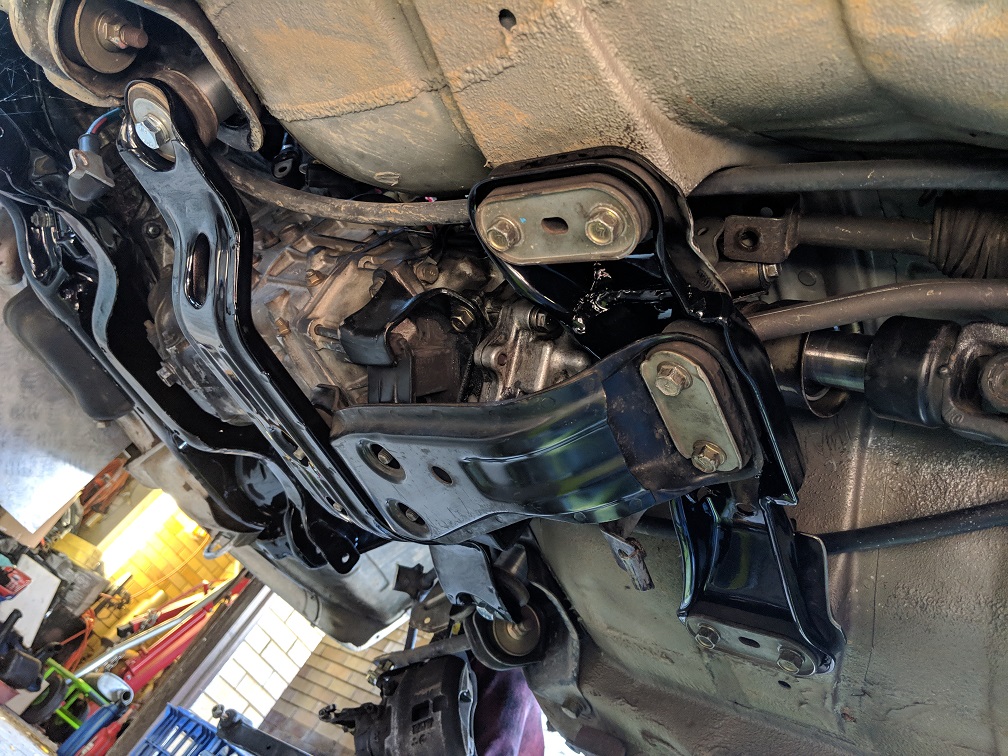
The up-pipe (I'm running a catless) fouls the original L-Series engine crossmember, but Mr. Subaru was a kind man, and released the L-Series in a turbo, so there are crossmembers available with the stamped depression for the up-pipe.
Now, I could modify the non-turbo one that I have, but I like to use original parts where possible. This sent me on a 3 month journey to find the unobtainium crossmember.
There are plenty in the USA, but they are all LHD . I found a few people that said they have them, but couldn't come up with the goods. I rang EVERY Subaru wrecker, parts place, workshop that I could think of.
It got to the point where I just decided to go ahead and modify my one, so I posted a request for a picture, so I could make it look as OEM as possible. A forum member kindly obliged.
The picture
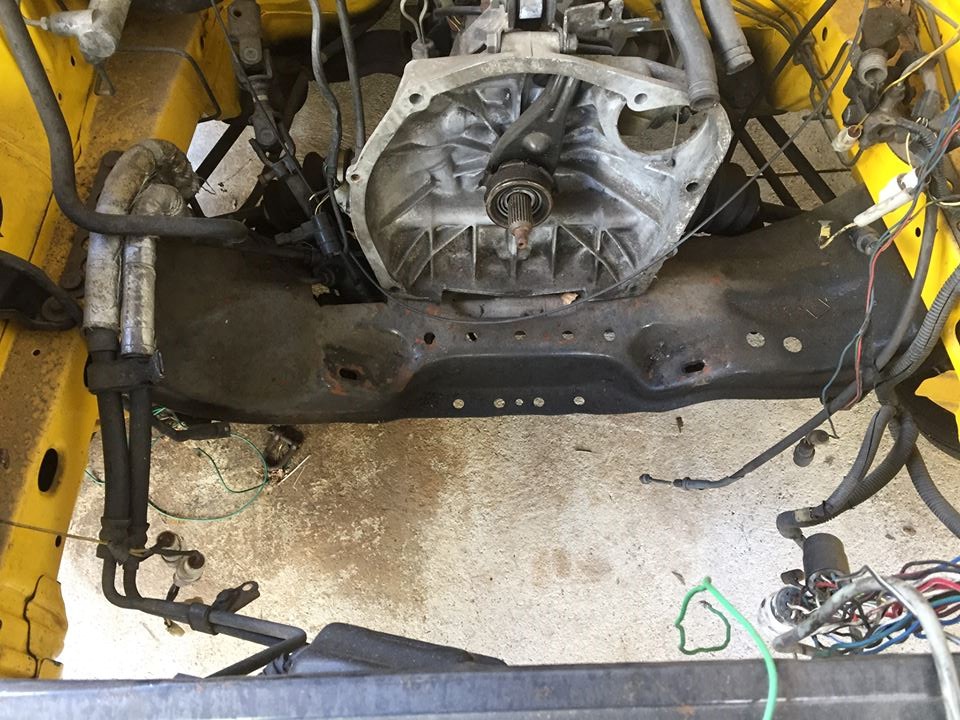
Note the scalloped depression next to the engine mount and steering.
Lo and behold, out of the blue, a bloke asked me if I wanted to buy one
After some monumental stuffing around with couriers (don't ask), I finally had it in my hands. I had to slot the engine mount holes slightly, but that's it.
As you can see, the up-pipe is a perfect fit.
Up-pipe clearance
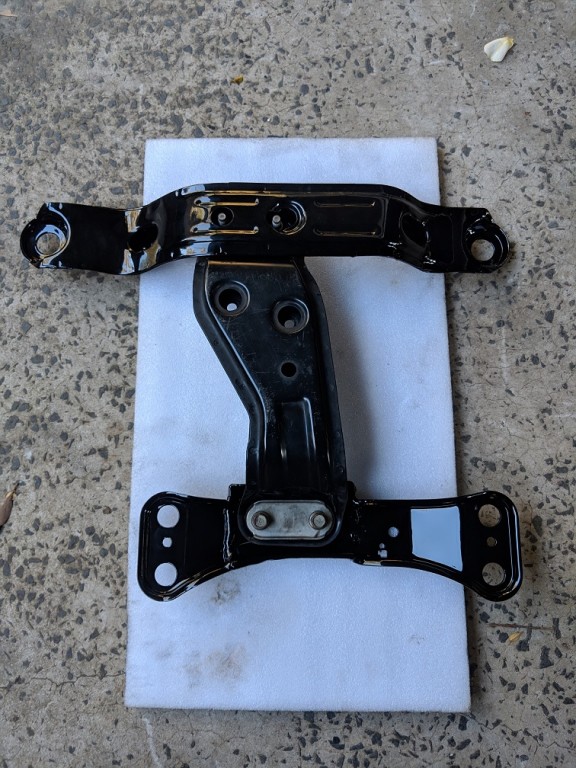
The crossmember will now be pulled out and sent to the powder-coaters for sandblasting and gloss black powder.
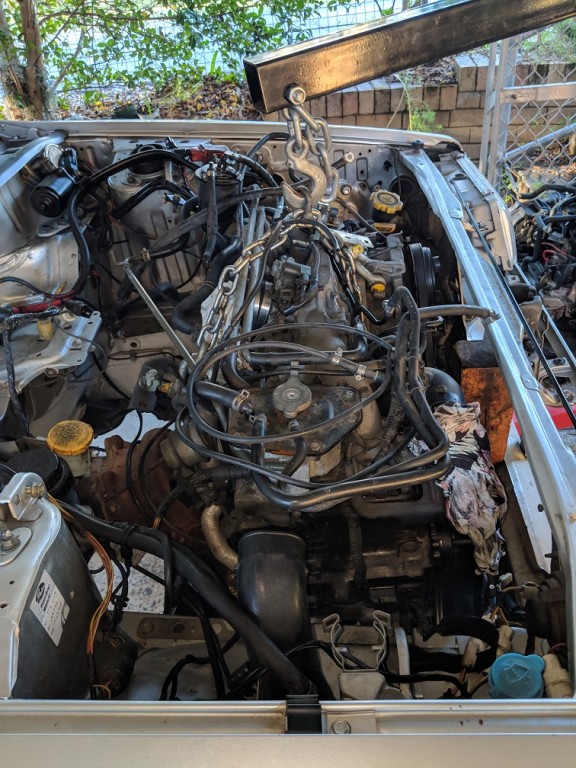
The engine is a nice fit, and is now back out for cleaning, and the rectification of some broken vacuum fittings, etc.
More to follow!...
Thought I'd start sharing the build thread for my latest project.
First, some background on me; I am an engineer, with 25+ years experience in the conversion scene, and enjoy doing the unusual conversions that most people don't attempt.
All of my conversions are fully complied through RTA/RMS signatories, and I do as much as possible of the work myself, including the machining, welding and fabrication.
Most of my conversions are still on the road, and it's pretty satisfying to see them pop up at car shows, or just spotted randomly.
Where possible, I use off-the-shelf parts, which keeps costs down, and ensures that the vehicle can be serviced/repaired well into the future.
None of my vehicles are built to be show cars. They are all designed to be reliable, daily drives, that don't draw attention to the owner; classic sleepers.
Vehicle; 1992 L-Series EA83 wagon, with a 3 speed auto.
Donor; 2001 Bug-eye WRX, manual.
Planned mods;
- WRX motor
- WRX 5 speed manual
- WRX rear diff
- Rear disc conversion
- Heavy duty suspension
- 14", 4 x 140 steel rims
- Heater box repair
- Radiator
- Front mount intercooler
- Hybrid wiring
First project; Rear disc conversion.
As many of you know, the L-series was available with rear disc brakes, both here and in the USA.
These were generally found on the turbo models, and also various Vortex vehicles.
There is a difference between the hubs for AWD and FWD, and they are available in 4 x 140 and 5 x 100 PCD.
The 5 x 100 PCD was fitted to the XT6 only (6 cylinder Vortex), and involved further modification to the front hubs to fit the L-Series.
I wanted to keep 4 x 140, so I set about sourcing those.
After ringing EVERY Subaru contact in Australia that I could think of, I received a few promising leads, all of which turned out to be dead ends, or just weirdos.
I finally found a wrecking yard in the good old USA, that had the setup that I wanted. I had them send over the hubs, backing plates and all fasteners.
The backing plates mount the rear calipers, so they are a critical part to source in good condition.
Again from the USA, I bought a set of reconditioned calipers, compete with the bracket that bolts to the backing plate.
The USA also provided a brand new set of NOS discs.
Bendix brake pads were sourced locally.
They are a direct fit, the only change required is to re-route the brake line to run over the trailing arm, below the bump stop mount.
Original drum setup
Disc brake
Brake line routing
Second project; rear diff
The L-Series and the WRX run virtually the same rear diff; the trusty R160.
However, there are some significant differences when it comes to interchanging them, mainly the pinion flange and the external stubs fitted to the L-Series diff (the WRX has internal splines).
The gearbox I am running is the 3.9 version, which has a 1:1.1 output ratio to the rear diff, so although my automatic L-Series runs a 3.9, the WRX rear diff ratio is not 3.9.
After careful consideration, I decided to fit the L-Series top-hat into the WRX carrier. This essentially gives me a WRX carrier and pinion, with stub axles.
I can then run the L-series rear CV joints, which I have by the bucket load.
Note; a T10 extended E-Torx socket is required to disassemble an L-Series diff.
Stub
Fitting to diff
Third project; heavy duty suspension
The OEM suspension in the L-Series is fairly basic. Now, I'm not building a car for track days, but I want a good daily driver.
I could have gone down the path of a complete WRX suspension conversion, but that's not what this car is about. It's a sleeper, that I will use daily, but want to surprise a few people at the traffic lights
It's also important to retain stock height, as I have a goat-track driveway (as does my workplace), and I also want to run 14" tyres that match the rolling radius of the WRX.
I looked at the available options, and decided on King's Springs, and KYB shocks, front and rear.
I'm also looking to source a larger front sway bar, and the rear sway bar off a Turbo Wagon.
Front suspension
Rear suspension
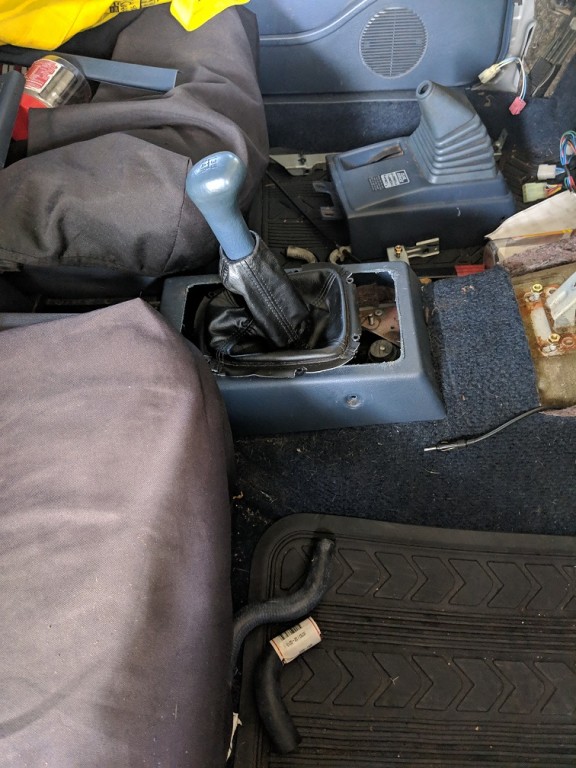
Fourth project; the clutch pedal
This is one of the major jobs with this conversion. The original L-series runs a cable, push-type clutch, whereas the WRX runs a hydraulic pull-type clutch. My car is auto, so it's start from scratch.
The WRX pedal has a spring assembly in the top pivot, which adds a significant amount of height to the pedal box, especially when the clutch pedal is depressed.
My plan was to use the existing clutch hole in the firewall to mount the WRX pedal box as a complete item. This requires some careful measurement.
One stud hole has to be drilled next to the booster, and a clamping plate has to be made for the other one next to the feedthrough (This is a simple setup of 2 thick washers).
The major part of the job is the firewall cut in the spare wheel well. The spare wheel won't be going back into the engine bay (no room) so I wasn't concerned about loosing this space.
I measured the required dimensions for the pedal box (with clutch pedal pressed), and cut a neat slot.
Then, using a combination of the removed firewall, and some sheet metal, I fabricated a box to cover the slot. This was fully welded on all seams, then coated with a generous amount of seam sealer.
A bracket was fabricated to support the top of the pedal box, welded to the box, and bolted to the steering column mount.
I then applied the required primer, base coat and clear to match the car.
At this stage, the motor has to go in for a trial fit of the dump pipe clearance to the clutch master. I spent a lot of time simulating this with measurement, but the proof is always in the pudding.
Plenty of clearance is evident, and the dump pipe will be wrapped, with the heat shield fitted. The clutch master will also be heat shielded, and the first part of the piping will be wrapped.
The original L-Series brake pedal was cut down, and the WRX pedal welded on, with the throttle pedal receiving the same treatment.
The clutch pedal had to be cut down and re-aligned to suit the new placement (and to ensure full travel). In this picture, I'm still tweaking it to get it the way I want it, but you get the general idea.
Fifth project; heater
The heater in the L-Series has plastic tanks crimped to a copper core. Mine had started leaking some time ago, and was bypassed.
As I had to take the dash out to do the clutch pedal and wiring loom, I decided to sort the heater issue.
Apon removal, I discovered the plastic tank was cracked (no surprises there). Heat had broken down the plastic, and it had become brittle.
After some ringing around, and a few fruitless visits to various shops, I finally found a place that had some NOS units with brass tanks!
They had 2 available, so I grabbed one straight away. I will fit this into the heater box, but first I plan to strip the heater box and replace all the worn out foam tape that seals the various flaps and components.
New heater
Sixth project; 14", 4 x 140 rims
In keeping with the sleeper look I prefer, I wanted to run 4 x 140 steel rims. The original 13" pizza cutters aren't going to be up to the task, so I set about sourcing some 14" steel rims.
I chose black, as it goes well with the car, and makes it look more stock. These are as close as you can get to the original Scorpion wheels, but are in a 14" x 6" size, and come with new chrome nuts.
They will be shod with 195/70-R14, which makes them the same rolling radius as the original WRX, keeping the speedo accurate, and giving the car a chunky look.
(I borrowed the pic from Google, as mine are still boxed up).
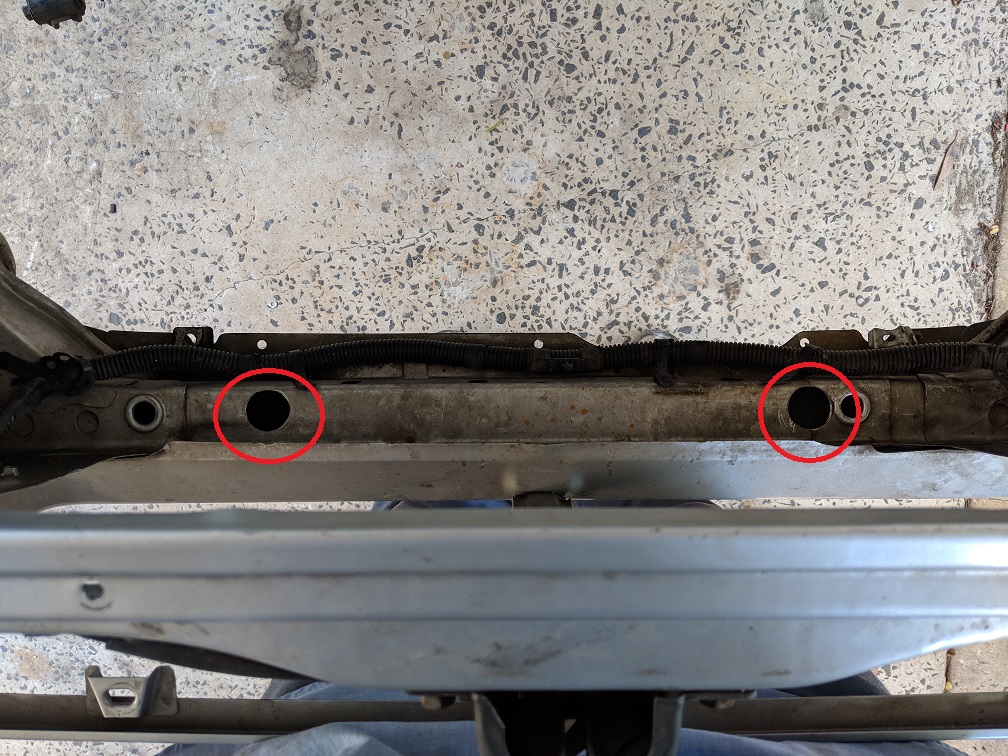
Seventh project; the radiator
The L-Series radiator is not up to the task of cooling the EJ, and the tank fittings are the wrong size (30mm vs 40mm) and location.
The WRX radiator is way too tall to fit in the engine bay, so another solution was required.
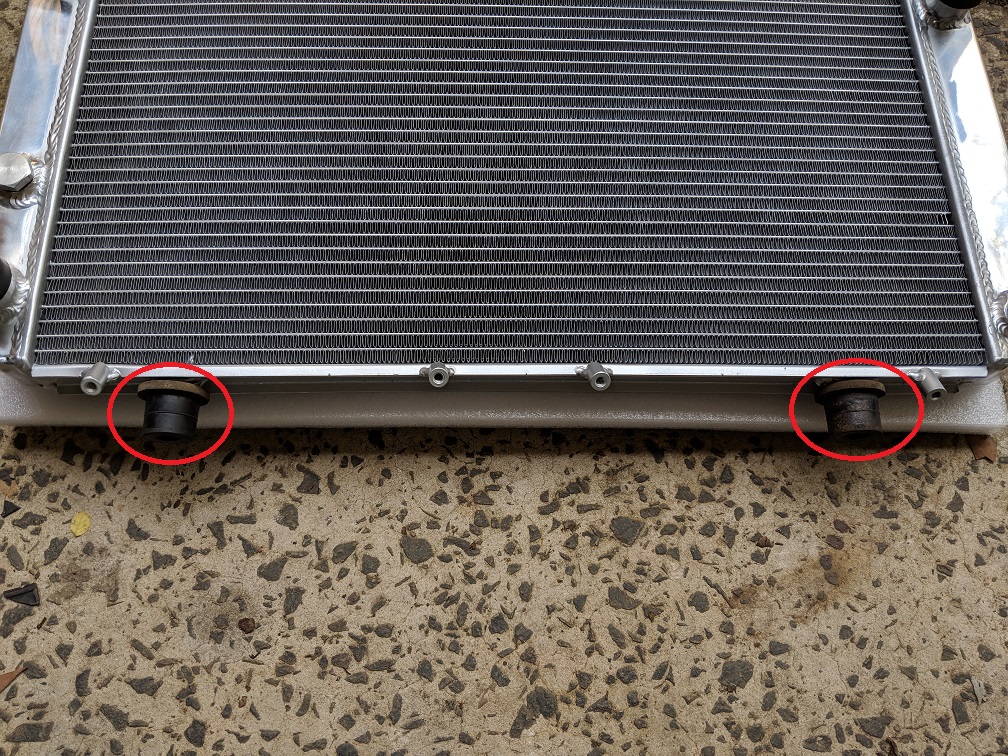
I looked at getting a 2-row radiator built in the same style as the L-Series, using brass tanks, with different fittings.
After visiting several radiator shops, they all put it in the can't do/too hard basket, and no amount of cash would persuade them
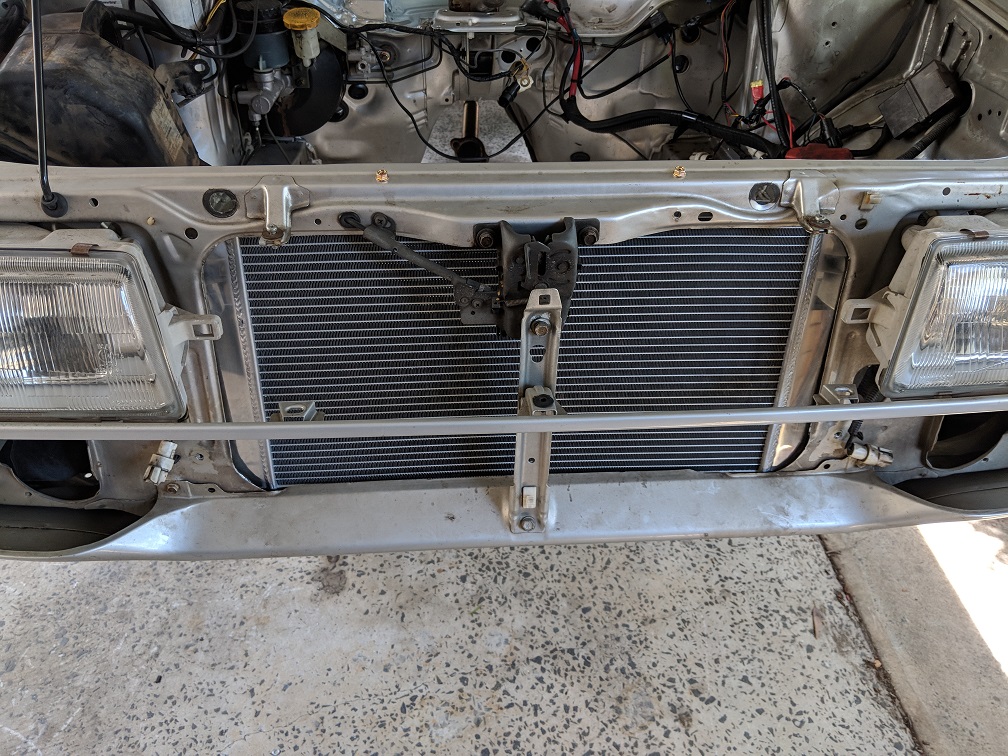
So, I hit the web, and found the perfect solution; an all alloy radiator to suit a 1989 Toyota MR2.
It will need to have some mounts fabricated, and a couple of 12" Davies Craig thermo fans fitted, but it's the perfect size, with the right inlet and outlet orientation.
There is probably a more elegant solution, but these are cheap and plentiful, in keeping with the ongoing serviceability of the vehicle.
More detail on the fitting process to follow...
The radiator
The eighth project; the water-to-air intercooler
A you all know, the WRX runs a top mount intercooler, which requires a bonnet scoop. The existing scoop doesn't fit the L-Series bonnet, and I want more of a sleeper look anyways.
There are plenty of front mount kits available for the WRX, but they take up a lot of room in the L, especially the piping. Based on this, I decided to go for a water-to-air setup. A kit like this will make it a lot easier to fit.
It will require a plumb-back BOV, because I'm not into the sound of an atmospheric (and they are illegal).
This will be fitted in front of the apron, in a bumper cut-out. Haven't ironed out the finer details of this yet, but I will add to the post when I do.
(Image borrowed from the eBay seller, as mine is still in the box).
The front mount
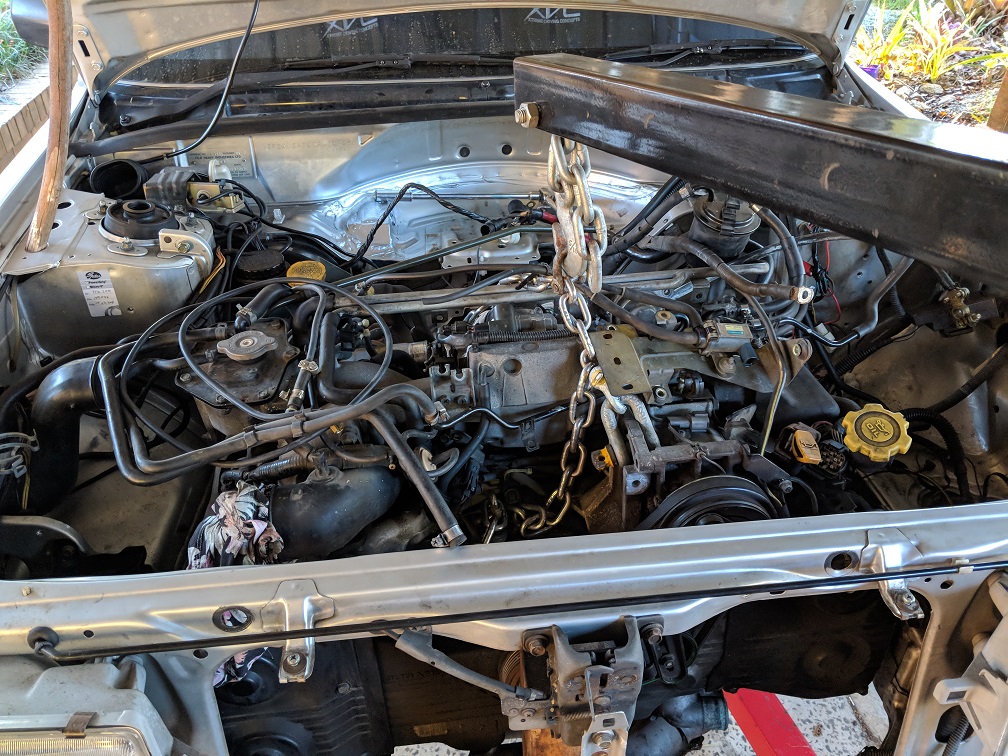
The ninth project; the engine
Having done a lot of the prep work, now it gets down to the fun part; actually getting the EJ to fit in there. The EJ20 turbo is a quad cam motor, with the "Spider" manifold.
Despite what people will tell you, the EJ25 turbo won't fit in there, unless you cut the rails, which introduces approval issues.
The EJ22 turbo will just fit, but it fails the "finger-gap" clearance, which I set for my projects (plus it's a bit of an orphan motor).
The up-pipe (I'm running a catless) fouls the original L-Series engine crossmember, but Mr. Subaru was a kind man, and released the L-Series in a turbo, so there are crossmembers available with the stamped depression for the up-pipe.
Now, I could modify the non-turbo one that I have, but I like to use original parts where possible. This sent me on a 3 month journey to find the unobtainium crossmember.
There are plenty in the USA, but they are all LHD
It got to the point where I just decided to go ahead and modify my one, so I posted a request for a picture, so I could make it look as OEM as possible. A forum member kindly obliged.
The picture
Note the scalloped depression next to the engine mount and steering.
Lo and behold, out of the blue, a bloke asked me if I wanted to buy one
After some monumental stuffing around with couriers (don't ask), I finally had it in my hands. I had to slot the engine mount holes slightly, but that's it.
As you can see, the up-pipe is a perfect fit.
Up-pipe clearance
The crossmember will now be pulled out and sent to the powder-coaters for sandblasting and gloss black powder.
The engine is a nice fit, and is now back out for cleaning, and the rectification of some broken vacuum fittings, etc.
More to follow!...

 Good work once again!