EJ20G RX Leone Rally Car Build

Rear end is WAY out, I have 10mm toe out on RHS and 4mm on LHS, I also have 4deg pos camber on RHS and 1deg postive on LHS. The alignment guy recons the hubs are bent so I stripped the arms out last night and am going to the work workshop today to press off the Crossbred kit and old leone backing plates off my spare set.
I am then going to mount the bare arms back on this weekend and and extrapolate the toe and camber from the bare backing plate to a piece of cardboard taped to the ground, then by swapping arms and playing around I can see if I can get any improvements.
Hope to have it back together and at the alignment guys place again on monday
85 Leone RX EJ20T Rally Car - plus spare rolling shell
91 Facelift 2.2 GX 4WD Legacy - SOLD
96 RSB Legacy
91 Facelift 2.2 GX 4WD Legacy - SOLD
96 RSB Legacy
-
discopotato03
- Senior Member
- Posts: 2134
- Joined: Sun Mar 18, 2007 9:29 am
- Location: Sydney
Just on the hydraulic handbrake , too late now but it may have been possible to make "fiddle brakes" by using two lever operated master cylinders .
My rally people have used them on motorkhana buggies with some success .
I guess you could say it sort of archives what current stability systems do but without the electronics and ABS bits .
The L's are a problem with their twin proportioning system to the rear , its designed to in theory fail safe and give a diagonal split with full BMC pressure to either front left and rear right or vice versa depending on which side leaks beyond the proportioning valve .
From talking to Gee , I gather that L series rear crossmembers are not fitted so that they go in at the same location every time . I think what he means is that where the bushes crush tubes go over their spigots or bolts (haven't had one out yet) the fit is not neat so they need to be somehow lined up properly or adjusted by loosening the fixings and levering the X member around to get the most neutral geometry .
Fun and games , cheers A .
May need to find another rear 4WD X member from a straight road car to check dimensions .
If the rules allow you may be able to make the inner mount vertically adjustable like a range of holes or slot to get the camber where you want it at your ride height . In the DR30 Skyline I had the idea was to slot the inner mount and set it up for the desired camber , mark it out remove the A arm and tack weld washers to locate the mounting bolt where it was set previously . Once bolted up they usually don't move and if you decide to change settings all you need to do is grind the tack welds off and move the washers .
Not sure with a L series but with the DR30 the slots at the outer mounts were made horizontal to adjust toe .
The hard part can be knowing at which precise height you want the camber and toe to be neutral . The car will obviously squat on power and for maximum traction the rear tyres need to have neutral camber and toe . you can find this height by placing a couple of cable ties around the bottoms of the shock rams and go do a few hard launches . When the suspension compresses the cable ties move up and give an accurate indication of where this point is in relation to static height . Race people I know of do wheel alignments at this height for maximum traction .
Outa time but .
I may have located a couple of urethane encapsulated front adjustable strut tops - adjustable for camber and caster . These have the spherical bearing offset upwards so you don't lose that critical 15-20mm of bump travel .
If they find me they will go in and get around the L's diabolical lack of neutral camber and positive caster .
DP - I am not sure what you mean by fiddle brakes, i do have a brake balance bar which alters the front to rear bias by varying the preasure on the two MC's. This is all most rally guys use that I know of.
Thanks for the hint on the rear subframe mounting, I will have a play tonight and try to get the frame as forward as possable to help with the toe out issue.
I am already thinking down similar lines to what you have mentioned re the inner mount, I am looking at moving the mounts outboard (to improve toe) and rotating it downward (to improve camber) and slotting the holes for fine adjustment, once set do the tack welded washer thing.
The hard part is figuring out how much to move the mounts.
Re the height for the setup, I am familure with the method (or variants of it) that you mention using cable ties and while I may do something down the track at the moment I am happy to leave it in the hands of the guru alignment guy, he specialises in race/rally cars.
Thanks for the tips Adrian.
85 Leone RX EJ20T Rally Car - plus spare rolling shell
91 Facelift 2.2 GX 4WD Legacy - SOLD
96 RSB Legacy
91 Facelift 2.2 GX 4WD Legacy - SOLD
96 RSB Legacy
-
discopotato03
- Senior Member
- Posts: 2134
- Joined: Sun Mar 18, 2007 9:29 am
- Location: Sydney
Thanks A,
"Fiddle" brakes are more for 4WD trialing etc, where very tight turning/improved traction/power delivery control etc is required, probably not a bad thing for a motokana type event but not really usefull at higher speeds.
Progress - of sorts....
After a manic weekend of changing rear arms over and measuring their relative camber and toe I discovered that all 3 sets of rear arms I have are different (read "bent to some degree") so appart from the fact I have established L series rear hubs are easilly bent and have no available factory alignment adjustment I have also determined none of the hubs in my possession were going to do the job for me and give me the camber/toe I wanted.
So, time to get serious.
I fiddled with the bush in the inner mounting on the subframe, just took the bolt out and moved the bush up and down in the hanger to try and get a feel for how much movement at the hanger equates to how much camber adjustment at the hub. Once happy I had an idea where I wanted to hanger to be out came the rear end and the subframe and I set about relocating the hangers on the subframe.
I ground off the welds and then reattached the hangers 5mm firther outboard (to help with toe) and 25mm radially firther round the subframe so the hanger pointed down instead of flat. This lowers the bolt point and increases negative camber. I also slotted out the existing bolt holes on the hanger to allow for fine adjustment.
I put it all back together and the car had so much negative camber it looked like I had forgotten to put the springs in... seriously the car must have had 8-10deg of negative camber, on the plus side the toe looked good!!
So, this was obviously no good but at least I had moved in the right direction.
Next I pulled it all to pieces again, ground off my nice new welds and relocated the hangers for a 2nd time. This time I only went 10mm radially firther around than the original location.
Handy hint here if anyone trys this I marked the original mounting points by using a centre punch to mark the corners of the hanger plate, I punched 10mm out from each corner in both directions so each hanger had 8 referance marks to work from. Also measure the deviation from a string line to get the rotation of each hanger the same and measure back from multiple subframe points to make sure each side is the same.
Then put it all back together and she looks sweet - camber is 1-2 deg negative and toe can be dialed in with slotted trailing arms. Once the wheel alignment is done I will weld all the washers on the adjustment points solid.
85 Leone RX EJ20T Rally Car - plus spare rolling shell
91 Facelift 2.2 GX 4WD Legacy - SOLD
96 RSB Legacy
91 Facelift 2.2 GX 4WD Legacy - SOLD
96 RSB Legacy
Well she survived her first weekend completing all the runs. It was a neat road, 7.7km of forestry gravel roads with some tricky corners and good climbs. We had a recce and three timed runs which is the usual format.
I was really carefull the first run and did it in 6min 31s as the brakes were still bedding in and I was listening for all the odd noises!!
By the third run I had knocked off 30sec but was still a minite or so behind the winner in a national champ Evo 8 car.
We found a few issues to sort through.
- Biggest issue was low boost, approx 7psi which ment low power and 4th gear had virtually no acceleration. It seems like it is running at waste gate pre load preasure only so I need to investigate the boost control solanoid etc
- managed to half tear off my front mud flaps - lol
- spring a small leak in the top rad hose which dripped onto the hot exhaust so lots of steam.
- Lots of banging of the gearbox onto the tunnel, the old car did this but not as bad. Everthing stayed bolted up tight so maybe the rubber mounts are a bit sad?
I will give the car a good clean down tonight and see what else appears as broken/bent/moved/loose/missing etc.
I have got 7 weeks till the next round at our club to sort it out, if all sussed out prior I may enter an event from a neighbouring club. Depends how itchy the feet get!
85 Leone RX EJ20T Rally Car - plus spare rolling shell
91 Facelift 2.2 GX 4WD Legacy - SOLD
96 RSB Legacy
91 Facelift 2.2 GX 4WD Legacy - SOLD
96 RSB Legacy
-
brumbyrunner

- General Member
- Posts: 1743
- Joined: Mon Apr 10, 2006 10:00 am
- Location: SEQ
Tell me more about "Gareths version" and how to get hold of him....brumbyrunner wrote:Excelent! Sounds like you had fun.
You might find that the stock gearbox mounts are not stiff enough to prevent movement. A few people have made up custom mounts to completely replace the stock ones. You could try to get a pic of Gareths version.
85 Leone RX EJ20T Rally Car - plus spare rolling shell
91 Facelift 2.2 GX 4WD Legacy - SOLD
96 RSB Legacy
91 Facelift 2.2 GX 4WD Legacy - SOLD
96 RSB Legacy
-
brumbyrunner
- General Member
- Posts: 1743
- Joined: Mon Apr 10, 2006 10:00 am
- Location: SEQ
Update -ToyRX wrote:
We found a few issues to sort through.
- Biggest issue was low boost, approx 7psi which ment low power and 4th gear had virtually no acceleration. It seems like it is running at waste gate pre load preasure only so I need to investigate the boost control solanoid etc
- managed to half tear off my front mud flaps - lol
- spring a small leak in the top rad hose which dripped onto the hot exhaust so lots of steam.
- Lots of banging of the gearbox onto the tunnel, the old car did this but not as bad. Everthing stayed bolted up tight so maybe the rubber mounts are a bit sad?
Low boost issue resolved - turns out the wastegate had no preload on it! In fact it was over half a "hole" open so no wonder it never spooled up, In fact i am surprised I manged to get 7lb.
I removed actuator and redrilled the hole in the end of the rod so I now have just over half a "hole" in preload - boosts strong now to ~14lb
Mudflaps half fixed
Top rad hose replaced and also retrofitted a twin turbo alloy header tank
Gearbox and engine mounts have not been touched yet but I can run with them the way the are.
85 Leone RX EJ20T Rally Car - plus spare rolling shell
91 Facelift 2.2 GX 4WD Legacy - SOLD
96 RSB Legacy
91 Facelift 2.2 GX 4WD Legacy - SOLD
96 RSB Legacy
-
subalex

- Junior Member
- Posts: 218
- Joined: Sun Oct 09, 2005 10:00 am
- Location: Kellyville Ridge, Sydney
I have just read your thread... I'm all too jealous that you have either the time or the money to delve into this kind of work. Congratulations on the successes so far. One thing that particularly stands out to me is your recent problems of rear alignment. The measurements were exactly the same as those last recorded by my guy last year before I started a whole stack of parts swapping including the hubs, trailing arms and complete rear crossmember. I'm yet to get another alignment but I'm waiting until I swap over bushes. Mind you, seeing your results makes me wonder if I'll be wasting time fitting new bushes to bent hubs. How can we check/measure for straightness?
'91 Sportswagon - 3" lifted, 14" speedys, 27" Nankangs + lots of small details improved. Wouldn't mind some extra grunt from an EJ.
In reply to your final question.... This is how i did it.subalex wrote:I have just read your thread... I'm all too jealous that you have either the time or the money to delve into this kind of work. Congratulations on the successes so far. One thing that particularly stands out to me is your recent problems of rear alignment. The measurements were exactly the same as those last recorded by my guy last year before I started a whole stack of parts swapping including the hubs, trailing arms and complete rear crossmember. I'm yet to get another alignment but I'm waiting until I swap over bushes. Mind you, seeing your results makes me wonder if I'll be wasting time fitting new bushes to bent hubs. How can we check/measure for straightness?
1) Get a wheel alignment and printout to give you a referance point.
2) put rear of cur up on axle stands at the same height so L to R side is flat - I used a spirit level ans small wooden chocks. This needs to be on a level concrete floor - eg: garage
3) remove rear wheel, brakes, backing plates, so you are left with the bare hub.
4) use a big roofers/builders set square (600x400 or so) and set the long edge against the hub flat face, then slide the set square up and down the face until end of the tip at 90deg to the hub touches the floor of the garage. This is assuming you have positive camber, if you have neg camber the corner heal of the set square wit hit the floor first.
5) measure the distance between the floor and the end of the short side of the square that is not touching the floor, this gives you a relative measure of camber so you can swap hubs out and determine relatively which hub is best.
6) to measure toe I used a 2m long piece of 40x40x3 90deg angle iron, I cut a piece out of one side at one end to fit around the bearing carrier on the hub so that the flat side the piece was cut from sits against a large amount of the hubs flat surface. This was held in place by 2 g-clamps. The 2m length of angle sticks ot the back and you can mark in the floor where it touches the ground and use hthe straight edge as a "sight" to guage toe.
7) remove rear arm and bolt up new one and repeat process to assess any differance.
Hopefully you can find a set that is not too bent, I couldnt, so I followed the process I outlined earlier in the thread to rotate the inner hangers down and out. I just used the pair that were closest to each other.
This is not ideal, but is cheaper than multiple wheel alignments and achieves the same end.
85 Leone RX EJ20T Rally Car - plus spare rolling shell
91 Facelift 2.2 GX 4WD Legacy - SOLD
96 RSB Legacy
91 Facelift 2.2 GX 4WD Legacy - SOLD
96 RSB Legacy
-
subalex
- Junior Member
- Posts: 218
- Joined: Sun Oct 09, 2005 10:00 am
- Location: Kellyville Ridge, Sydney
Thanks ToyRX. I'm going to have a go at those over the next couple of days. I've got all new urethane bushes coming in a couple of days and that should help tighten things up too. I greatly appreciate you taking the time to give that feedback. Ain't got no welder though, nor the skills to use one if I had one so I'll do the best I can with the best hubs and new bushes. I think that'll work out ok.
'91 Sportswagon - 3" lifted, 14" speedys, 27" Nankangs + lots of small details improved. Wouldn't mind some extra grunt from an EJ.
Well,
2nd event was a 5.2km hillclimb which went really well - 49 corners and lots of fun! Even a small moment or two..... It was great to dice with another RX leone that is local. A 2dr coupe with a blueprinted and worked EJ25.
He beat me by less than 1/2 a sec - gutted
Next was another 10km rallysprint, which did not go so well. I was having fun
until I broke the left rear strut, snapped the 12mm insert in half!
Found this one photo of the car at the last event.
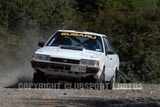
85 Leone RX EJ20T Rally Car - plus spare rolling shell
91 Facelift 2.2 GX 4WD Legacy - SOLD
96 RSB Legacy
91 Facelift 2.2 GX 4WD Legacy - SOLD
96 RSB Legacy
-
aussie_guy00000
- Junior Member
- Posts: 56
- Joined: Sat Jul 21, 2007 11:40 am
- Location: Townsville, NthQLD
Great thread mate, and top car, looks like you've put in a lot of hard work. Just curious who made the custom strut tops for you. I'm going to make some strut tops of my own, that's no worries, but it's more the spherical bearing and holder that i'm interested in that bolts to the strut top plate. I'd love to get my hands on a pair already made up, that way I can fabricate the plate to suit my brumby. Did you made the bearing holders yourself, or can you get them off the shelf somewhere? CheersToyRX wrote:Update:
These are the custom strut top camber plates with a spherical bearing so no rubber mounted bearing.
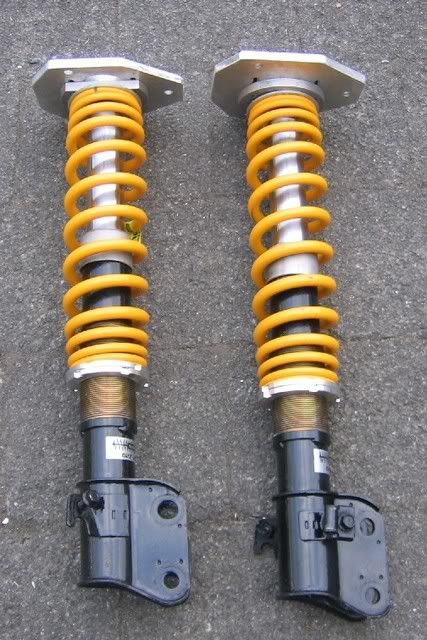
It is not worth doing to a Brumby as you can't get enough adjustment out of them, you need to look at control arms, adjustable castor rods. 
"Bianca"
'86 Brumby - Dual Port Heads, 5 Speed Dual Range, Custom Cam, Tuned Weber, Tuned Suspension, 2" Body Lift Kit, LSD, 14" rims, 2.25" Exhaust, Snorkel, Dual Batteries, DVD Player, UHF, VHF, etc. Offically now part of the 350, 000 km Club! And still pulling like a freight train.

"Claudia"
82 MY Wagon - EA81T, RS Liberty WIAC, 5 Speed Dual Range, Tuned Suspension, 14" Rims 27" Tyres, 2" Body Lift Kit, Apline Head unit, UHF, Roof Console, L Series seats, Soon to have New Paint, snorkel, Dual batteries, etc

'86 Brumby - Dual Port Heads, 5 Speed Dual Range, Custom Cam, Tuned Weber, Tuned Suspension, 2" Body Lift Kit, LSD, 14" rims, 2.25" Exhaust, Snorkel, Dual Batteries, DVD Player, UHF, VHF, etc. Offically now part of the 350, 000 km Club!

"Claudia"
82 MY Wagon - EA81T, RS Liberty WIAC, 5 Speed Dual Range, Tuned Suspension, 14" Rims 27" Tyres, 2" Body Lift Kit, Apline Head unit, UHF, Roof Console, L Series seats, Soon to have New Paint, snorkel, Dual batteries, etc

The camber plates came from a mate who had several custom machined up at a local shop, I just had to cut the mounting plate to fit the tower and drill the 3 mounting holes. He had these made for use in race cars.aussie_guy00000 wrote:Great thread mate, and top car, looks like you've put in a lot of hard work. Just curious who made the custom strut tops for you. I'm going to make some strut tops of my own, that's no worries, but it's more the spherical bearing and holder that i'm interested in that bolts to the strut top plate. I'd love to get my hands on a pair already made up, that way I can fabricate the plate to suit my brumby. Did you made the bearing holders yourself, or can you get them off the shelf somewhere? Cheers
The bearing carrier part is machined so you can press fit in a std sperical bearing and has a cir-clip groove machined in so you can retain the bearing
Check out the next photo down on page 3 to see the top view.
The ID of the bearing fits the shock top shaft OD, or you can get a sleeve made up.
85 Leone RX EJ20T Rally Car - plus spare rolling shell
91 Facelift 2.2 GX 4WD Legacy - SOLD
96 RSB Legacy
91 Facelift 2.2 GX 4WD Legacy - SOLD
96 RSB Legacy
-
aussie_guy00000
- Junior Member
- Posts: 56
- Joined: Sat Jul 21, 2007 11:40 am
- Location: Townsville, NthQLD
I mainly want to convert to spherical bearing mount to do away with the rubber mountMatt wrote:It is not worth doing to a Brumby as you can't get enough adjustment out of them, you need to look at control arms, adjustable castor rods.
Yeah, I saw the top view of the strut tops, I just quoted the wrong pic in my reply and for some reason it spits the dummy when I try to edit it. I don't suppose your mate has another pair of the spherical bearing carriers around that he'd like to sell? not interested in the drilled strut top, just the carrier and bearing.ToyRX wrote:The camber plates came from a mate who had several custom machined up at a local shop, I just had to cut the mounting plate to fit the tower and drill the 3 mounting holes. He had these made for use in race cars.
The bearing carrier part is machined so you can press fit in a std sperical bearing and has a cir-clip groove machined in so you can retain the bearing
Check out the next photo down on page 3 to see the top view.
The ID of the bearing fits the shock top shaft OD, or you can get a sleeve made up.