My Touring Wagon EJ25 build, Part 2
-
d_generate

- General Member
- Posts: 1529
- Joined: Sat Feb 16, 2008 1:51 am
- Location: Back in Perth and SORing it atm.
I'm keen.
98 Libbo with V3 STI running gear. 13.0 @ 105mph with CAI & 3" Zorst:mrgreen:
http://www.youtube.com/watch?v=TKrsF-2JS3M
http://www.youtube.com/watch?v=TKrsF-2JS3M
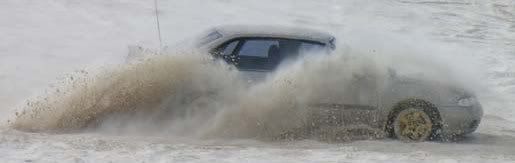
Ok so i finally started on my rear bumper/ rear wheel carrier/ towbar:D
Pics say more than words...


Pics say more than words...
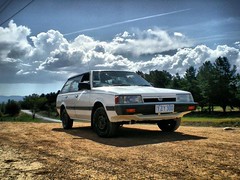
The project, EJ22 --->>> EJ25 Quad CAM:D touring wagon

Thinking of going on holidays on a little paradise island, Check out http://www.dodolidays.com

Thinking of going on holidays on a little paradise island, Check out http://www.dodolidays.com
So at this point everything had been tack welded by me using my stick welder. Unfortunately my main preferred Mig wekder guy, "Paul" was busy building a gearbox:) so i went to see this other welder at an exhaust shop. He is a nice guys and welded it all for me for a carton:)
Hayman reese style tow bar

Bumper


Got back home, gave it a clean with the grinder only on the visible welds and gave it a coat of zinc black primer paint. Not sure yet if i'll get it powder coated, I should but it a couple of hundred that i don't have.
Hayman reese style tow bar
Bumper
Got back home, gave it a clean with the grinder only on the visible welds and gave it a coat of zinc black primer paint. Not sure yet if i'll get it powder coated, I should but it a couple of hundred that i don't have.
The project, EJ22 --->>> EJ25 Quad CAM:D touring wagon
Thinking of going on holidays on a little paradise island, Check out http://www.dodolidays.com
Thinking of going on holidays on a little paradise island, Check out http://www.dodolidays.com
-
El_Freddo

- Master Member
- Posts: 12707
- Joined: Tue Oct 04, 2005 10:00 am
- Location: Bridgewater Vic
- Contact:
Looking good there Guyph!
Just curious to know why the tyre on the RHS? And will you be running with another swing arm on the other side?
I'm asking as I've done mine the other way around for two reasons:
1) When changing a flat tyre, the more time spent further way from traffic the better - tyre on the left keeps you away from the edge of the road.
2) if you're going to run with a jerry can holder on the other arm it's further away from the exhaust. If you have a look at those older vehicles that have One exhaust pipe out the rear, the exhaust pipe is on the other side of the vehicle in relation to the fuel filler cap or vice versa. Plus you don't have to drag the jerry can as far to the fuel filler
Either way it doesn't really matter, I just thought I'd ask...
Keep up the good work!
Cheers
Bennie

Mannnnn, Mood killer!!!You think too much!!! Nan i don't know, didn't think of that i guess. I did measure 5 time and cut once and was gonna have two wheels with one removable so that i can swap with a jerry can but i screwed up a little bit on the arm and the wheel sits a little too high and a little too in the center and i can't fit another wheel side by side now. I just got lazy and hanged the wheel to see how it looked. BUT the arms are way from being finished. I might just rock up some courage, grind a bit and get it the way i wanted it. Anyway tomorrow i've got Uni most of the day and on the weekend i've got to do an engine swap for a mate, plus both Marc and Damien are coming over to do more mods on their Libs. So i'll see if i've got time and the courage to do it:)
The project, EJ22 --->>> EJ25 Quad CAM:D touring wagon
Thinking of going on holidays on a little paradise island, Check out http://www.dodolidays.com
Thinking of going on holidays on a little paradise island, Check out http://www.dodolidays.com
lol, thats ok i was kidding, forgot the  I like the comments and thoughts, help me get more ideas. whatever is good i keep and use, Or i just disregard it an paint my car like i feel like:) Hummmm Red and Yellow rear bumper:p... LOL nan kidding
yeah i might just get the arms done right like i want it so i don't have any regrets later on.
yeah i might just get the arms done right like i want it so i don't have any regrets later on.
The project, EJ22 --->>> EJ25 Quad CAM:D touring wagon
Thinking of going on holidays on a little paradise island, Check out http://www.dodolidays.com
Thinking of going on holidays on a little paradise island, Check out http://www.dodolidays.com

because he wants to be different!
davo
davo
no more subarus
[/SIZE] [/color][/B][/color][/SIZE][/color]http://community.webshots.com/user/D3V1L9
[/SIZE] [/color][/B][/color][/SIZE][/color]http://community.webshots.com/user/D3V1L9
yep, after a quick google, the wheel is always on top of the exhaust and the jerry can on the opposite side of the exhaust:(
Ohhh well, more cutting and welding for me:p
Ohhh well, more cutting and welding for me:p
The project, EJ22 --->>> EJ25 Quad CAM:D touring wagon
Thinking of going on holidays on a little paradise island, Check out http://www.dodolidays.com
Thinking of going on holidays on a little paradise island, Check out http://www.dodolidays.com
-
El_Freddo
- Master Member
- Posts: 12707
- Joined: Tue Oct 04, 2005 10:00 am
- Location: Bridgewater Vic
- Contact:
You don't have to do it, I was just curious. Also you can buy locking jerry can holders, I got mine for $70 and have since found the same unit for less somewhere else that I cared not to remember...
That cuts out half of the work you need to do for that swing arm, plus it's a little extra security for your fuel.
Cheers
Bennie
That cuts out half of the work you need to do for that swing arm, plus it's a little extra security for your fuel.
Cheers
Bennie
Yeah but i don't really like the holders. I'll think and see if i can weld something up i like:) but yeah if i screw that up too i'll just get one...
The project, EJ22 --->>> EJ25 Quad CAM:D touring wagon
Thinking of going on holidays on a little paradise island, Check out http://www.dodolidays.com
Thinking of going on holidays on a little paradise island, Check out http://www.dodolidays.com
-
d_generate
- General Member
- Posts: 1529
- Joined: Sat Feb 16, 2008 1:51 am
- Location: Back in Perth and SORing it atm.
You'd better set a pair of tail lights into that new bar or la Gendarmerie will be stickering you for obscured tail lights, there is a diagram somewhere on this page for the angles you need to be able to see them at.
http://www.transport.wa.gov.au/licensing/20395.asp
http://www.transport.wa.gov.au/licensing/20395.asp
98 Libbo with V3 STI running gear. 13.0 @ 105mph with CAI & 3" Zorst:mrgreen:
http://www.youtube.com/watch?v=TKrsF-2JS3M
http://www.youtube.com/watch?v=TKrsF-2JS3M
yeah i'll put some lights on:) I don't know, they look like that are shit. I'll see. i never saw one in front of me, only in pics.
The project, EJ22 --->>> EJ25 Quad CAM:D touring wagon
Thinking of going on holidays on a little paradise island, Check out http://www.dodolidays.com
Thinking of going on holidays on a little paradise island, Check out http://www.dodolidays.com
Little progress on the rear bar.
Got the towbar painted and fitted:)


Got the rear bar installed and some fittings. only have to get the rear lights on.

And my special 'Copy right' addition,

Ohhh and yea i could not resist, I had to get some red on it somewhere:p
Good thing, Marc is taking the rear arm i welded wrong for his liberty. Its gonna be ok on his car. I'll make sure to get the new ones right this time:)
Got the towbar painted and fitted:)
Got the rear bar installed and some fittings. only have to get the rear lights on.
And my special 'Copy right' addition,
Ohhh and yea i could not resist, I had to get some red on it somewhere:p
Good thing, Marc is taking the rear arm i welded wrong for his liberty. Its gonna be ok on his car. I'll make sure to get the new ones right this time:)
The project, EJ22 --->>> EJ25 Quad CAM:D touring wagon
Thinking of going on holidays on a little paradise island, Check out http://www.dodolidays.com
Thinking of going on holidays on a little paradise island, Check out http://www.dodolidays.com

is that an air fitting, do you just have a resovior or a compressor in there some where too.
"THE BRUMBY ! , Your not taking the Brumby I just dry cleaned the mud flaps."
Current
00 Outback with class, SOHC EJ25 auto 240,068ks
"B1" 90 Brumby with character 271,800K EA81 (But soon 5speed,103,000k EJ202)
"B2" wrecked and crushed
"B3" 89 Bush Bashing Brumby (BeeRumBee) Kept a Bucca
"B4" 89 Black Brumby (wam balam ) Kept at Kempsey
"B5" 92 Brumby (sold it)
"B6" 88 Beige Brumby
"W1" 83 wagon 308,000 AC and alot of rust repairs. (Wanda)
Brumby Trailer (Sulky)
LUV THAT BRUM !
RevMax Hobbies
[SIGPIC][/SIGPIC]


I'll take a pic without the hose on. Basically is a connection point to my ARB air comp thats tucked inside the car as per the pics on page 3. No tanks, no rear pressure bar vessel 'to complicated, expensive, etc to make. Cool idea tho:)
I've just extended the outlet from the pump to the rear bumper. You can see the air hose hanging out in the first pic in the above post 255. Ive use the trailer female cover adapter to keep out the sand and dirt. Basically grinded off some of the metal plugs, drilled a center hole and clamped the hose in. Its pretty solid to allow plug in and out the air hose. The air comp has a cut off pressure switch built in so it can't blow up:)
This makes life easy, i don't have to dig for getting out my pump to pump up the tyres as most of the time its under all the camping gear:)
The project, EJ22 --->>> EJ25 Quad CAM:D touring wagon
Thinking of going on holidays on a little paradise island, Check out http://www.dodolidays.com
Thinking of going on holidays on a little paradise island, Check out http://www.dodolidays.com
Thx Ken, Quite happy with it too:pniterida wrote:That looks very professional - well done.
The project, EJ22 --->>> EJ25 Quad CAM:D touring wagon
Thinking of going on holidays on a little paradise island, Check out http://www.dodolidays.com
Thinking of going on holidays on a little paradise island, Check out http://www.dodolidays.com