Ruby Scoo’s epic build, ten years and counting...
Moderator: El_Freddo

Bennie, I don't get it ! you have complemented others on there work but your work looks just as good if not bigger and better. I am thinking you underestimate yourself.
"THE BRUMBY ! , Your not taking the Brumby I just dry cleaned the mud flaps."
Current
00 Outback with class, SOHC EJ25 auto 240,068ks
"B1" 90 Brumby with character 271,800K EA81 (But soon 5speed,103,000k EJ202)
"B2" wrecked and crushed
"B3" 89 Bush Bashing Brumby (BeeRumBee) Kept a Bucca
"B4" 89 Black Brumby (wam balam ) Kept at Kempsey
"B5" 92 Brumby (sold it)
"B6" 88 Beige Brumby
"W1" 83 wagon 308,000 AC and alot of rust repairs. (Wanda)
Brumby Trailer (Sulky)
LUV THAT BRUM !
RevMax Hobbies
[SIGPIC][/SIGPIC]
-
El_Freddo

- Master Member
- Posts: 12707
- Joined: Tue Oct 04, 2005 10:00 am
- Location: Bridgewater Vic
- Contact:
Yeah thanks revmax, but I'm still not sold on it! The welding isn't the greatest - I actually started to get it right in the last day or half day of welding! Murphy's lawrevmax wrote:Bennie, I don't get it ! you have complemented others on there work but your work looks just as good if not bigger and better. I am thinking you underestimate yourself.
That said about the welding, it'll do the job just fine, I have no doubt about that - but if a pro looked at it they'd probably have a sinking feeling in their heart. I like to try and get things right all the time but I was against the clock on this one (welder borrowing time).
Now I'm after another can or two of rust converter/sealer to finish off the sealing of all the welding. After this will be a coat of fish oil (thanks venom!) then a liberal coat of black anti-rust enamel to finish it off.
I'm now thinking that once she's in one piece it'll be a trip to the car wash to clean up everything the way I should have done it before I pulled her all apart - then a coat or two of that sound deadener foam stuff... Thinking of doing a coat in the cab along the floor to help seal up the exposed flooring from the stiff sound deadener lifting because of the inverting of the floor pan! Plus it's apparently flexible which will be good IMO.
Cheers
Bennie


-
El_Freddo
- Master Member
- Posts: 12707
- Joined: Tue Oct 04, 2005 10:00 am
- Location: Bridgewater Vic
- Contact:
I hope you ate something in between!Bradenrm wrote:Just read the entire thread/novel/diy/how to over the past few days.
Dunno about that... maybe just a subi nut gone wrong! Plus I've got to finish her off to complete this phase. Thanks for the comment thoughBradenrm wrote:God amoungst us mortal men, well done!
I didn't get anything done today - I got some rust converter/sealer replacement cans today, I ran out last weekend. And I missed centre road wreckers for that PS pump bracket due to the bloody traffic and because I stuffed around too long at campbellfield PAP looking for a sigma head, after removing two and finding them in the same corroded condition or worse than the one I got off Kez's one I then started stuffing around with the astron2 head from a magna. It'd probably work, but for the amount of money we'd have to spend on the head, matching cam and cam followers it wasn't worth the gamble.
After this we headed off and thus missed out - real pissed since we essentially drove across to the other side of melbourne for nothing
Cheers
Bennie
-
FROG

- General Member
- Posts: 1409
- Joined: Fri Feb 23, 2007 12:41 pm
- Location: UNDER THE SOUTHERN CROSS GRIFFITH NSW
- Contact:
Yeah monster effort Bennie  I love your dedication and passion
GRAB THE VIN FROM DONOR VEHICLES
AUSubaru member specials
Brumby EA81 Oil Pump kit (4 x 'o'rings + gasket) posted Australia wide $22!
Brumby sloppy shifter bush kit $44 posted
email me
http://www.domsmotors.com.au
NOW DISTRIBUTING FOR SUBAXTREME BASH PLATES, NUDGE AND BULLBARS
-
El_Freddo
- Master Member
- Posts: 12707
- Joined: Tue Oct 04, 2005 10:00 am
- Location: Bridgewater Vic
- Contact:
Thanks mate! It does mean a lot, and there's a lot of work in it. Can't wait to have her going again but like I've said earlier, I want to do it properly - paint everything up properly to protect against rust.FROG wrote:Yeah monster effort Bennie
I've also been thinking about writing up a summary to shorten the whole thing down - it should keep me busy for a while after Ruby's back together.
Cheers
Bennie
-
El_Freddo
- Master Member
- Posts: 12707
- Joined: Tue Oct 04, 2005 10:00 am
- Location: Bridgewater Vic
- Contact:
Today I continued sealing up the welding - the interior is turning out to be much more painful than I thought it would be. Hopefully I'll get all the welds wire-wheeled with the grinder and at least one coat of rust converter sealer on before I've got to be other places I need to be.
And for a little bit of fun so I can say that I've done it, hopefully the only time this ever happens:
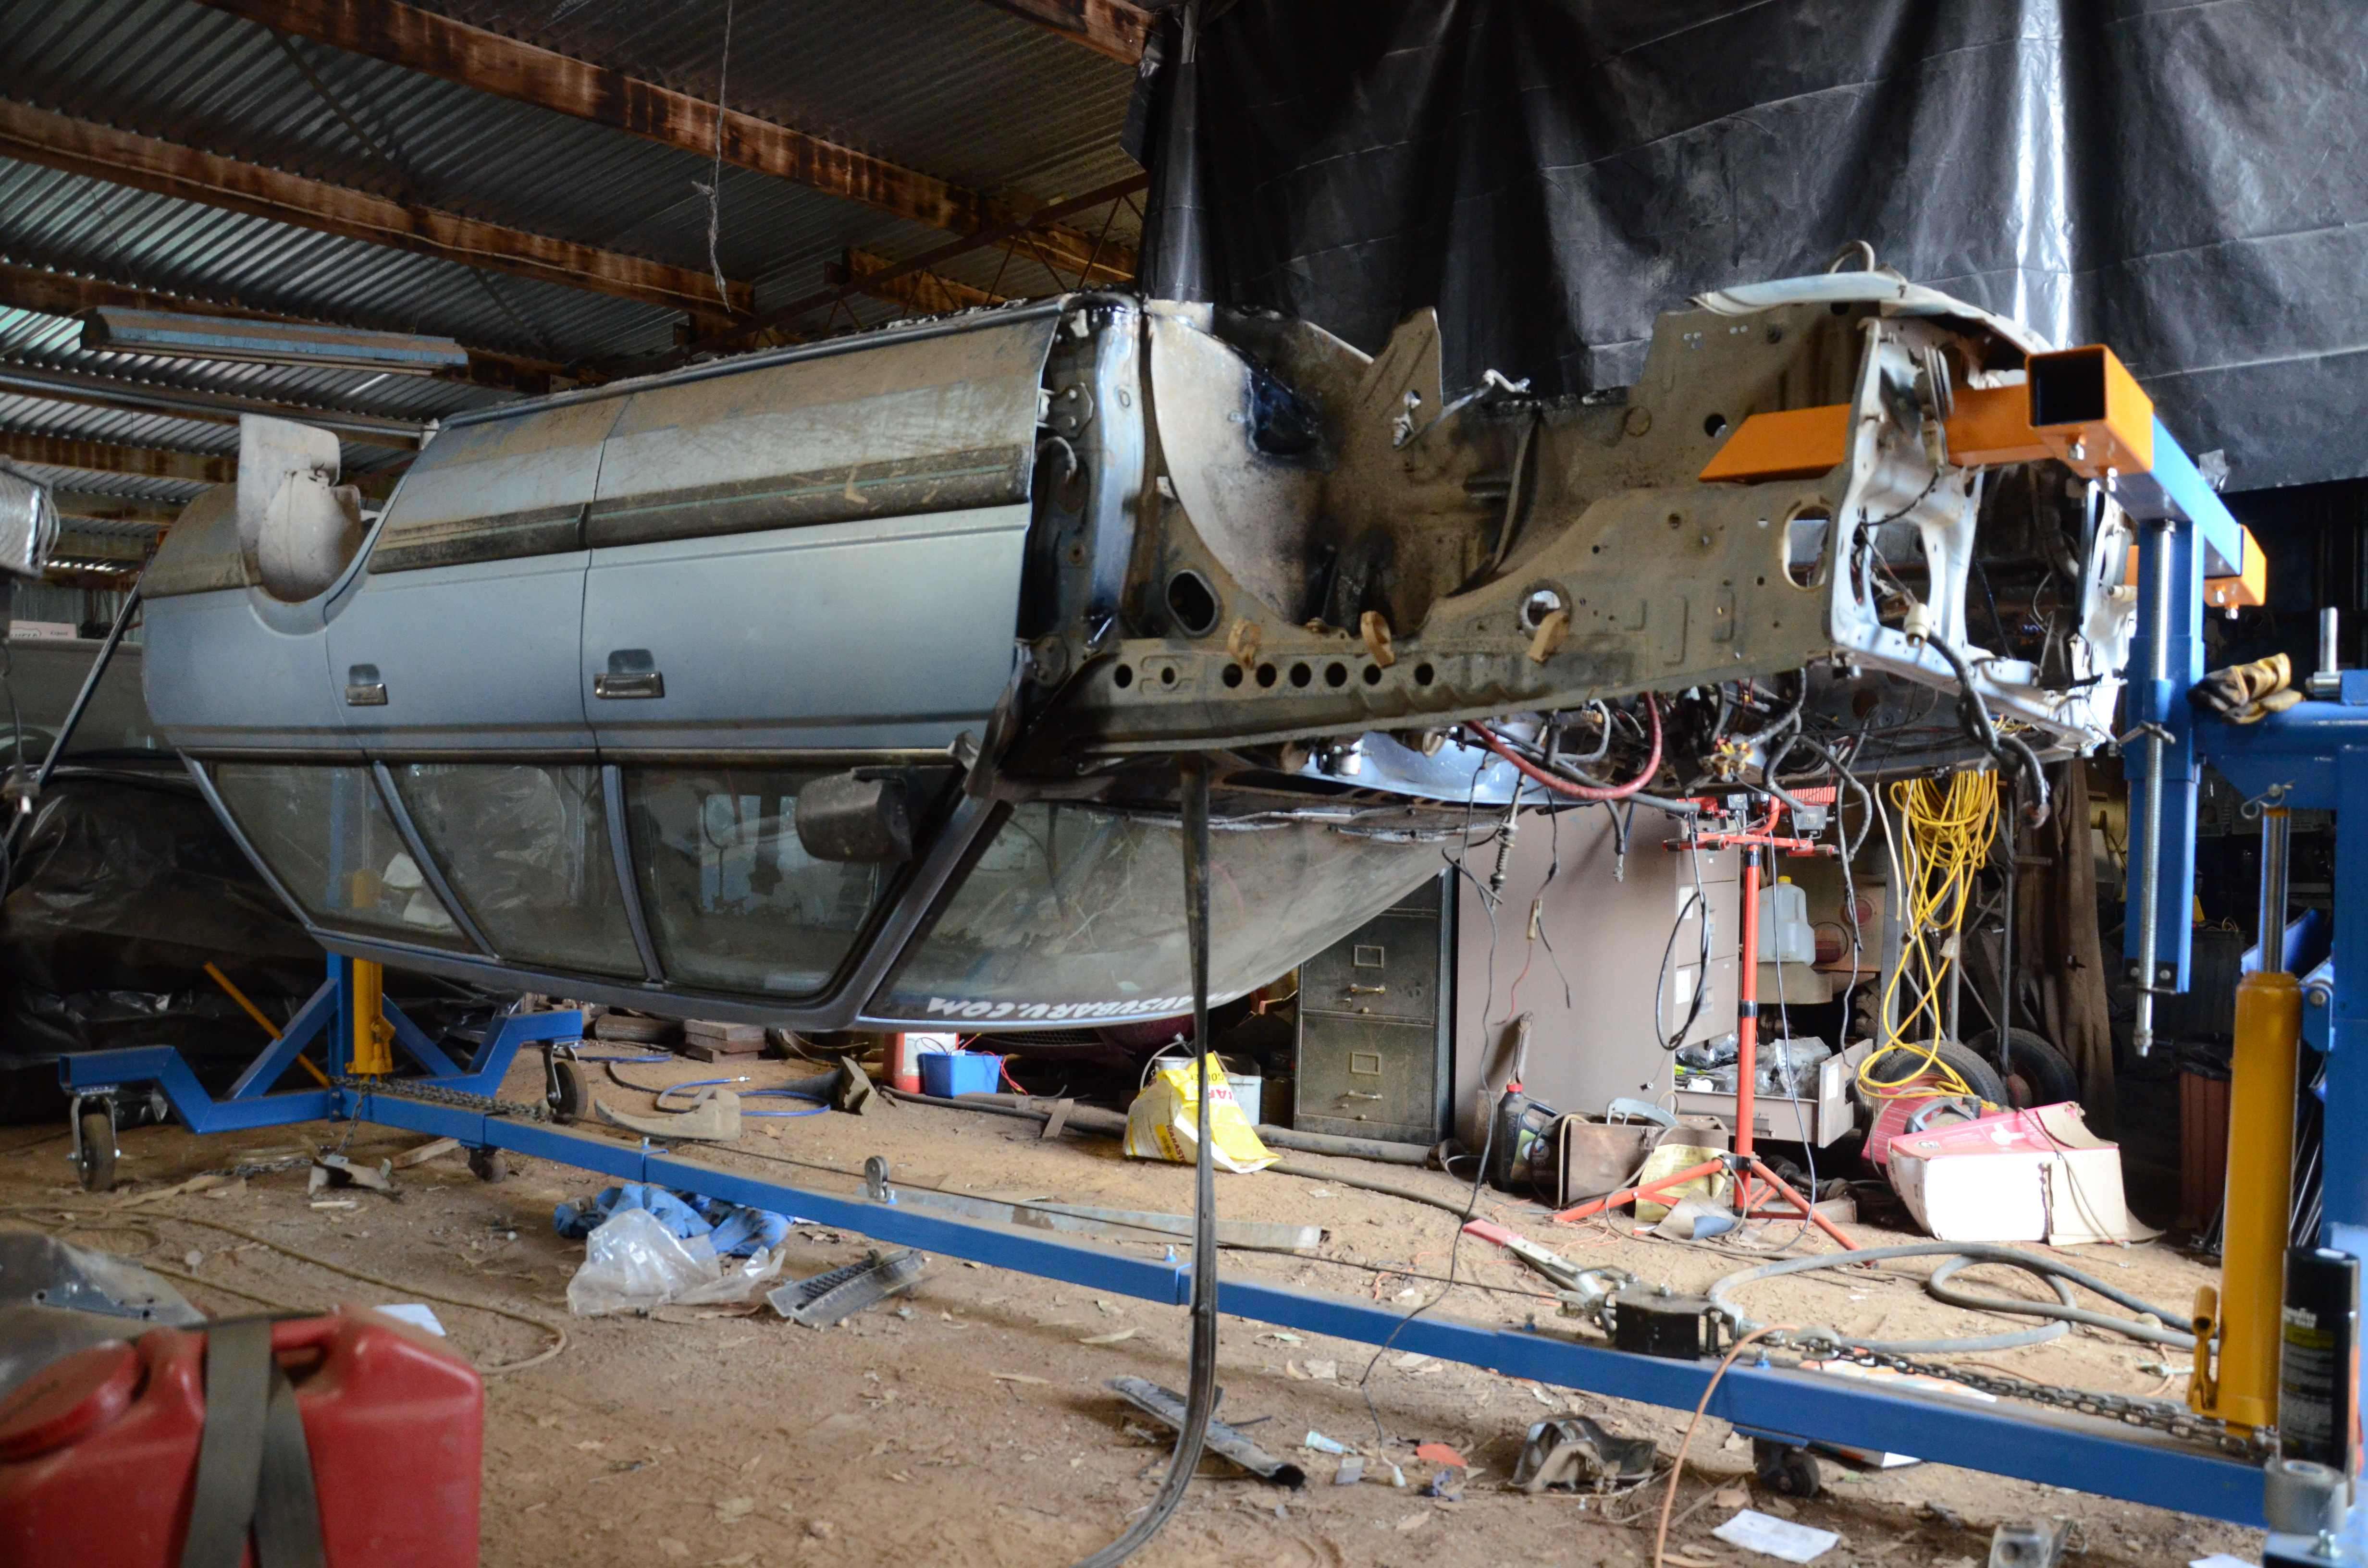

Here's most of my spray work at the moment - at least two coats of the rust converter sealer and now a coat of fish oil. Tomorrow it'll get a coat of Kill rust black enamel to finish off the paint work from under neath:

That's it for now.
Cheers
Bennie
And for a little bit of fun so I can say that I've done it, hopefully the only time this ever happens:
Here's most of my spray work at the moment - at least two coats of the rust converter sealer and now a coat of fish oil. Tomorrow it'll get a coat of Kill rust black enamel to finish off the paint work from under neath:
That's it for now.
Cheers
Bennie
-
FROG
- General Member
- Posts: 1409
- Joined: Fri Feb 23, 2007 12:41 pm
- Location: UNDER THE SOUTHERN CROSS GRIFFITH NSW
- Contact:
sheesh Bennie get her over again before she stretches her knickers
GRAB THE VIN FROM DONOR VEHICLES
AUSubaru member specials
Brumby EA81 Oil Pump kit (4 x 'o'rings + gasket) posted Australia wide $22!
Brumby sloppy shifter bush kit $44 posted
email me
http://www.domsmotors.com.au
NOW DISTRIBUTING FOR SUBAXTREME BASH PLATES, NUDGE AND BULLBARS
Bennie have you considered abrasive blasting.
Wire wheels n rust converter are OK but blasting removes rust forever.
Wire wheels n rust converter are OK but blasting removes rust forever.
"THE BRUMBY ! , Your not taking the Brumby I just dry cleaned the mud flaps."
Current
00 Outback with class, SOHC EJ25 auto 240,068ks
"B1" 90 Brumby with character 271,800K EA81 (But soon 5speed,103,000k EJ202)
"B2" wrecked and crushed
"B3" 89 Bush Bashing Brumby (BeeRumBee) Kept a Bucca
"B4" 89 Black Brumby (wam balam ) Kept at Kempsey
"B5" 92 Brumby (sold it)
"B6" 88 Beige Brumby
"W1" 83 wagon 308,000 AC and alot of rust repairs. (Wanda)
Brumby Trailer (Sulky)
LUV THAT BRUM !
RevMax Hobbies
[SIGPIC][/SIGPIC]
Current
00 Outback with class, SOHC EJ25 auto 240,068ks
"B1" 90 Brumby with character 271,800K EA81 (But soon 5speed,103,000k EJ202)
"B2" wrecked and crushed
"B3" 89 Bush Bashing Brumby (BeeRumBee) Kept a Bucca
"B4" 89 Black Brumby (wam balam ) Kept at Kempsey
"B5" 92 Brumby (sold it)
"B6" 88 Beige Brumby
"W1" 83 wagon 308,000 AC and alot of rust repairs. (Wanda)
Brumby Trailer (Sulky)
LUV THAT BRUM !
RevMax Hobbies
[SIGPIC][/SIGPIC]
-
El_Freddo
- Master Member
- Posts: 12707
- Joined: Tue Oct 04, 2005 10:00 am
- Location: Bridgewater Vic
- Contact:
She's back to where she would be if her wheels were where they should be - got that? I should word it better but can't be bothered, the english language was designed to be hard!FROG wrote:sheesh Bennie get her over again before she stretches her knickers
I've checked out your setup but don't have the money or time to set it up - plus I don't have my own place, I'm currently "borrowing" too much room in Dad's shed. If this place could speak we'd all be in trouble around here!revmax wrote:Bennie have you considered abrasive blasting.
Wire wheels n rust converter are OK but blasting removes rust forever.
It might be something I'll look into in the future
Cheers
Bennie
-
El_Freddo
- Master Member
- Posts: 12707
- Joined: Tue Oct 04, 2005 10:00 am
- Location: Bridgewater Vic
- Contact:
Jonno, here's where my window relays reside - I remember you asking after I flooded Ruby:

I'm glad I put them up there. It took a little while to work out how to mount it so it didn't foul the seat belt or protrude out so that the cover wouldn't fit. It's done the trick once and that's enough for me
The clutch adjustment issue - read about it here - I ended up using two washers to space the pivot ball forward. The gearbox is back on the engine and all's going well with the relation to the fork pivot and the clutch pressure plate - the engine turns over and there's no noise so it's all good. Here's one of the reasons why my adjustment has gone:

And here's the washer trick:

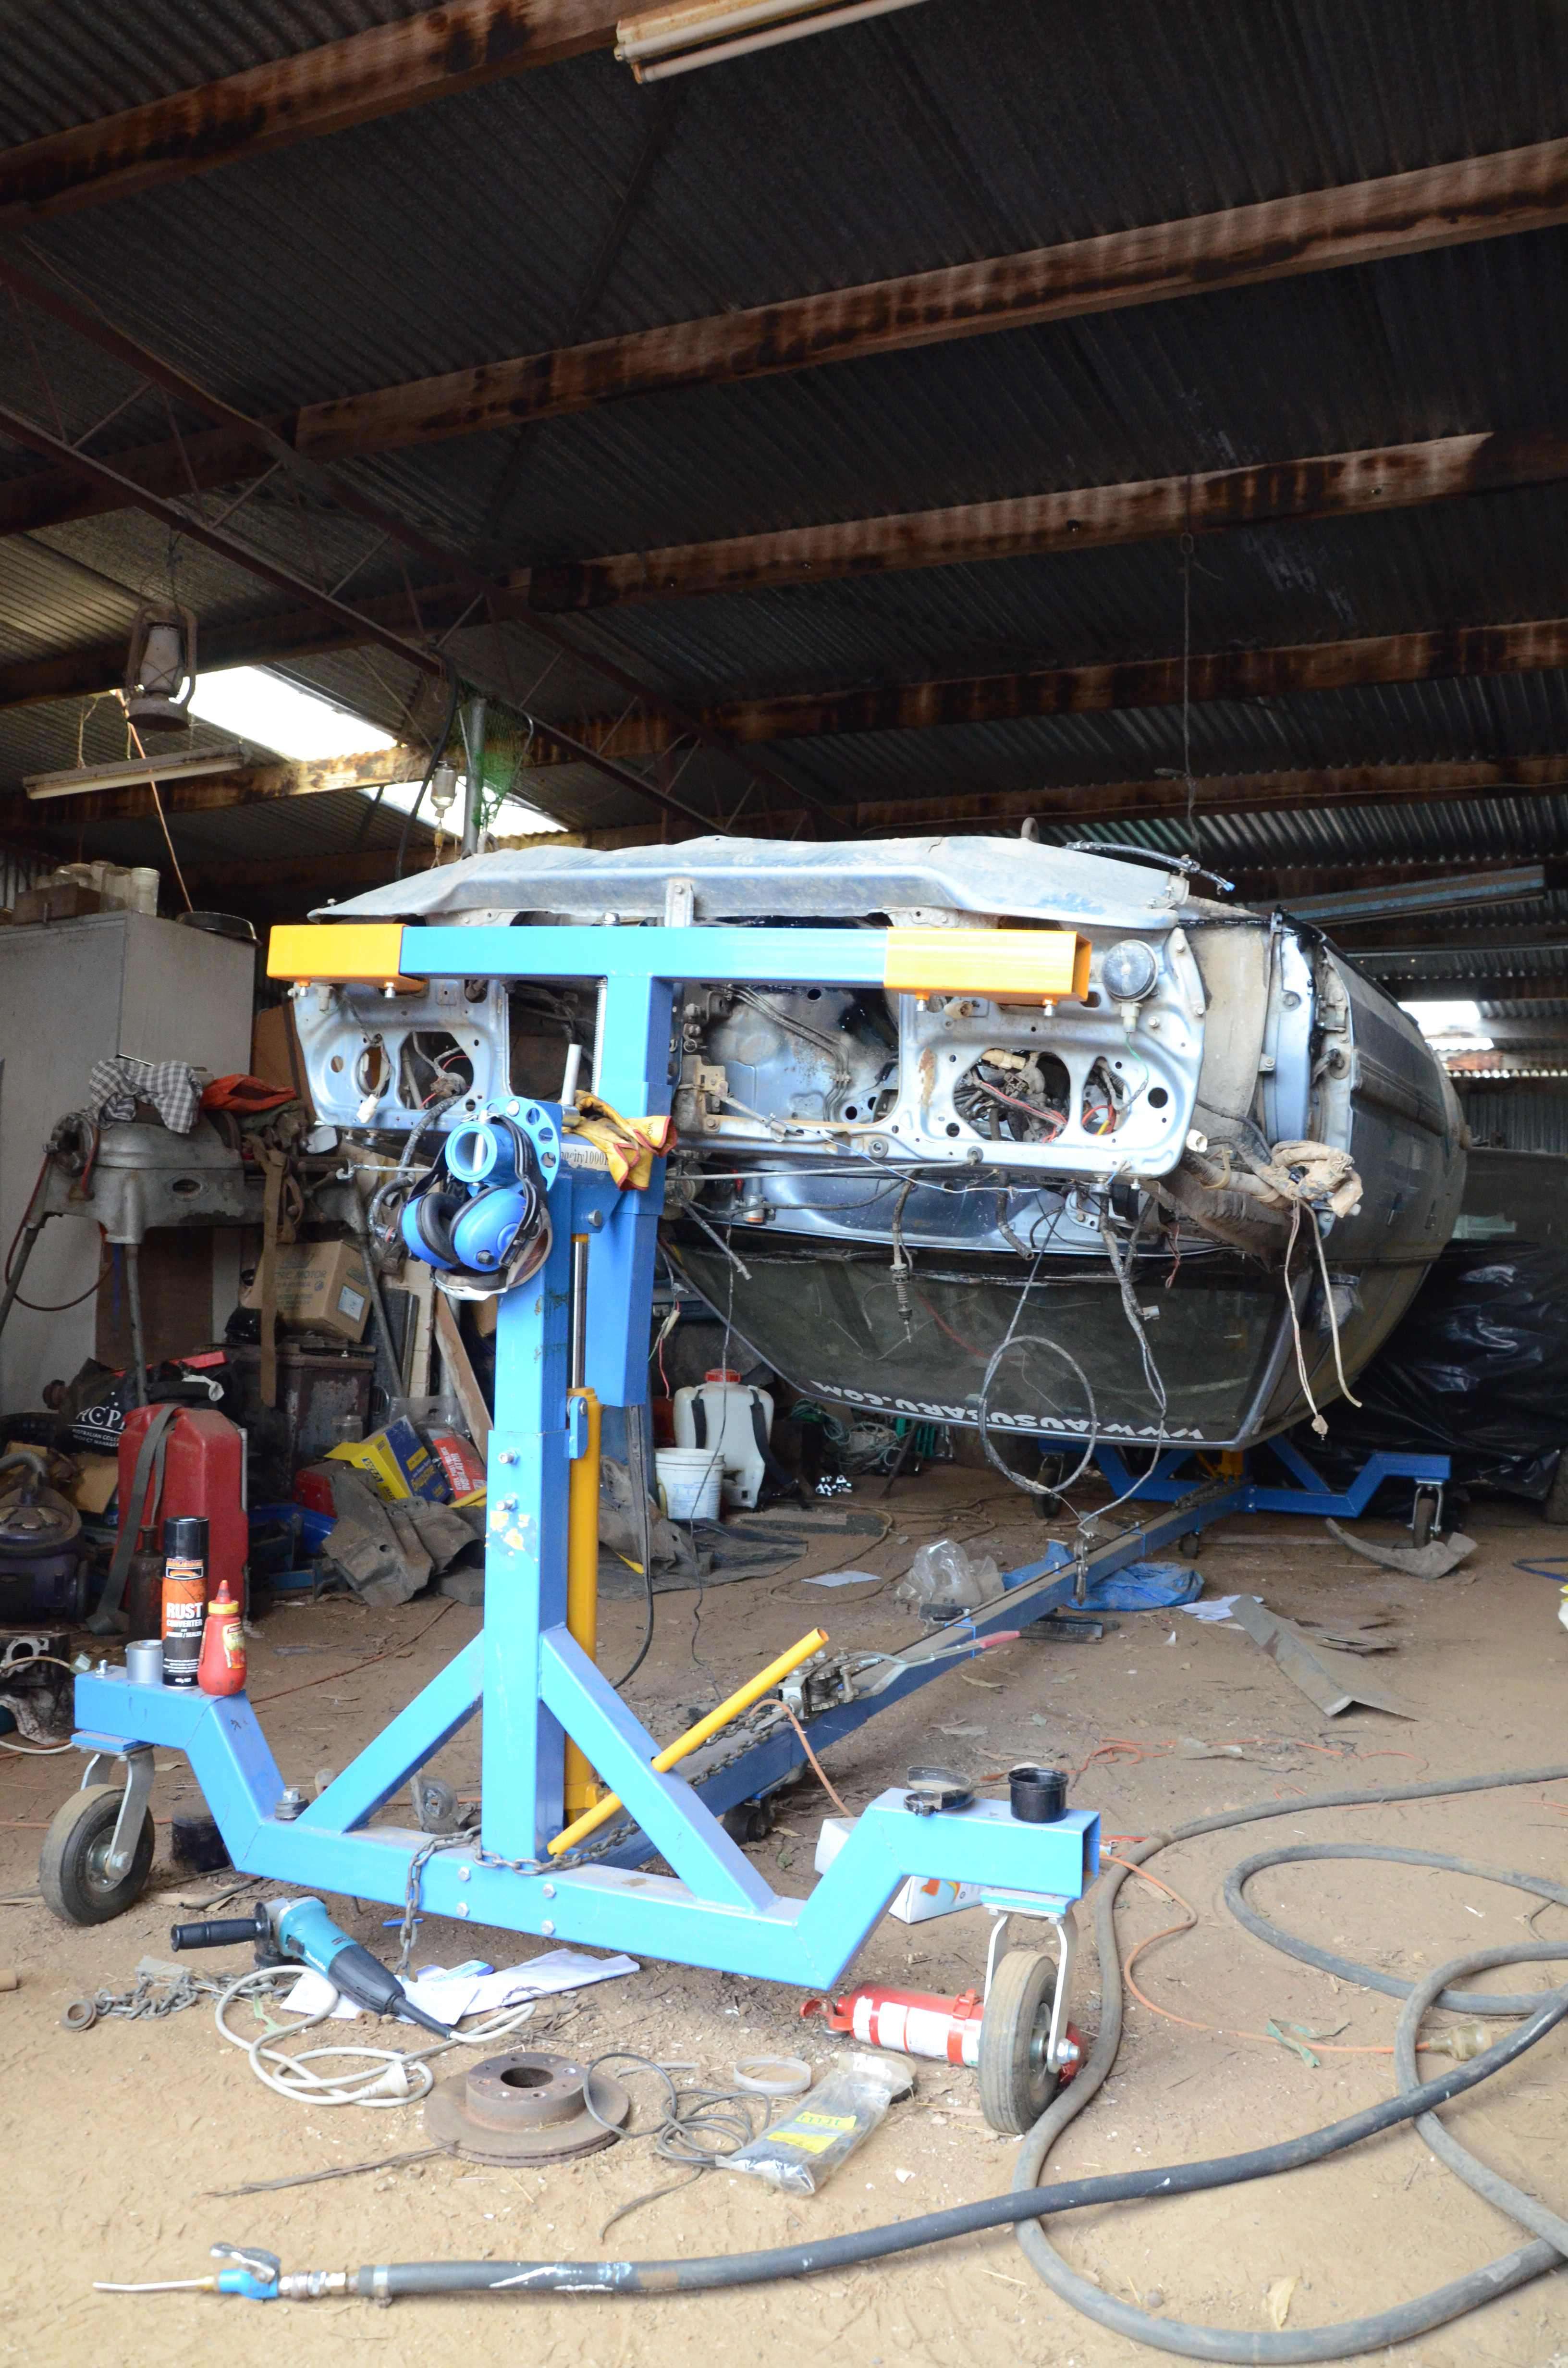
Most of today was spent waiting for paint to dry! Actually it was fish oil but anyway. Later in the arvo I was waiting for paint to dry, and it dried a lot quicker than I expected. Here's the work done so far today:


I doesn't look like a lot - but there's at least two coats of rust converter/sealer, a layer of fish oil and a thick coat of rust protection enamel plus a lot of chipping away of the sound deadener to clear out all the sand - it was right under the sound deadener, any little crack it could get through it did. I was surprised how far it got!
So now the floor is all painted and the door seams painted and dried. I'm going to do the underside with the kill rust enamel so it'll be dry for tomorrow (Wed), hopefully this will allow me to get Ruby Scoo off the rotisserie and I can start re-installing the front and rear suspension. Then from there everything else can go back on I'm looking forward to it!
That's it for now.
Cheers
Bennie
I'm glad I put them up there. It took a little while to work out how to mount it so it didn't foul the seat belt or protrude out so that the cover wouldn't fit. It's done the trick once and that's enough for me
The clutch adjustment issue - read about it here - I ended up using two washers to space the pivot ball forward. The gearbox is back on the engine and all's going well with the relation to the fork pivot and the clutch pressure plate - the engine turns over and there's no noise so it's all good. Here's one of the reasons why my adjustment has gone:
And here's the washer trick:
Most of today was spent waiting for paint to dry! Actually it was fish oil but anyway. Later in the arvo I was waiting for paint to dry, and it dried a lot quicker than I expected. Here's the work done so far today:
I doesn't look like a lot - but there's at least two coats of rust converter/sealer, a layer of fish oil and a thick coat of rust protection enamel plus a lot of chipping away of the sound deadener to clear out all the sand - it was right under the sound deadener, any little crack it could get through it did. I was surprised how far it got!
So now the floor is all painted and the door seams painted and dried. I'm going to do the underside with the kill rust enamel so it'll be dry for tomorrow (Wed), hopefully this will allow me to get Ruby Scoo off the rotisserie and I can start re-installing the front and rear suspension. Then from there everything else can go back on
That's it for now.
Cheers
Bennie
-
El_Freddo
- Master Member
- Posts: 12707
- Joined: Tue Oct 04, 2005 10:00 am
- Location: Bridgewater Vic
- Contact:
Looking even better now:taza wrote:Looking good mate

And this should be dry enough to install after lunch (which will be after this post). I looked at it with it's surface rust and couldn't just re-install it so I hit it with the angle grinder wire wheel as much as I could and then gave it a good licking of Killrust black enamel. It'll be interesting to see how long it lasts:

Getting very excited now, having the rotisserie removed is a BIG step forward on this project, it wasn't a lot of work to remove it but it means that everything under Ruby Scoo is done
Back to the shed for me
Cheers
Bennie
-
ScubyRoo
- Junior Member
- Posts: 584
- Joined: Thu Oct 09, 2008 2:55 pm
- Location: Templestowe, Vic (When in Aus)
Loving the attention to detail bennie, looking great!
The Green Machine is up for sale  . Lifted, bars, exhausts... View Gumtree ad
-
FROG
- General Member
- Posts: 1409
- Joined: Fri Feb 23, 2007 12:41 pm
- Location: UNDER THE SOUTHERN CROSS GRIFFITH NSW
- Contact:
[quote="steptoe"]PHWOAR you are keen - give you that much !!
[quote]
I think Jonno said it best PHWOAR!!!!!
[quote]
I think Jonno said it best PHWOAR!!!!!
GRAB THE VIN FROM DONOR VEHICLES
AUSubaru member specials
Brumby EA81 Oil Pump kit (4 x 'o'rings + gasket) posted Australia wide $22!
Brumby sloppy shifter bush kit $44 posted
email me
http://www.domsmotors.com.au
NOW DISTRIBUTING FOR SUBAXTREME BASH PLATES, NUDGE AND BULLBARS
-
The Loyale

- Junior Member
- Posts: 53
- Joined: Fri Aug 17, 2007 2:56 pm
- Location: Waukesha, WI. United States
- Contact:
Bennie,
This might have been posted somewhere in here, but what is the black stuff you are sealing the floor with? Might be interested in getting something like that for my EA82.
POR-15 is what I've always used, maybe there is an Aussie secret!
This might have been posted somewhere in here, but what is the black stuff you are sealing the floor with? Might be interested in getting something like that for my EA82.
POR-15 is what I've always used, maybe there is an Aussie secret!
'92 Loyale - Safariwagon (Under Restoration)
130,000
'92 Toyota Landcruiser - Safariwagon-II "Nimble as an Ox!"
181,000
[SIGPIC][/SIGPIC]
130,000
'92 Toyota Landcruiser - Safariwagon-II "Nimble as an Ox!"
181,000
[SIGPIC][/SIGPIC]
-
El_Freddo
- Master Member
- Posts: 12707
- Joined: Tue Oct 04, 2005 10:00 am
- Location: Bridgewater Vic
- Contact:
The Loyale wrote:Bennie,
This might have been posted somewhere in here, but what is the black stuff you are sealing the floor with? Might be interested in getting something like that for my EA82.
POR-15 is what I've always used, maybe there is an Aussie secret!

So the last couple of days I've been between things and had limited time to work on Ruby Scoo. She's coming along well though!
Since putting the rear end in I've got the engine, gearbox, and front cross member installed. Today I got the gearbox crossmember and lift blocks bolted in, I thought I'd stripped a captive nut (the one that I replaced!) but it turned out good once I got the torque wrench out to really test it out - I figured that if it did strip out I'd still be "doing it up" for a long time and if this happened it would be the best time to drill and heli-coil it.
Not needed though
So I got the rest of the front end in - radius rods, hand brake cables, front struts and lift blocks followed very closely by the front wheels:


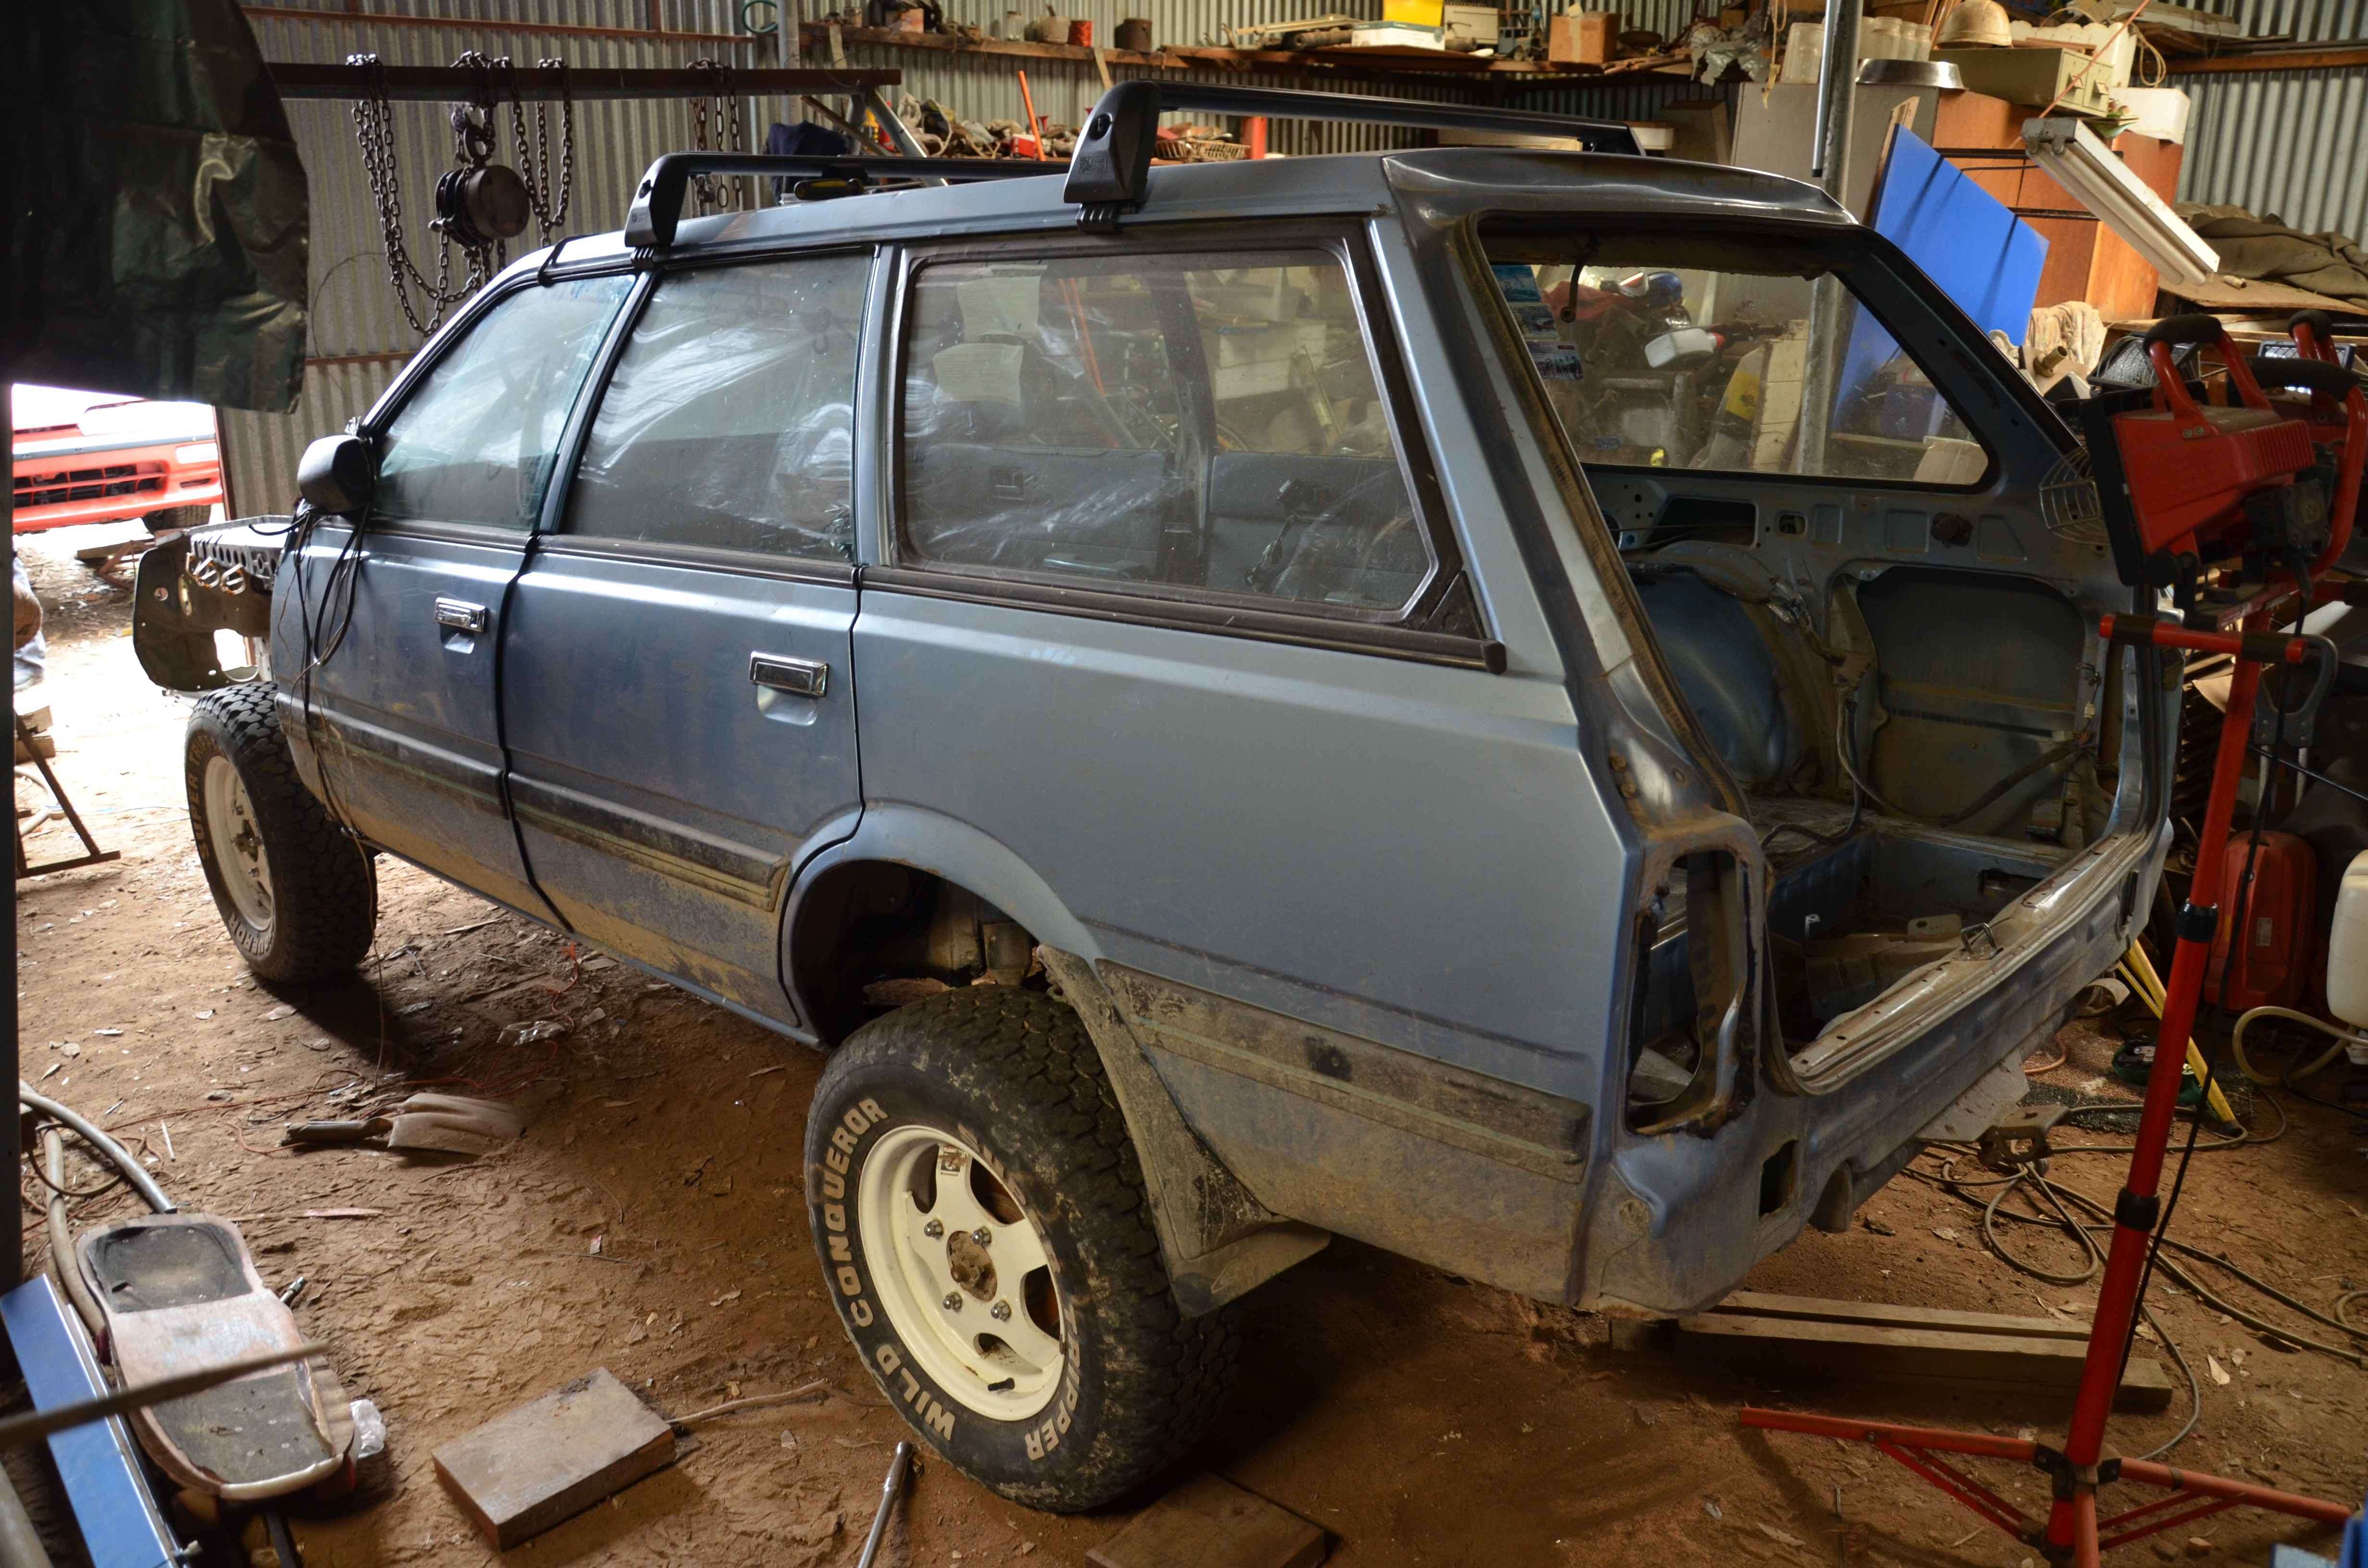
Also with the advice of some fellow board members here I painted some of the floor with sound deadener - the motosport brand (I think). Going to get a bigger tin in the next couple of days to do the rest that I want to cover. Once that's done it's time to get the interior back in! Can't wait.
Cheers
Bennie
-
The Loyale
- Junior Member
- Posts: 53
- Joined: Fri Aug 17, 2007 2:56 pm
- Location: Waukesha, WI. United States
- Contact:
I never thought about Epoxy paint. Good show! I will indeed have to buy some of that. Thanks!
The L is looking good, keep it up!
The L is looking good, keep it up!
'92 Loyale - Safariwagon (Under Restoration)
130,000
'92 Toyota Landcruiser - Safariwagon-II "Nimble as an Ox!"
181,000
[SIGPIC][/SIGPIC]
130,000
'92 Toyota Landcruiser - Safariwagon-II "Nimble as an Ox!"
181,000
[SIGPIC][/SIGPIC]
-
El_Freddo
- Master Member
- Posts: 12707
- Joined: Tue Oct 04, 2005 10:00 am
- Location: Bridgewater Vic
- Contact:
Yep it's the same stuff:The Loyale wrote:I never thought about Epoxy paint. Good show! I will indeed have to buy some of that. Thanks!

Cheers mate! I've now got all the sound deadener I want painted on - 5 litres of the stuff in total! Crazy but good:The Loyale wrote:The L is looking good, keep it up!


Tomorrow the interior will start to go back in
Cheers
Bennie
