Ok so,
Where are the breathers?
And what is the best way/thing to do to get them ready for offroad?
I.e raising them
Cheers Cam
Brumby Diff Breathers
-
Brumby Kid

- General Member
- Posts: 1297
- Joined: Sun Jul 17, 2011 9:19 pm
- Location: Belair S.A.
Brumby Diff Breathers
When life gives you a corner, drop a gear, pitch, and stomp the loud pedal
Bianca: 1991 Subaru Brumby
My First / Project car
EA81 Rebuilt by Tony Knight from knight Engines
2" body lift
25" 185r14 Yokahama Delivery Star, light truck tyres
2" Sports exhaust
Rear Aguip step/bar
Liberty seats
Mums Car 08 Liberty Wagon
Bianca: 1991 Subaru Brumby
My First / Project car
EA81 Rebuilt by Tony Knight from knight Engines
2" body lift
25" 185r14 Yokahama Delivery Star, light truck tyres
2" Sports exhaust
Rear Aguip step/bar
Liberty seats
"Bianca"
[SIGPIC][/SIGPIC]
Dads Car: 02 Impreza WRX STi[SIGPIC][/SIGPIC]
Mums Car 08 Liberty Wagon
-
El_Freddo

- Master Member
- Posts: 12695
- Joined: Tue Oct 04, 2005 10:00 am
- Location: Bridgewater Vic
- Contact:
There was another member on here recently asking the same thing. Do a search for that thread for pics.
The front diff/gearbox breather - use the dipstick hole
The rear diff, remove it and you'll find it caked under layers of grease in dust (under shroud on the moustache bar). It's a white-ish little thing. Use some pipe to move it higher. I'm going to be running mine up into the engine bay and into the air intake behind the filter - I'm still planning this so it could be a while.
Cheers
Bennie


And a 1/2 inch right angle poly pipe fitting fits in it just with a little tape and then run it to where ever you want and then put the original Breather on the end 
"Bianca"
'86 Brumby - Dual Port Heads, 5 Speed Dual Range, Custom Cam, Tuned Weber, Tuned Suspension, 2" Body Lift Kit, LSD, 14" rims, 2.25" Exhaust, Snorkel, Dual Batteries, DVD Player, UHF, VHF, etc. Offically now part of the 350, 000 km Club! And still pulling like a freight train.

"Claudia"
82 MY Wagon - EA81T, RS Liberty WIAC, 5 Speed Dual Range, Tuned Suspension, 14" Rims 27" Tyres, 2" Body Lift Kit, Apline Head unit, UHF, Roof Console, L Series seats, Soon to have New Paint, snorkel, Dual batteries, etc

'86 Brumby - Dual Port Heads, 5 Speed Dual Range, Custom Cam, Tuned Weber, Tuned Suspension, 2" Body Lift Kit, LSD, 14" rims, 2.25" Exhaust, Snorkel, Dual Batteries, DVD Player, UHF, VHF, etc. Offically now part of the 350, 000 km Club!

"Claudia"
82 MY Wagon - EA81T, RS Liberty WIAC, 5 Speed Dual Range, Tuned Suspension, 14" Rims 27" Tyres, 2" Body Lift Kit, Apline Head unit, UHF, Roof Console, L Series seats, Soon to have New Paint, snorkel, Dual batteries, etc

-
Brumby Kid
- General Member
- Posts: 1297
- Joined: Sun Jul 17, 2011 9:19 pm
- Location: Belair S.A.
Awesome thanks Matt,
And the engine bay is generally the spot?
And the front doesn't have one?
Cheers Cam
And the engine bay is generally the spot?
And the front doesn't have one?
Cheers Cam
When life gives you a corner, drop a gear, pitch, and stomp the loud pedal
Bianca: 1991 Subaru Brumby
My First / Project car
EA81 Rebuilt by Tony Knight from knight Engines
2" body lift
25" 185r14 Yokahama Delivery Star, light truck tyres
2" Sports exhaust
Rear Aguip step/bar
Liberty seats
Mums Car 08 Liberty Wagon
Bianca: 1991 Subaru Brumby
My First / Project car
EA81 Rebuilt by Tony Knight from knight Engines
2" body lift
25" 185r14 Yokahama Delivery Star, light truck tyres
2" Sports exhaust
Rear Aguip step/bar
Liberty seats
"Bianca"
[SIGPIC][/SIGPIC]
Dads Car: 02 Impreza WRX STi[SIGPIC][/SIGPIC]
Mums Car 08 Liberty Wagon
My breather i ran up to the inside of the ute back and tied it to the fuel tank breather Also i should have clarified the Poly pipe angle needs the barb cut off to fit in.
"Bianca"
'86 Brumby - Dual Port Heads, 5 Speed Dual Range, Custom Cam, Tuned Weber, Tuned Suspension, 2" Body Lift Kit, LSD, 14" rims, 2.25" Exhaust, Snorkel, Dual Batteries, DVD Player, UHF, VHF, etc. Offically now part of the 350, 000 km Club! And still pulling like a freight train.
"Claudia"
82 MY Wagon - EA81T, RS Liberty WIAC, 5 Speed Dual Range, Tuned Suspension, 14" Rims 27" Tyres, 2" Body Lift Kit, Apline Head unit, UHF, Roof Console, L Series seats, Soon to have New Paint, snorkel, Dual batteries, etc
'86 Brumby - Dual Port Heads, 5 Speed Dual Range, Custom Cam, Tuned Weber, Tuned Suspension, 2" Body Lift Kit, LSD, 14" rims, 2.25" Exhaust, Snorkel, Dual Batteries, DVD Player, UHF, VHF, etc. Offically now part of the 350, 000 km Club!
"Claudia"
82 MY Wagon - EA81T, RS Liberty WIAC, 5 Speed Dual Range, Tuned Suspension, 14" Rims 27" Tyres, 2" Body Lift Kit, Apline Head unit, UHF, Roof Console, L Series seats, Soon to have New Paint, snorkel, Dual batteries, etc
-
Brumby Kid
- General Member
- Posts: 1297
- Joined: Sun Jul 17, 2011 9:19 pm
- Location: Belair S.A.
Cool, I found some cheap kits on eBay that look the goods.
The fuel tank has a breather too?
Anything else that needs attention before going offroad?
The fuel tank has a breather too?
Anything else that needs attention before going offroad?
When life gives you a corner, drop a gear, pitch, and stomp the loud pedal
Bianca: 1991 Subaru Brumby
My First / Project car
EA81 Rebuilt by Tony Knight from knight Engines
2" body lift
25" 185r14 Yokahama Delivery Star, light truck tyres
2" Sports exhaust
Rear Aguip step/bar
Liberty seats
Mums Car 08 Liberty Wagon
Bianca: 1991 Subaru Brumby
My First / Project car
EA81 Rebuilt by Tony Knight from knight Engines
2" body lift
25" 185r14 Yokahama Delivery Star, light truck tyres
2" Sports exhaust
Rear Aguip step/bar
Liberty seats
"Bianca"
[SIGPIC][/SIGPIC]
Dads Car: 02 Impreza WRX STi[SIGPIC][/SIGPIC]
Mums Car 08 Liberty Wagon

hey mate,
it was me. i'll find photos of what i've done so far, sounds like we are on the same modifying path!
have a look at my build thread, its missing heaps of photos but that should be fixed in a few weeks.
i just posted in your snorkel thread also.
it was me. i'll find photos of what i've done so far, sounds like we are on the same modifying path!
have a look at my build thread, its missing heaps of photos but that should be fixed in a few weeks.
i just posted in your snorkel thread also.
Brumby 1992: EA81, 15" peugot steelies, 2" ********* body lift, tonneau cover, bullbar, GME UHF, ARB compressor, ********* rear diff protector, SOLD
-97 Landcruiser
-97 Landcruiser
-
Brumby Kid
- General Member
- Posts: 1297
- Joined: Sun Jul 17, 2011 9:19 pm
- Location: Belair S.A.
Thanks tambox.
Could you please elaborate on this?
Cheers Cam
Could you please elaborate on this?
Cheers Cam
When life gives you a corner, drop a gear, pitch, and stomp the loud pedal
Bianca: 1991 Subaru Brumby
My First / Project car
EA81 Rebuilt by Tony Knight from knight Engines
2" body lift
25" 185r14 Yokahama Delivery Star, light truck tyres
2" Sports exhaust
Rear Aguip step/bar
Liberty seats
Mums Car 08 Liberty Wagon
Bianca: 1991 Subaru Brumby
My First / Project car
EA81 Rebuilt by Tony Knight from knight Engines
2" body lift
25" 185r14 Yokahama Delivery Star, light truck tyres
2" Sports exhaust
Rear Aguip step/bar
Liberty seats
"Bianca"
[SIGPIC][/SIGPIC]
Dads Car: 02 Impreza WRX STi[SIGPIC][/SIGPIC]
Mums Car 08 Liberty Wagon
An answer
Ok,
This depends on how good the white plastic breather is on your diff:
1. If it is good and strong your can angle a wide blade screwdriver from underneath and tap it up words, TAP being the key word.
2. if it breaks, grab it with some long nose pliers, a good set, and you can work it it out. Clean around the breather first.
There are no sleeves or ridges, it just slides out.
From memory, although many drinks whilst working on many Subies have damaged this, a half inch BSP straight barb will screw in. Take your old breather for a reference.
Add sealer/ thread locker as you screw it in.
Add a length of 3/8 hose with a hose clamp to the barb.
Run it along the diff hanger (drill a couple of holes to cable tie it on) over to where the fuel hoses go up.
Remove the panelling to get access to this area.
Run the 3/8 hose up to above the rear guard.
If your Subie gets water into that you are submerged)
Buy a boat.
Many years of dunking Subaru's has shown this works.
Good luck
This depends on how good the white plastic breather is on your diff:
1. If it is good and strong your can angle a wide blade screwdriver from underneath and tap it up words, TAP being the key word.
2. if it breaks, grab it with some long nose pliers, a good set, and you can work it it out. Clean around the breather first.
There are no sleeves or ridges, it just slides out.
From memory, although many drinks whilst working on many Subies have damaged this, a half inch BSP straight barb will screw in. Take your old breather for a reference.
Add sealer/ thread locker as you screw it in.
Add a length of 3/8 hose with a hose clamp to the barb.
Run it along the diff hanger (drill a couple of holes to cable tie it on) over to where the fuel hoses go up.
Remove the panelling to get access to this area.
Run the 3/8 hose up to above the rear guard.
If your Subie gets water into that you are submerged
Buy a boat.
Many years of dunking Subaru's has shown this works.
Good luck
answer1
This depends on how good your plastic breather is.
Clean around your plastic breather.
1. Use a wide flat blade screwdriver to tap the breather up wards from undereath.
2. If it breaks, use a pair of pliers, good long nose, to wiggle it out.
There are no sleeves or ridges, it just slides out.
From memory, (do not quote this) a half inch/ to 3/8 BSP barb will screw in.
Use thread lock or similar when screwing in.
Take your old plastic breather as a reference.
Add 3/8 pipe, with a hose clamp to the barb.
Run the 3/8 hose over the diff hanger, drill a couple of holes to cable tie it on.
Run up with the fuel lines.
Remove paneling to get access to this area and run the 3/8 hose up to the top of the gaurd.
Loop the top end so it faces down, (gives a vac lock when diff is cool).
If you get water in here you have submerged you Subie, buy a boat)
Good luck.
Clean around your plastic breather.
1. Use a wide flat blade screwdriver to tap the breather up wards from undereath.
2. If it breaks, use a pair of pliers, good long nose, to wiggle it out.
There are no sleeves or ridges, it just slides out.
From memory, (do not quote this) a half inch/ to 3/8 BSP barb will screw in.
Use thread lock or similar when screwing in.
Take your old plastic breather as a reference.
Add 3/8 pipe, with a hose clamp to the barb.
Run the 3/8 hose over the diff hanger, drill a couple of holes to cable tie it on.
Run up with the fuel lines.
Remove paneling to get access to this area and run the 3/8 hose up to the top of the gaurd.
Loop the top end so it faces down, (gives a vac lock when diff is cool).
If you get water in here you have submerged you Subie, buy a boat
Good luck.
-
Brumby Kid
- General Member
- Posts: 1297
- Joined: Sun Jul 17, 2011 9:19 pm
- Location: Belair S.A.
Thanks, any pics would be very very much aprichiated.
So the breather is in between the outer paneling and the removable panels in the tray?
What is a barb in this context?
Now the front diff/gearbox. Does it really need one?
Thanks Cam.
So the breather is in between the outer paneling and the removable panels in the tray?
What is a barb in this context?
Now the front diff/gearbox. Does it really need one?
Thanks Cam.
When life gives you a corner, drop a gear, pitch, and stomp the loud pedal
Bianca: 1991 Subaru Brumby
My First / Project car
EA81 Rebuilt by Tony Knight from knight Engines
2" body lift
25" 185r14 Yokahama Delivery Star, light truck tyres
2" Sports exhaust
Rear Aguip step/bar
Liberty seats
Mums Car 08 Liberty Wagon
Bianca: 1991 Subaru Brumby
My First / Project car
EA81 Rebuilt by Tony Knight from knight Engines
2" body lift
25" 185r14 Yokahama Delivery Star, light truck tyres
2" Sports exhaust
Rear Aguip step/bar
Liberty seats
"Bianca"
[SIGPIC][/SIGPIC]
Dads Car: 02 Impreza WRX STi[SIGPIC][/SIGPIC]
Mums Car 08 Liberty Wagon


-
steptoe
- Master Member
- Posts: 11582
- Joined: Thu Oct 06, 2005 10:00 am
- Location: 14 miles outside Gotham City
showthread.php?t=21226&highlight=B00sting&page=3
post #24 and the photo of rear diff breather exposed
post #24 and the photo of rear diff breather exposed
-
El_Freddo
- Master Member
- Posts: 12695
- Joined: Tue Oct 04, 2005 10:00 am
- Location: Bridgewater Vic
- Contact:
Only problem is that subi's don't float, not when they're stuck anyway:tambox wrote:then run it with the fuel pipes up into the top rear quater panel. The subie will float before it gets up there.

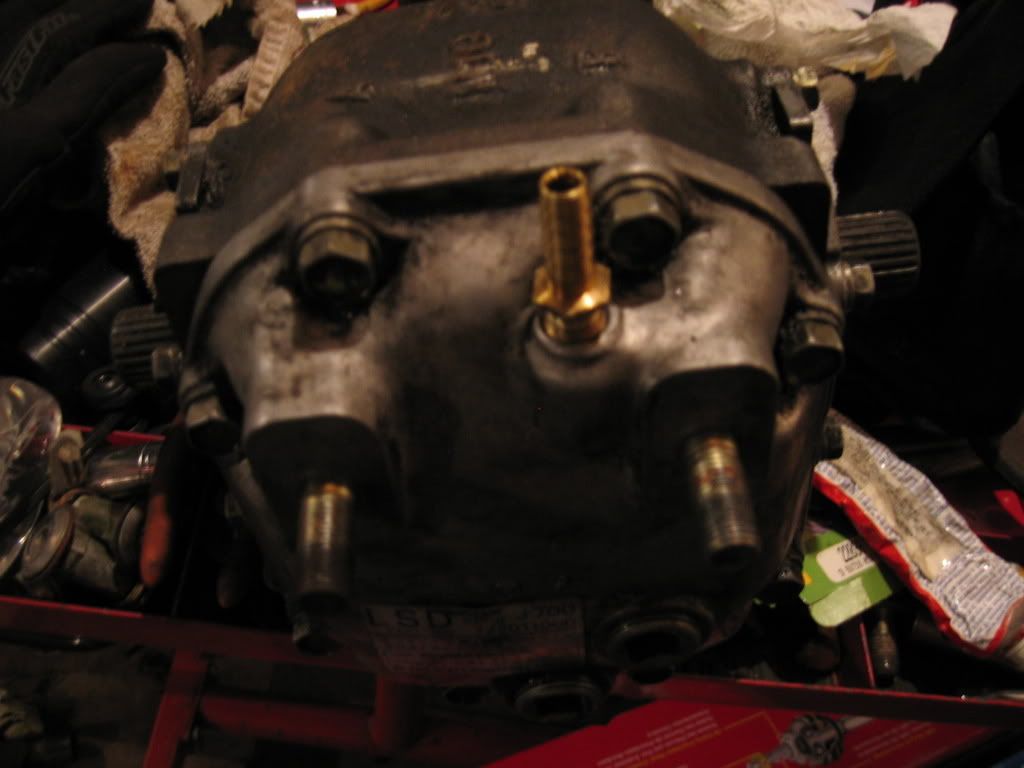
I'd say that he is - from his description you slide it in the breather's hole with some sealant around it. I've used a plastic one from bunnings that's meant for sprinkler systems, shave one barb off and shove it in, nice and tight fit.purp wrote:Hey tambox, are you talking something like this?
Is the hole that the existing breather sits in threaded, or is it just about the right size?
Don't use the cheap plastic hose that this barb is used with on a garden system, I ran it along the moustache bar up into the cab near the fuel filler point, only to have a rock pierce it and almost empty out the diff of it's oil...
Cheers
Bennie
-
vincentvega

- Senior Member
- Posts: 2446
- Joined: Tue Oct 04, 2005 10:00 am
- Location: Brisvegas
- Contact:

-
El_Freddo
- Master Member
- Posts: 12695
- Joined: Tue Oct 04, 2005 10:00 am
- Location: Bridgewater Vic
- Contact:
I just found this while looking for another image. Moustache bar is missing so you can see what's been done:
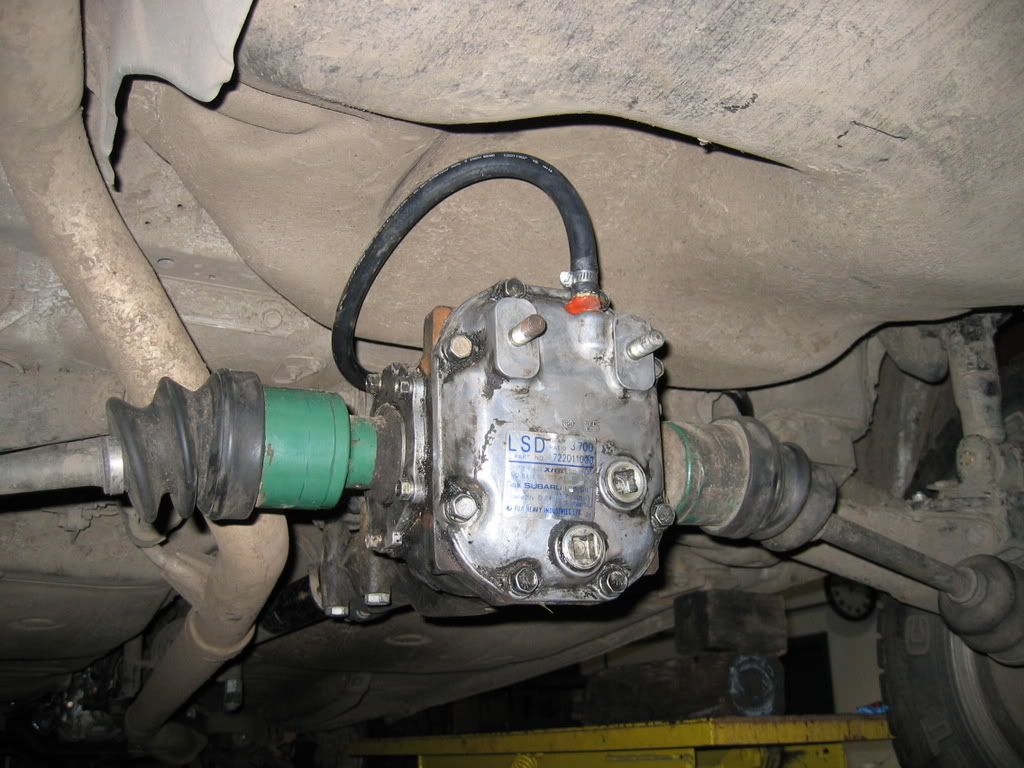
I also like the way he's "lifted" the rear shock/strut ^ If anyone know's their early subaru rear ends will see that the lower mounting point for the shock/strut has been raised.
from this fella's photobucket account
Cheers
Bennie
I also like the way he's "lifted" the rear shock/strut ^ If anyone know's their early subaru rear ends will see that the lower mounting point for the shock/strut has been raised.
from this fella's photobucket account
Cheers
Bennie