Very cool
Sent from my iPhone using Tapatalk
Silverbullets' resto: Interior
-
mrwalker500

- Junior Member
- Posts: 65
- Joined: Mon Aug 17, 2015 8:17 pm
- Location: Western Victoria
-
Silverbullet

- Senior Member
- Posts: 2952
- Joined: Mon Aug 23, 2010 6:20 pm
- Location: Adelaide
Same as the head liner, the trim shop had just enough left over.Bantum wrote:Sweet, like the roof console ...
What sort of fabric covering did you use there ?
Cheers, Batnum ...
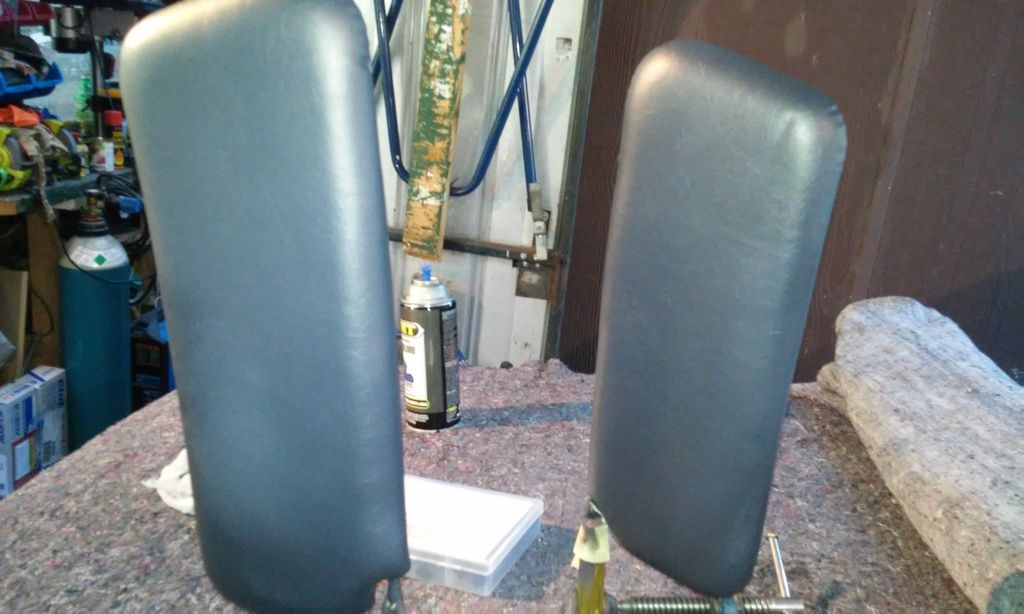
Today I went down to autobarn and got some VHT vinyl dye to test out on my interior trim pieces. I bought one each of their charcoal, light grey and satin black to try. To start with I sprayed one side of my sun visors and 2 plastic trim pieces. 2 light dust coats to start with then 1 wet coat 10 minutes in between each. Have to say I am thoroughly impressed with the stuff so far. The "charcoal" is remarkably similar in color to the stock grey interior that came in MY's. I'd say almost identical. Also the dye brought the plastic pieces back from faded tan (had gone pink in the sun) to looking absolutely brand new
It's really important that all the parts are absolutely clean, so I cleaned them in 1:20 solution of CT14 degreaser and water which wiped the dirt right off. Rinse in clean water, thoroughly dried and then a final wipe down with white spirit and a clean rag before spraying.
Looking forward to using this stuff more!
Sun visors before
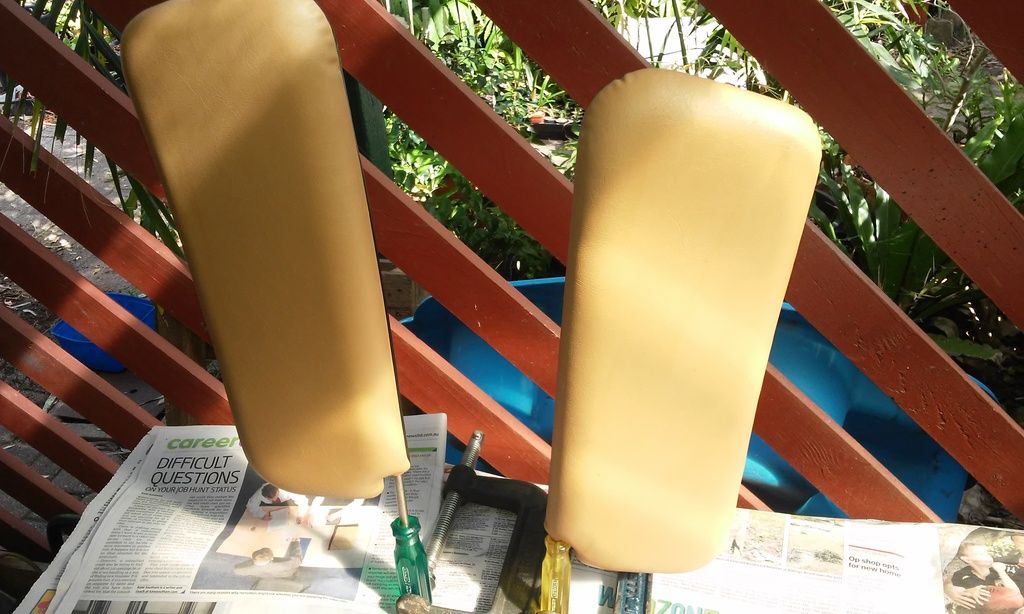
And after
Plus drivers kick panel, probably the most abused and visible trim panel in the whole car

Will it ever end!?
-EA81 TWIN CARB!!!!
-L series 5 speed
-Custom paint job
-2" lift
-Full custom re-wire
-L series front end

-EA81 TWIN CARB!!!!
-L series 5 speed
-Custom paint job
-2" lift
-Full custom re-wire
-L series front end

-
Silverbullet
- Senior Member
- Posts: 2952
- Joined: Mon Aug 23, 2010 6:20 pm
- Location: Adelaide
It is good on flexible vinyl for sure, but today I did a test on the plastic pieces to test its toughness and well, it's not too great on the plastic pieces  dig in hard enough with your fingernail and it scratches off showing the old tan underneath. It's not really bad though, light scratches don't worry it so I will try again with an adhesion promoter first and see if that gives it more sticking power. Otherwise I'm going to have to try something else and I'm favoring that new fangled plasti-dip. Although it is more expensive it is definitely tough and will give a good solid coating.
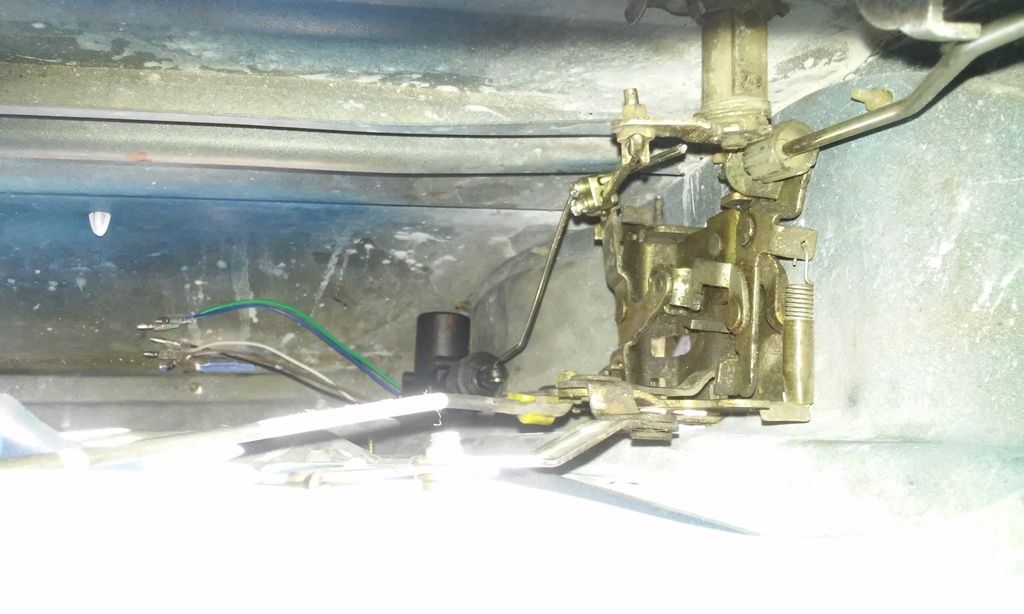
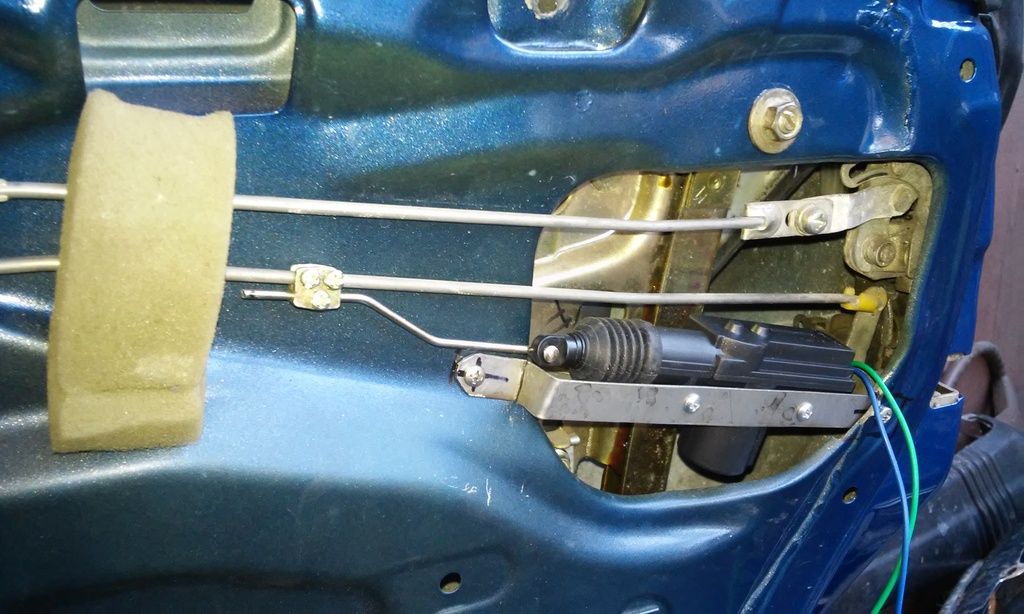
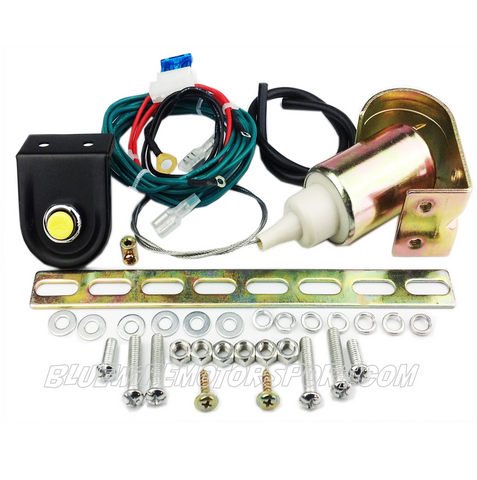
Today a whole pile of goodies arrived in the mail including the new UHF antenna, security system with dual immobilizer and the central locking kit! I jumped right into installing an actuator in the drivers door to get the location and gauge the difficulty. It is a right royal PITA! Window glass has to come out, rear side window runner and even the winding mechanism should come out to make it easier. I will use this time though to put sound deadener inside the door skin since it's easier with the glass out.
I decided with the neatest, cleanest install I could manage and put the actuator directly below the latch mech, with a Z shaped push rod going directly to the locking lever arm on the latch mech. Works perfectly! and no dodgy brackets and self tapping screws. Even better the rear doors have heaps more space in this area funnily enough, and even use an identical locking mechanism so there is still a lever arm in there with no push rod in it (where the key barrel usually connects) Perfect for attaching an actuator push rod.
Bit hard to get a decent pic but anyway
Today a whole pile of goodies arrived in the mail including the new UHF antenna, security system with dual immobilizer and the central locking kit! I jumped right into installing an actuator in the drivers door to get the location and gauge the difficulty. It is a right royal PITA!
I decided with the neatest, cleanest install I could manage and put the actuator directly below the latch mech, with a Z shaped push rod going directly to the locking lever arm on the latch mech. Works perfectly! and no dodgy brackets and self tapping screws. Even better the rear doors have heaps more space in this area funnily enough, and even use an identical locking mechanism so there is still a lever arm in there with no push rod in it (where the key barrel usually connects) Perfect for attaching an actuator push rod.
Bit hard to get a decent pic but anyway
Will it ever end!?
-EA81 TWIN CARB!!!!
-L series 5 speed
-Custom paint job
-2" lift
-Full custom re-wire
-L series front end
-EA81 TWIN CARB!!!!
-L series 5 speed
-Custom paint job
-2" lift
-Full custom re-wire
-L series front end


-
Silverbullet
- Senior Member
- Posts: 2952
- Joined: Mon Aug 23, 2010 6:20 pm
- Location: Adelaide
Bennie, I do remember seeing the servos on Sunnie but when I was mucking around on the wagon front door yesterday I didn't like how it would line up, or that access hole was a little too small or something like that ") I used this method on the rear doors though.
I used this method on the rear doors though.
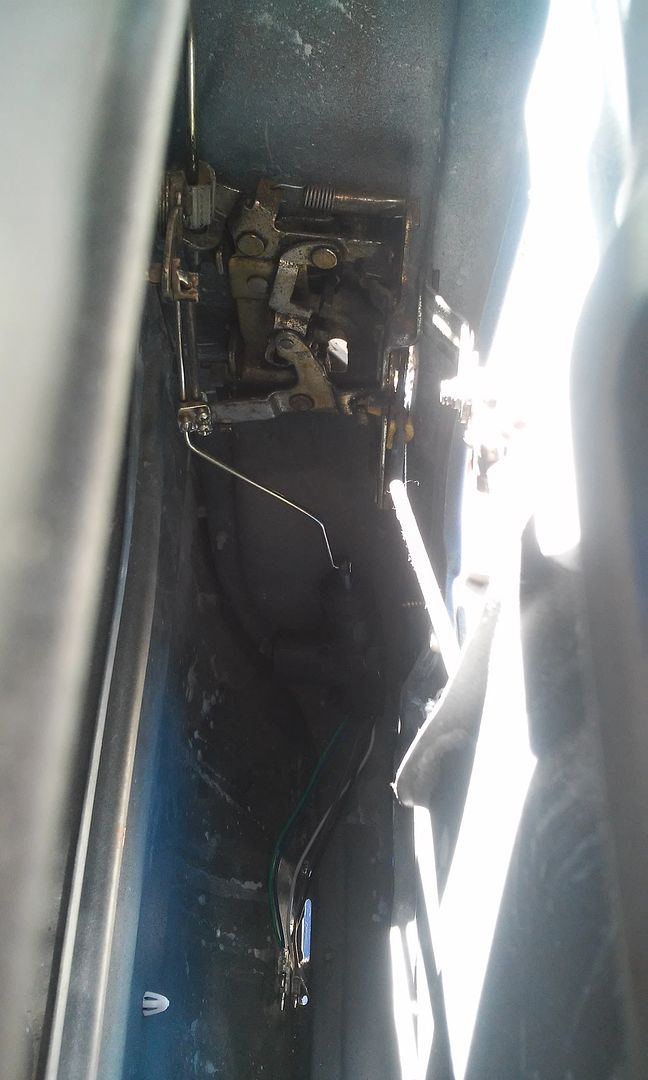
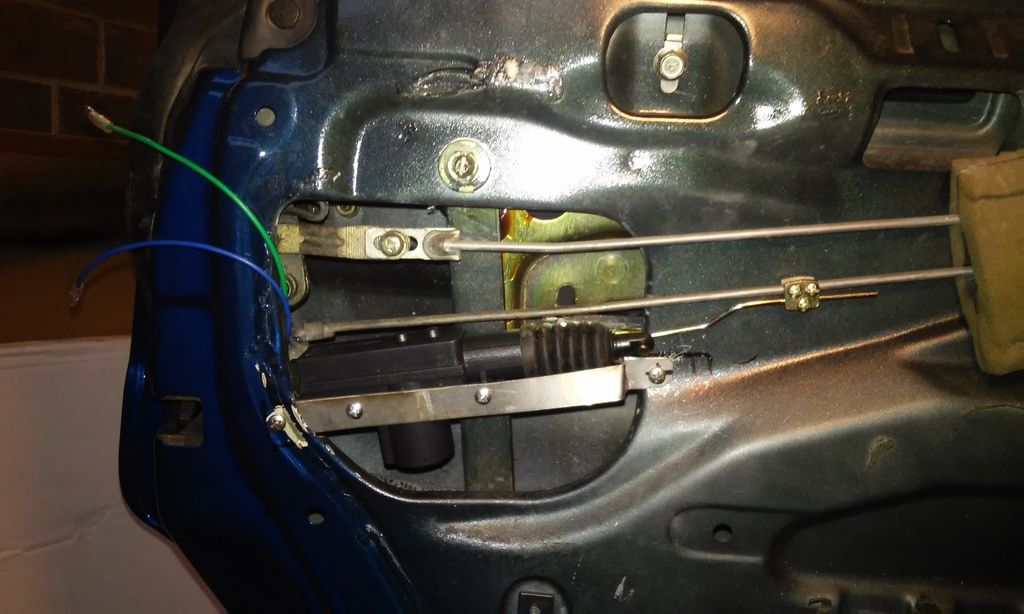
When it came to the rear doors today there was no way known to mount the servo how I did on the fronts; yes there's lot's of space in there but not when the window comes down So I had to put it in the access hole, with its force working on the long pushrod from the inside lock/latch. The supplied bracket/straps were nowhere near long enough so I made my own, much better too. Made full use of my new favorite thing; riv nuts!
  So in all the mount worked out really well, and very strong since I used a piece of 409 stainless I had lying around, there's no flex in that bracket
Also mounted the control box up under the dash where the old flasher cans used to be, and today I also mounted up the rather large(!) control box for the security system/immobiliser neatly up under the dash as well with some inspired (if I don't say so myself) work with the riv nuts again. Thought I better not show where the security went, but there is heaps of space under the dash of these things if you look
Rear drivers side
Rear passenger side
And here's a demo because I couldn't resist
https://www.youtube.com/watch?v=Kis7u1Z ... e=youtu.be
When it came to the rear doors today there was no way known to mount the servo how I did on the fronts; yes there's lot's of space in there but not when the window comes down
Also mounted the control box up under the dash where the old flasher cans used to be, and today I also mounted up the rather large(!) control box for the security system/immobiliser neatly up under the dash as well with some inspired (if I don't say so myself) work with the riv nuts again. Thought I better not show where the security went, but there is heaps of space under the dash of these things if you look
Rear drivers side
Rear passenger side
And here's a demo because I couldn't resist
https://www.youtube.com/watch?v=Kis7u1Z ... e=youtu.be
Will it ever end!?
-EA81 TWIN CARB!!!!
-L series 5 speed
-Custom paint job
-2" lift
-Full custom re-wire
-L series front end
-EA81 TWIN CARB!!!!
-L series 5 speed
-Custom paint job
-2" lift
-Full custom re-wire
-L series front end
-
Silverbullet
- Senior Member
- Posts: 2952
- Joined: Mon Aug 23, 2010 6:20 pm
- Location: Adelaide
Would love to, but sadly I've discovered it's impossible! Because of the design of the lock and how the opening mechanism works. There's no push rod or anything to attach a servo toEl_Freddo wrote:After thought: will you have a slave server to unlock the rear tailgate? Very worth while!
Cheers
Bennie
Will it ever end!?
-EA81 TWIN CARB!!!!
-L series 5 speed
-Custom paint job
-2" lift
-Full custom re-wire
-L series front end
-EA81 TWIN CARB!!!!
-L series 5 speed
-Custom paint job
-2" lift
-Full custom re-wire
-L series front end
-
Silverbullet
- Senior Member
- Posts: 2952
- Joined: Mon Aug 23, 2010 6:20 pm
- Location: Adelaide
I'm probably not explaining it very well, but there's no locking arm or anything coming out from the key barrel on the inside Nothing for the actuator to push/pull on. You'll see it if you have a look. Would be cool to have an auto boot open
Were you using the genuine American made stuff? Performix I think is the "brand"
That's bad news then. But maybe I won't need it after all; as an update on the VHT dye on the plastics, the parts I sprayed have been hanging in the shed for days, and today was quite warm. Looks like it takes a while to achieve a full cure. The same piece I could scratch the stuff off 2 days ago, can't scratch it off anymore I would even say it is quite robust now. And it would be so easy to touch up if it does get scratched. Looks like the key is a week hanging in a warm shed to season the stuff properly
The soft vinyl parts were not an issue, they look absolutely stunning for 35 year old visors, could have been made yesterday.
Oh reallysteptoe wrote:that plasti dip style spray on is not robust at all on our interior plastics, maybe the originals or the ones they demo on youtube as being pressure washer safe ...not the can i did my stuff with, and once it starts to peel looks bad
That's bad news then. But maybe I won't need it after all; as an update on the VHT dye on the plastics, the parts I sprayed have been hanging in the shed for days, and today was quite warm. Looks like it takes a while to achieve a full cure. The same piece I could scratch the stuff off 2 days ago, can't scratch it off anymore
The soft vinyl parts were not an issue, they look absolutely stunning for 35 year old visors, could have been made yesterday.
Will it ever end!?
-EA81 TWIN CARB!!!!
-L series 5 speed
-Custom paint job
-2" lift
-Full custom re-wire
-L series front end
-EA81 TWIN CARB!!!!
-L series 5 speed
-Custom paint job
-2" lift
-Full custom re-wire
-L series front end
-
Silverbullet
- Senior Member
- Posts: 2952
- Joined: Mon Aug 23, 2010 6:20 pm
- Location: Adelaide
Progress on the wagon has slowed this week...I got a new job  So it's back to only weekends were progress can be made.
Today I installed the last locking actuator in the front passenger door, finished off the sound deadening in the doors. Also this week some headlights arrived in the mail (replaceable bulb type) but their quality is dubious in terms of reflector shape and beam pattern. Not sure if they will actually make a proper beam shape or if the reflector was made to "that looks about right" chinese standards.
This isn't really interior related but it is electrical related I put the front lights and combi lights/indicators together to wire up the plugs for them and do a test. I didn't quite make it to test stage today, so demo will be tomorrow With some more LEDs that arrived this week as well I now have full LED indicators and parkers, even the T10 little wedge bulbs on the side indicators. Also the security system/immobilizer is all wired up, tested and working! I even connected a battery up to the car to test everything, no problems so far.
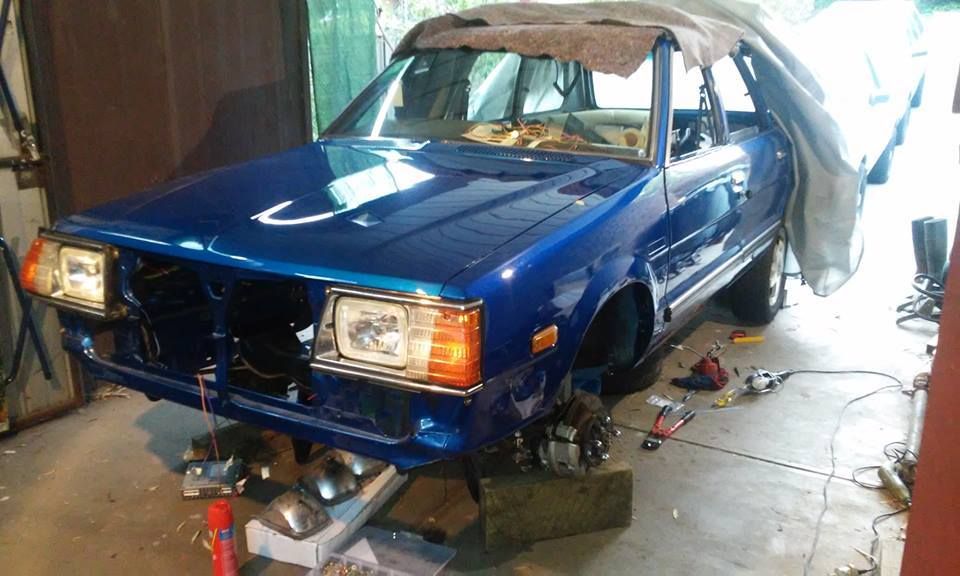
So the car looks a bit more like a car today. Still can't decide what I'm going to do about front struts annoyingly, so I can't put the front wheels back together. I think the L series strut idea is out the window because they are so much longer than std, my lift blocks make the front too high. I'm currently deciding if I could chop up my original showa rebuildable struts and add 50mm of tube, use a longer strut insert and a custom spring to do away with the lift block altogether and keep original top mounts. Haven't found a strut insert that would be suitable though.
Today I installed the last locking actuator in the front passenger door, finished off the sound deadening in the doors. Also this week some headlights arrived in the mail (replaceable bulb type) but their quality is dubious in terms of reflector shape and beam pattern. Not sure if they will actually make a proper beam shape or if the reflector was made to "that looks about right" chinese standards.
This isn't really interior related but it is electrical related
So the car looks a bit more like a car today. Still can't decide what I'm going to do about front struts annoyingly, so I can't put the front wheels back together. I think the L series strut idea is out the window because they are so much longer than std, my lift blocks make the front too high. I'm currently deciding if I could chop up my original showa rebuildable struts and add 50mm of tube, use a longer strut insert and a custom spring to do away with the lift block altogether and keep original top mounts. Haven't found a strut insert that would be suitable though.
Will it ever end!?
-EA81 TWIN CARB!!!!
-L series 5 speed
-Custom paint job
-2" lift
-Full custom re-wire
-L series front end
-EA81 TWIN CARB!!!!
-L series 5 speed
-Custom paint job
-2" lift
-Full custom re-wire
-L series front end
-
Silverbullet
- Senior Member
- Posts: 2952
- Joined: Mon Aug 23, 2010 6:20 pm
- Location: Adelaide
Thought about it Jonno, but I think the extra height is in the L top mount ball bearing arrangement. Engine weight would be a help...but I can't install the engine in our tight quarters without the car being mobile I've got some nice spring compressors on the way so I can play with struts properly.
Anyway, test time! Hooked up a battery to see what would happen. First try had the RH headlight on constantly Almost completely freaked out at what it could be but it was simple enough; I'd put the main beam power wire into the wrong spot in the plug at the fuse box...phew! All good now. Everything is working perfectly now happily.
Shaky cam warning
https://www.youtube.com/watch?v=moLsVNKw5qY
Anyway, test time! Hooked up a battery to see what would happen. First try had the RH headlight on constantly
Shaky cam warning
https://www.youtube.com/watch?v=moLsVNKw5qY
Will it ever end!?
-EA81 TWIN CARB!!!!
-L series 5 speed
-Custom paint job
-2" lift
-Full custom re-wire
-L series front end
-EA81 TWIN CARB!!!!
-L series 5 speed
-Custom paint job
-2" lift
-Full custom re-wire
-L series front end
-
Silverbullet
- Senior Member
- Posts: 2952
- Joined: Mon Aug 23, 2010 6:20 pm
- Location: Adelaide
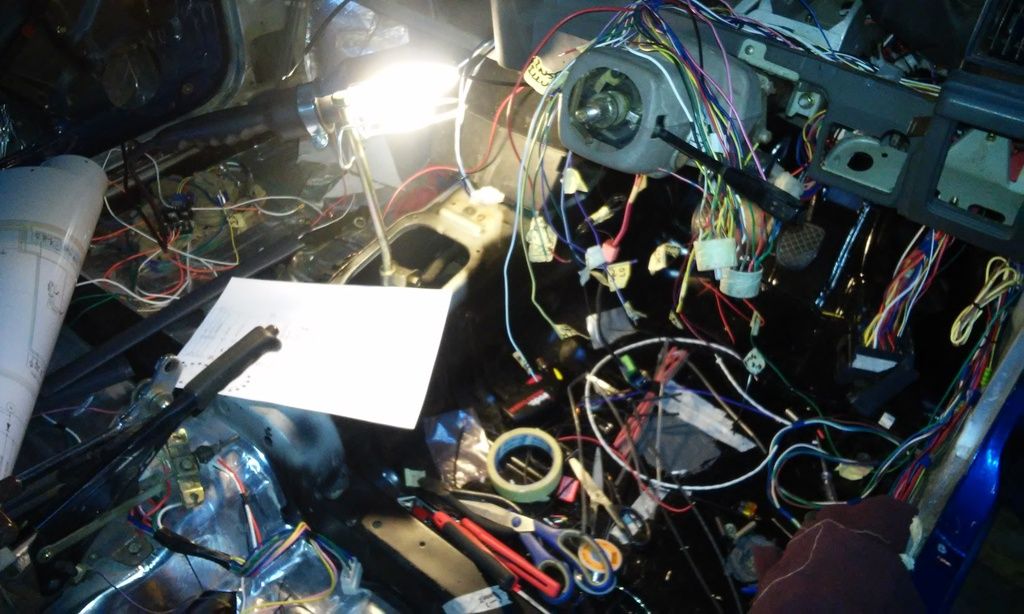
Having worked on the engine bay a bit more and wiring in my new EDIS system has prompted me to do a bit more wiring on the inside too...started attaching the plugs needed for the 6 gauge cluster, hope my self-made pin out diagrams are all accurate! I know I labelled all my wires right, just have to attach them to the corresponding pins in the 2 big round plugs, plus 3 x square plugs up the other end. I need to add a few more important wires, but at least now when I crank the engine for the first time I will be able to see my oil pressure, and tell the security system the car is alive. Annoyingly I couldn't find any crimp terminals like the stock ones to re-pin those round plugs, so I am forced to solder to the aged and brittle wires already in the plugs. Not a good sign when the wire stripper is breaking the copper strands so easily
Nice relaxing bit of wiring on a Sunday evening
Nice relaxing bit of wiring on a Sunday evening
Will it ever end!?
-EA81 TWIN CARB!!!!
-L series 5 speed
-Custom paint job
-2" lift
-Full custom re-wire
-L series front end
-EA81 TWIN CARB!!!!
-L series 5 speed
-Custom paint job
-2" lift
-Full custom re-wire
-L series front end
-
Bantum

- Senior Member
- Posts: 2040
- Joined: Sun Jul 29, 2012 4:30 pm
- Location: Northern Territory + QLD
- Contact:
Wired ...
Been there ... ( I should post up some of my earlier stuff ) Seriously good work though ... 
P.S. - While you're there, don't forget to fix the indicator return strike ...
You gonna come over & do mine when your finished ?
Cheers, Bantum ....
P.S. - While you're there, don't forget to fix the indicator return strike ...
You gonna come over & do mine when your finished ?
Cheers, Bantum ....